| The Jifhafa raid | |||||
|---|---|---|---|---|---|
| Part of the Middle Eastern theatre of the First World War | |||||
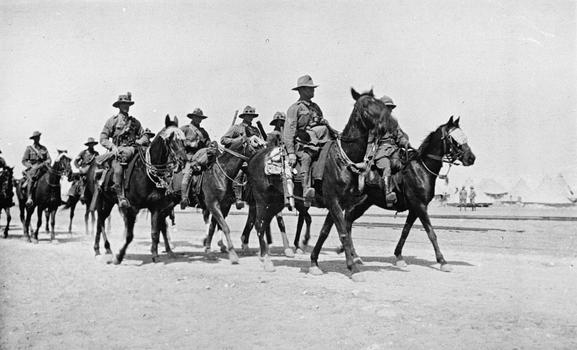
 Men of the 9th Light Horse Regiment crossing the Suez Canal | |||||
| |||||
| Belligerents | |||||
|
|
| ||||
| Commanders and leaders | |||||
|
|
| ||||
| Units involved | |||||
|
9th Light Horse Regiment 8th Light Horse Regiment Royal Flying Corps Bikaner Camel Corps Egyptian Camel Transport Corps ANZAC Mounted Division support troops | 2nd Company, 4th Battalion 79th Regiment | ||||
| Strength | |||||
|
320 men 175 horses 261 camels |
1 Austrian Engineer officer 1 Turkish officer, 25 soldiers 15 Labour Corps | ||||
| Casualties and losses | |||||
| 1 Dead |
6 Dead 36 Captured (5 Wounded) | ||||
| |||||
The Jifjafa Raid (11–14 April 1916) was a long range pre-emptive operation by a composite formation of the British Empire against Ottoman Turkish Empire forces at the Jifjafa well in the Sinai Desert. During the Sinai and Palestine Campaign of the First World War.
The Jifkafa well (Bir el Jifjafa) is located in the Sinai Desert fifty-two miles (84 km) to the east of Ismalia on the Suez Canal. The raid was carried out by men from the 3rd Light Horse Brigade, supported by small detachments of other corps and a larger group from the Egyptian Camel Transport Corps. Although some of the Australians had seen action in the Gallipoli Campaign, this was the first offensive operation, conducted by any Australian force, during the Sinai and Palestine Campaign.
The raid was a complete success. For the cost of one man killed, the first light horse casualty of the campaign, they killed six men captured another thirty-six and destroyed the wells infrastructure. The raiders returned safely to their own lines. In recognition of their achievement Major William Henry Scott the commander of the raid was invested as a Companion of the Distinguished Service Order.
Background[]
Bir el Jifjafa or the Jifjafa well is located on the central of three traditional routes crossing the Sinai Desert.[1] Its fifty-two miles (84 km) east of Ismalia on the Suez Canal,[2] about midway between there and Magdhaba, which is near the Egyptian-Palestine border.[1] The central crossing which winds its way across the mountains, to the well which is at an altitude of 1,000 feet (300 m), was the most likely route used in antiquity to cross the desert.[3]
In January 1916, British agents reported there was a Turkish force of around 25,000 in the Sinai. Which reinforced the British high command belief that a Turkish attempt to attack the Suez Canal was imminent.[4] Aerial reconnaissance seemed to confirm the information, reporting Beersheba was a large encampment. Where the Turkish Army was already digging trenches and other defences.[5][nb 1]
Following reports from the Royal Flying Corps (RFC) and agents of a Turkish post being established at the Jifjafa well Brigadier-General John Antill commanding the 3rd Light Horse Brigade was ordered to send a unit to verify the information. They were tasked to destroy the two wells, which were believed to be defended by heavy guns, and if possible capture the position. Secondary they were to report on any other wells or water in the region. Any defensive works established or being built. Any other information of military value and finally capture if possible enemy personnel or inhabitants.[7] The force would be commanded by Major William Henry Scott, the second-in-command of the 9th Light Horse Regiment (9th LHR). With him in the forces headquarters was Captain Macaulay, a General Staff Officer belonging to the 2nd Australian Division. Captain Albert Ernest Wearne, of the 8th Light Horse Regiment (8th LHR), Captain Ayris, from the Headquarters 3rd Light Horse Brigade. The 9th LHR and 8th LHR provided the fighting component, of another eight officers and 122 men. Supporting them the ANZAC Mounted Division provided the engineers, one officer and eight men. The Royal Flying Corps, provided a ground signals unit of two officers and two men. Radio communications were provided by a Royal Engineers Wireless Section of one officer and eight men. Medical support was from the 3rd Light Horse Field Ambulance, one officer and eight men. Additional transport capacity came from the Egyptian Camel Transport Corps (ECTC), one officer, thirty-one Light Horseman drivers and ninety-five Egyptian drivers. The Australian Army Service Corps provided an officer to assist with supply. To protect the ECTC the Bikanir Camel Corps provided one officer and twenty-four men. There was also two guides and an Arabic interpreter. Comprising a total force of eighteen officers, 302 men, 175 horses and 261 camels.[7][8][9][10] The Australians and New Zealanders had carried out some reconnaissance patrols in the desert, but this would be their first offensice action.[2]
A second RFC reconnaissance, on 9 April, reported that Jifjafa may have been evacuated, as no men were seen but tents and equipment were still in place. Further intelligence reported Turkish garrisons in that area as 900 men at Hassana, fifty men at Bir el Hamma, and 200 men at Nekhel.[10]
The raid[]
Approach[]

Australian Light Horse in 1916
Scott's force left the on the raid just after 14:00 11 April 1916. Adopting the normal cavalry or mounted force procedure they rode for fifty minutes then, to rest their mounts, walked for the next ten minutes every hour. They rested at 17:00 to feed the animals, starting out again at 19:30, they eventually halted that night at the Wady um Muksheib at 22:30.[2][11]
The next day the force started out at 07:30 heading for a known water source, reconnoitred earlier in the year by a patrol from the ANZAC Mounted Division. The horse mounted troops arrived there at 11:20, but the slower camels did not arrive for another two hours. While waiting for the camels, patrols were sent out to look for signs of any Bedouin activity and water sources. The force set out again this time on a bearing of north-north-east, until coming to a halt at 02:30 13 April eight miles (13 km) from the well.[2][11] This camp would be their forward operating base where the Royal Engineers Wireless Section and the camel transport would wait, while the light-horsemen carried out the attack. The raiding force left three hours later reaching Hill 1082 at 07:30. Here they halted waiting for a RFC reconnaissance aircraft to check the well. The aircraft appeared thirty minutes later and dropped a message saying the way ahead was clear.[11] During this period the force also, in connection with the secondary part of their orders located several sources of water, in the region of 51,700 imperial gallons (235,000 l; 62,100 US gal).[12] Setting out again the raiding force established their base at Hill 1080, just out of view of the Jifjafa well. The RFC reconnaissance had reported that the wells inhabitants took cover whenever a aircraft appeared. So it was believed a hostile force still occupied the well and the attack was planned for the next day, 13 April at 09:00.[2][12]
Assault[]


Turkish troops in the Sinai, this image dates to 1915 but their uniform and equipment is what the wells defenders would be equipped with.
This position allowed Scott to carry out a close reconnaissance of the Turkish positions using field glasses and he was able to plan his assault. One troop would move to a position one mile (1.6 km) north-west of the well. Another troop would move around to the south-west of the well. A third troop would position itself to the south of the well, While the fourth troop would carry out a frontal assault, supported by a machine-gun section, from their present position. Four men of the assault troop were detached to protect the engineers and another four for the machine-gun section.[12][13]
When the assault began a Turkish sentry on seeing them, withdrew back to the well. the rest of the wells defenders evacuated the position, some headed for the hills and others south-east away from the well. Those that headed to the hills were cut of by the troop positioned there, and all the fighting took place. During which six Turkish soldiers were killed, and five wounded.[12] Afterwards several prisoner were taken, which included an Austrian Engineer officer and thirty-four soldiers.[14] The Austrian officer revealed that the Turkish garrison consisted of one Turkish officer, twenty-five soldiers and fifteen men from the Turkish labour corps. The soldiers belonging to the 2nd Company, 4th Battalion, 79th Regiment. So the attack had dealt with the entire garrison less two men who were observed to have ridden off towards the east. Casualties for the raiding force were one man and a horse killed. The first light horse casualty in the Sinai and Palestine Campaign.[13][14]
The well consisted of three bore holes, and water abstraction equipment, which was destroyed. As well as other equipment and supplies stored around the camp. Including 4,000 rounds of small arms ammunition. When the raiding force examined the Turkish defences, they located three trench systems, which had not yet been finished and a concrete emplacement designed for an anti-aircraft gun. At 12:00 the raiding force, covered by a rear guard, started back toward the Suez Canal. Making frequent stops to accommodate the camels they halted for the night at 22:30. The next day, 14 April, the raiding force returned safely to their own lines.[15]
Aftermath[]
Several men who participated on the raid were mentioned in dispatches in Scott's report.[15] For his own leadership skills Scott became a Companion of the Distinguished Service Order. The citation reading "For conspicuous ability and good work. He led a small column to reconnoitre a distant enemy post, attacked it, killed several of the enemy, and brought in thirty-eight prisoners, including the officer in command. His plans were so well laid that he effected this with the loss of only one man and one horse".[16] The details of the raid, although for the time a minor event, was also published In the London Times,[17] and the New York Times.[18]
References[]
- Footnotes
- ↑ At the time of the First World War, the modern Turkish state did not exist, and instead it was part of the Ottoman Empire. While the terms have distinct historical meanings, within many English-language sources the term "Turkey" and "Ottoman Empire" are used synonymously, although many academic sources differ in their approaches.[6] The sources used in this article predominately use the term "Turkey".
- Citations
- ↑ 1.0 1.1 Woodfin p.xviii
- ↑ 2.0 2.1 2.2 2.3 2.4 Gullet, p.71
- ↑ Gullet, p.44
- ↑ Gullet, p.47
- ↑ Gullet, p.48
- ↑ Fewster, Basarin, Basarin pp.xi–xii
- ↑ 7.0 7.1 "3rd Light Horse Brigade War Diary Appendix 14". Australian War Memorial. http://static.awm.gov.au/images/collection/bundled/RCDIG1012649.pdf. Retrieved 31 October 2013.
- ↑ Darley, pp.37–38
- ↑ "3rd Light Horse Brigade War Diary Appendix 18". Australian War Memorial. http://static.awm.gov.au/images/collection/bundled/RCDIG1012649.pdf. Retrieved 31 October 2013.
- ↑ 10.0 10.1 "3rd Light Horse Brigade War Diary Appendix 17". Australian War Memorial. http://static.awm.gov.au/images/collection/bundled/RCDIG1012649.pdf. Retrieved 31 October 2013.
- ↑ 11.0 11.1 11.2 "3rd Light Horse Brigade War Diary Appendix 19". Australian War Memorial. http://static.awm.gov.au/images/collection/bundled/RCDIG1012649.pdf. Retrieved 31 October 2013.
- ↑ 12.0 12.1 12.2 12.3 "3rd Light Horse Brigade War Diary Appendix 20". Australian War Memorial. http://static.awm.gov.au/images/collection/bundled/RCDIG1012649.pdf. Retrieved 31 October 2013.
- ↑ 13.0 13.1 Gullet, p.72
- ↑ 14.0 14.1 "3rd Light Horse Brigade War Diary Appendix 21". Australian War Memorial. http://static.awm.gov.au/images/collection/bundled/RCDIG1012649.pdf. Retrieved 31 October 2013.
- ↑ 15.0 15.1 "3rd Light Horse Brigade War Diary Appendix 22/23". Australian War Memorial. http://static.awm.gov.au/images/collection/bundled/RCDIG1012649.pdf. Retrieved 31 October 2013.
- ↑ "No. 29584". 16 May 1916. https://www.thegazette.co.uk/London/issue/29584/page/
- ↑ "Enemy Camp in Egypt Captured". The London Times. 17 April 1916. http://alh-research.tripod.com/Light_Horse/index.blog/1967470/the-jifjafa-raid-sinai-april-10-to-14-1916-times-account-17-april-1916/. Retrieved 31 October 2013.
- ↑ "The Jifjafa Raid". New York Times. 16 April 1916. http://alh-research.tripod.com/Light_Horse/index.blog/1967445/the-jifjafa-raid-sinai-april-10-to-14-1916-new-york-times-account-16-april-1916/. Retrieved 31 October 2013.
- Bibliography
- Darley, T H Major (reprint 2009 [1924]). With the Ninth Light Horse in the Great War. London: Naval and Military Press. ISBN 9781845747718.
- Fewster, Kevin; Basarin, Vecihi; Basarin, Hatice Hurmuz (2003). Gallipoli: The Turkish Story. Crows Nest, New South Wales: Allen and Unwin. ISBN 1-74114-045-5.
- Gullett, Henry Somer (1923). The Australian Imperial Force in Sinai and Palestine, 1914–1918. Official History of Australia in the War of 1914–1918. Volume VII. Sydney: Angus and Robertson. OCLC 59863829.
- Woodfin, Edward C (2012). Camp and Combat on the Sinai and Palestine Front: The Experience of the British Empire Soldier, 1916–18. Basingstoke: Palgrave Macmillan. ISBN 1137264802.
The original article can be found at The Jifjafa raid and the edit history here.