| Sunderland Rifles 3rd (Sunderland) VB, Durham Light Infantry 7th Bn Durham Light Infantry 47th (DLI) Searchlight Regiment, RA 112th Light AA Regiment, RA 582 (DLI) LAA/SL Regiment, RA 463 (7DLI) LAA/SL Regiment, RA County of Durham Regiment, RA | |
|---|---|
| Active | 1860–1975 |
| Country |
|
| Branch |
|
| Role |
Infantry Pioneers Air Defence |
| Part of |
Durham Light Infantry Brigade 50th (Northumbrian) Division 43 AA Brigade 21st Army Group |
| Garrison/HQ | Sunderland |
| Nickname(s) | Vaux's Own |
| Engagements | |
| Commanders | |
| Notable commanders | Col Ernest Vaux |
The Sunderland Rifles was a Volunteer unit of the British Army formed in 1860. It went on to become a Battalion of the Durham Light Infantry (DLI) in the Territorial Force and saw action as infantry and pioneers in some of the bloodiest actions on the Western Front during World War I. Between the wars it became an air defence unit, serving during World War II in The Blitz and the campaign in North West Europe, when it had a special role in the Rhine crossing. Postwar it continued in the Territorial Army in the air defence role until 1975, when its successor unit reverted to infantry.
Origin[]
During an invasion scare in 1859, large numbers of part-time Rifle Volunteer Corps (RVCs) were formed throughout Great Britain, eager to supplement the Regular British Army in case of need.[1][2][3] The 3rd (Sunderland Rifles) Durham Rifle Volunteer Corps was one such unit, with the first officers' commissions being issued on 6 March 1860. By 1862 the unit had six companies under the command of Major Lord Adolphus Vane-Tempest, MP for North Durham.[4][5][6] After the death of Vane-Tempest in 1864, Edward Temperley Gourley (later MP for Sunderland) was appointed Lieutenant-Colonel in command on 10 November 1865.[7] The 'Sunderland' title was authorised in 1867. The unit's uniform was scarlet, with blue facings.[5] The Regimental Colour of the former Sunderland Volunteer Infantry raised in the Napoleonic Wars (1803–13) was presented to the new corps in 1860. A purpose-built drill hall was opened in Livingstone Road in 1880.[8]
Under the scheme of 'localisation' introduced by the Cardwell Reforms in 1873, the Durham RVCs, together with the Durham Militia and the two Regular battalions (68th Light Infantry and 106th Light Infantry) that later formed the Durham Light Infantry (DLI), constituted Brigade No 3, based at Sunderland in the Durham sub-district of Northern District. While the sub-districts were referred to as 'brigades', they were purely administrative organisations and the Volunteers were excluded from the 'mobilisation' part of the Cardwell system, though they carried out joint manoeuvres.[7][9]
Under the Childers Reforms the Volunteers were affiliated to their local Regular Army regiment – the DLI in the case of the Durham RVCs. The Sunderland rifles changed its facing colour to white in 1884 to match the DLI (the DLI reverted to its traditional dark green at the beginning of the 20th Century) and formally became the 3rd (Sunderland) Volunteer Battalion of the DLI in December 1887.[5][7][10] While the sub-districts had been referred to as 'brigades', they were purely administrative organisations and the Volunteers were excluded from the 'mobilisation' part of the Cardwell system. The Stanhope Memorandum of December 1888 proposed a more comprehensive Mobilisation Scheme for Volunteer units, which would assemble in their own brigades at key points in case of war. In peacetime these brigades provided a structure for collective training.[11][12] Under this scheme the Volunteer Battalions of the DLI and the Northumberland Fusiliers formed the Tyne and Tees Brigade until a separate Durham Light Infantry Brigade was formed in 1902.[7]
The 3rd VB gained an extra company in 1900, giving it a total of six rifle companies and one of cyclists, and it contributed detachments to three successive service companies of Volunteers who served alongside the Regular DLI in the Second Boer War and gained its first battle honour: South Africa 1900–1902.[5][7][13][14]
Territorial Force[]
.jpg)
Cap badge of the Durham Light Infantry, Territorial version (1909–53).
When the Volunteers were subsumed into the new Territorial Force (TF) under the Haldane Reforms of 1908, the 3rd VB became the 7th Battalion Durham Light Infantry. There were eight companies, six at Livingstone Road and two at South Shields that had previously formed part of the 5th VB DLI. The cyclist company transferred to the Northern Cyclist Battalion.[5][15][16] The 7th DLI formed part of the Durham Light Infantry Brigade in the Northumbrian Division of the TF.[16][17][18][19]
When war broke out in 1914, the battalion was commanded by Lt-Col Ernest Vaux, of the Sunderland-based Vaux Breweries family. He had formerly served in the 1st Durham Royal Garrison Artillery (Volunteers) and had won the Distinguished Service Order (DSO) with the 5th Imperial Yeomanry during the Boer War.[7][20][21]
World War I[]
Mobilisation[]
The outbreak of World War I found the DLI Brigade at Conwy in North Wales at its annual training camp, which had started on 25 July. Orders to prepare for mobilisation were received on 3 August and the battalion returned to Sunderland by train, where mobilisation began the next day. The Northumbrian Division then took up its war stations in the Tyne Defences as part of Central Force. The 7th DLI was distributed around Sunderland by companies, to a roller-skating rink in Park Lane, to Hudson Road School, to Hendon Valley Road School, and to the Granary at Sunderland Docks.[17][22][23]
On 31 August 1914, the formation of Reserve or 2nd Line units for each existing TF unit was authorised. Initially these were formed from men who had not volunteered for overseas service, and the recruits who were flooding in. Later they were mobilised for overseas service in their own right. They were distinguished by the prefix '2/', the parent 1st Line battalion taking '1/'. Later 3rd Line or Reserve battalions were formed to train drafts for the 1st and 2nd Line battalions.[24][25]
1/7th Battalion[]
After the Home Service men had been separated, the DLI Brigade concentrated under canvas at Ravensworth Castle, Gateshead, where the training became more intense. When the autumn weather deteriorated, the troops were once again billeted in schools around Gateshead. Orders to proceed overseas to join the British Expeditionary Force (BEF) arrived in early April, and the transport and equipment of the battalion was completed. The advance party left Gateshead for Boulogne on 17 April, the rest of the battalion following on 19 April, arriving the same day.[17][26][27]
2nd Battle of Ypres[]
The division completed its concentration in the area of Steenvoorde and went straight into action at the Second Battle of Ypres. The DLI Bde was at Ryveld, and at 16.30 on 23 April 1/7th Bn began marching to Vlamertinge, arriving soon after midnight and being billeted in a hop warehouse. Next day the brigade received a succession of countermanded orders, ending with 1/7th Bn bivouacking under shellfire in the grounds of Potijze Chateau. British forces were fighting to stabilise the British line (the Battle of St Julien) and the Northumbrian Division's units were thrown in piecemeal. 1/7th Battalion came under the command of 2nd Bn King's Shropshire Light Infantry and at 14.00 on 26 April Lt-Col Vaux was ordered to move up towards Gravenstafel. The battalion advanced across open fields in 'artillery formation' under heavy fire, watched by Col Vaux standing in the open with his shepherd's crook in his hand. They reached a position north of Zonnebeke to support 85th Bde, before being ordered to retire after dark to Verlorenhoek, where they spent the whole of 27 April. Unlike the rest of the brigade, 1/7th Bn's casualties in their first action had been light, though they suffered a trickle of other casualties before being relieved from the front line on 3 May.[28][29]
During the Battle of Frezenberg Ridge (8–13 May), 1/7th DLI was engaged in digging a new second line of defences (the GHQ line), sometimes under shellfire. The Northumbrian Division officially became the 50th (Northumbrian) Division on 14 May, when the DLI Bde became 151st (Durham Light Infantry) Brigade.[17][30][31][32]
On 21 May the battalion was sent up to learn the routine of trench holding with 85th Bde. A and B Companies were attached to 3rd Bn Royal Fusiliers, HQ, C and D Companies to 3rd Bn Middlesex Regiment. The brigade's trenches were knee-deep in mud. While the battalion was in the line, the Germans launched another serious attack on Whit Monday (24 May) preceded by a gas cloud (the Battle of Bellewaarde Ridge). At one point Lt-Col Vaux ordered his men out of the trench an stand up to avoid the low-hanging gas cloud, which they did, singing the hymn Abide with Me. The Fusiliers and Durhams repulsed the initial attack, but a neighbouring unit was driven back and the battalions' left flank was open. They were pushed back to the third line, just behind Railway Wood before reinforcements (including C and D Companies of 7th DLI) arrived to help halt the enemy advance. The battalion lost 29 killed, 76 wounded or gassed, and 183 missing, mainly Prisoners of War (PoW) from the overrun front trench.[17][30][33][34]
Over the following months the division was concentrated and took over its own section of the line south of Ypres, with 1/7th DLI occupying dug-outs in Sanctuary Wood when not in the front line. It then moved to better trenches near Kemmel, where it received a draft of 160 reinforcements from home.[35][36] By the end of July the division had moved to the Armentières sector, and stayed in this quiet sector until mid-November, when it moved to Merris.[37][38]
Pioneer battalion[]

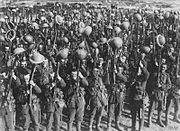
Men of 1/7th Bn DLI parading for the trenches, Reningelst, near Ypres, 29 April 1916.
1/7th DLI left 151st Bde on on 16 November 1915 to became the divisional pioneer battalion. In this role it provided working parties to assist the divisional Royal Engineers (RE) in tasks ranging from trench digging and wiring, to road making, while remaining fighting soldiers. The men received extra pay and the battalion transport was augmented to carry the necessary tools and equipment, but the battalion machine gun section was transferred out: brigade machine gun companies were formed soon afterwards. Lieutenant-Colonel Vaux was instrumental in the battalion's conversion, arguing that many of the Sunderland shipbuilders in its ranks already had the skills required.[17][18][19][39][40][41]
In December 1915 the division returned to the Ypres Salient, in the Hill 60 sector, with 1/7th DLI billeted at 'Canada Huts' in appalling conditions. Here the battalion established repair workshops, cleared abandoned equipment, repaired communication trenches and set out dummy trenches to confuse the enemy. There was almost constant low-level fighting until the division was relieved at the beginning of April 1916 and moved to the Wytschaete sector, 1/7th DLI marching from Canada Huts to La Clytte. The usual trench work continued, often under shell and machine gun fire.[42][43]
Somme[]
50th (Northumbrian) Division was not involved in the Somme Offensive until its third phase (the Battle of Flers–Courcelette). The 1/7th DLI arrived in the area in mid-August and began training to construct a new cruciform pattern of strongpoint, then was engaged in building roads and tramways before the rest of the division took up its positions. For the attack, one company of 1/7th DLI was attached as pioneers to each attacking infantry brigade (A Company to 149th (Northumberland) Bde and D Company to 150th (York & Durham) Bde). The remaining platoons assisted 7th Field Company, RE, to repair the road bringing in supplies. 50th Division took its first objective in an hour and then struggled forward, taking heavy casualties, to reach the second objective, assisting 47th (1/2nd London) Division to capture High Wood. In the afternoon, 1/7th DLI worked under heavy shellfire on new communication trenches to link up the captured areas and to dig new gun positions. The division made further piecemeal advances during the Battle of Morval (25–28 September); during this whole time the battalion was constantly at work, suffering heavy casualties.[44][45]
50th Division made another setpiece attack at the Battle of the Transloy Ridges on 1 October. 1/7th Durham Light Infantry's task for this attack was to dig communication trenches forward from the jumping-off trenches to the captured objectives. Work commenced on 'North Durham Trench', 'South Durham Trench', 'Blaydon Trench' and 'Rutherford Alley' after dark the night before. The attack was generally successful, but the work continued even after the rest of the division was relieved on the night of 3/4 October. A and D Companies linked up Rutherford Alley but struggled to compete Durham Trench under fire, and C Company could not get their trench connected until 3 October; meanwhile B Company worked on the roads.[46][47]


William Orpen: The Butte de Warlencourt.
1/7th Durham Light Infantry remained just behind the front line preparing tramways across flooded shell-holes, and then built huts near Mametz Wood for the battalion, while the Lewis gun detachment and the band built a new divisional headquarters at Sabot Copse. The work was finished on 3 November and the battalion rested for one day before the 50th Division made a new attack on the Butte de Warlencourt on 5 November (celebrated as Inkermann Day by the DLI). 151st Bde and two battalions of 149th Bde made the attack, with B Company 1/7th DLI attached to 1/8th DLI in the right sector in 'Hexham Road' and C Company and a platoon of D Company to 1/9th DLI on the left in 'Abbaye Trench'. The men went forward in appalling conditions. B Company's task was to move overland and then extend 'Pioneer Alley' from 'Maxwell Trench' to 'Gird Trench' (the German front line), while C Company was to move up a communication trench and then continue 'Tail Trench' to reach 'Butte Trench' in front of Gird Trench. The companies suffered casualties from shellfire even before setting off. The left attack occupied the Butte de Warlencourt and passed beyond it, but the right attack was held p by machine gun fire and the German counter-barrage. B Company could do little, but C Company tried to link up with the parties on the butte. However, German counter-attacks drove the whole attack back to its starting point. The two companies lost 9 killed and 22 wounded.[48][49]
Further lodgements made in the enemy positions on 14 November were also driven back. The division was then relieved on 17 November, but the pioneers continued their work behind the lines until the end of January 1917 when they were withdrawn for training and rest.[50][51]
Arras[]
From February the battalion was engaged in trench improvements and building camps until the division moved to the Arras sector in April. After the success of the opening attack of the Battle of Arras on 9 April, 50th Division followed hp through the attacking troops to keep the enemy retreating. This led to slow, costly advances while the 1/7th DLI kept the road repaired for supplies, then worked on strongpoints, wiring and constructing shelters, until they were relieved on 26 April.[52][53]
1/7th Durham Light Infantry spent most of May 1917 training and resting. The battalion lent its transport horses to the local farmers, for which Lt-Col Vaux was awarded the French Médaille d'honneur agricole. The summer was spent in the usual road building, trench digging and minor operations until 6 October when the battalion began a week's infantry training and received a draft of 210 reinforcements in preparation for active operations.[54][55]
Passchendaele[]

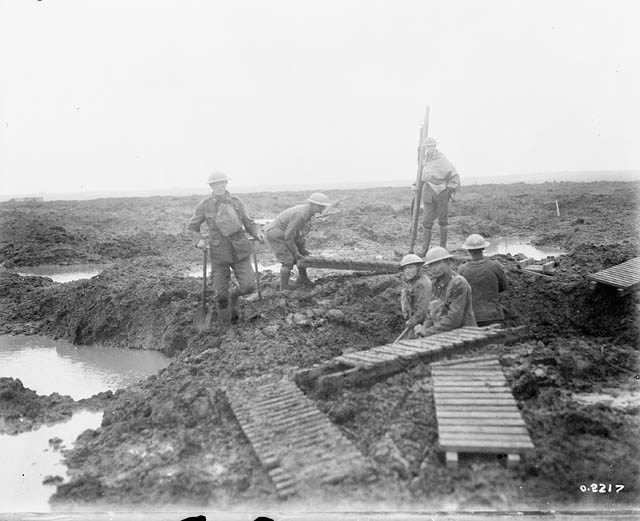
Pioneers laying duckboards at Passchendaele
On 24 October the battalion moved into White Mill Camp at Elverdinghe in the Ypres sector, A and B Companies later moving to Red Rose Camp. The work was to maintain the constantly-shelled tracks and complete a duckboard track known as 'Railway Street' while the rest of the division took part in the Second Battle of Passchendaele The camps were regularly shelled and bombed, and the Lewis gun detachment took up forward positions to deal with low-flying aircraft. On the night of 31 October/1 November the camp and divisional area received a heavy bombing raid and the battalion suffered numerous casualties.[56][57]


.jpg)
Captured German pillbox or 'Mebu' at Passchendaele
After the Third Battle of Ypres petered out in the mud of Passchendaele, the division was relieved on 30 November, but the pioneers remained behind to carry on the work. It rejoined the division on 12 December and spent the winter building tracks through the terrible mud up the Passchendaele ridge, continuing to work when the division was relieved on 6 January 1918. This work included burying telephone cables and clearing captured enemy pillboxes.[58][59]
Spring Offensive[]
In February 1918 the BEF was extensively reorganised to deal with a severe manpower shortage. Pioneer battalions adopted a three-company establishment, the 1/7th DLI completing this on 24 February.[60][61] The 50th Division moved south in March, taking over positions previously held by the French Army. The division was in Corps reserve when the German Spring Offensive opened on the morning of 21 March. It moved up in the evening and occupied the Green Line the following morning. But the trenches on the Green Line had barely been started, and the retreating British troops were streaming through the positions to the rear. Meanwhile the Pioneers began work on a new defensive line from Le Mesnil to Athies. Under pressure on its flanks, 50th Division began withdrawing to this line on 23 March, while the 1/7th DLI moved back behind the Somme Canal ahead of it, shooting down a German aircraft that was machine-gunning the road. The whole division was back across the canal by the end of the day, ending the Battle of St Quentin.[62][63]
On 24 March the 1/7th DLI was sent to defend the canal in a gap between the 66th (2nd East Lancashire) Division to the left and the 8th Division to the right. With the bridges destroyed this should have been a strong position, but during the night of 24/25 March German troops worked their way across a partially-destroyed bridge in 8th Division's sector, and outflanked the battalion (beginning the Actions at the Somme Crossings). The right-hand company was ordered to fall back to a ridge behind the canal, where they joined up with 1/5th DLI arriving to make a counter-attack. As the enemy continued to advance, and the right flank was 'in the air', the 1/5th DLI took up positions in a well-wired old trench, with part of the 1/7th DLI on each flank. The 1/5th Bn was ordered to 'hang on to the death' while the 1/7th was ordered to retire. Although the 1/7th's company commander offered to stay with the 1/5th, orders were then received for all troops to withdraw. The battalion retreated across open fields to take up positions behind Estrées shortly after midnight.[64][65] On 26 March the pressure on both flanks forced the 50th Division back to a new position near Rosières, which was taken up by 14.00. The Germans took advantage of a gap in the line and pressed on (forcing the Battle of Rosières), so A and B Companies of 1/7th DLI were ordered to make a counter-attack on the village of Framerville on a broad spur running towards the River Somme, while 1/5th Bn Northumberland Fusiliers attacked on the left of the village. The attack was successful, the companies twice forcing their way through the village at bayonet-point, but the respite was temporary and a further withdrawal took place that night. The Germans attacked Rosières itself the following day aided by morning mist, but were held up, orders to the 1/7th DLI to retire were countermanded and it advanced against little or no opposition to re-occupy the Vauvillers Ridge. At 05.00 on 28 March the battalion was relieved and went back to the divisional concentration area at Caix. Fresh withdrawals on both flanks suddenly made this position critical, but the 1/7th DLI held on until 15.30, when it was moved to Caix Ridge, and then relieved by French troops at 18.00. The battalion then had its first rest for a week.[66]
After the March battles, 50th Division was withdrawn to rest and refit near Douriez. Lieutenant-Colonel Vaux left the 1/7th DLI on 9 April on grounds of ill-health, having commanded the battalion since September 1911: almost three years' continuous service in command on the Western Front was a remarkable record for a pre-war TF officer. The battalion sometimes referred to itself as 'Vaux's Own'.[67][68]
The next German offensive (the Battle of the Lys began at Estaires on 9 April, and the 50th Division was sent to shore up the retreating 2nd Portuguese Division, 1/7th DLI clearing roads through shelled towns. Next day, A Company was sent to reinforce 1/6th DLI along the River Lawe. On 11 April the German pressure continued. B and C Companies were digging new positions, but soon fond themselves defending bridgeheads over the River Lys at Merville to cover the withdrawal of 1/6th Bn. Battalion HQ details were made up into a makeshift company, which successfully counter-attacked a German incursion. However, pressure on both flanks forced a withdrawal to the canal behind. The 50th Division was now extremely weak, but German offensive ran out of impetus, many of their troops getting out of hand and looting Merville. The attacks the following day (the Battle of Hazebrouck) were halted, and 1/7th DLI was relieved on the evening of 12 April.[69][70]
The very weak 50th Division was sent to a 'quiet sector' along the Chemin des Dames on the French front to rest and recuperate, where it absorbed a draft of raw replacement troops. However, intelligence warned of impending attack, and on 27 May the next phase of the German Offensive opened on the Chemin des Dames ridge (the Third Battle of the Aisne). The front line was flattened by German artillery, and a party of the 1/7th DLI was sent up to reinforce 1/8th DLI as the attack developed. Almost all of 1/8th Bn and this party were killed or captured. Stragglers of 1/8th DLI rallied alongside 1/7th Bn's HQ and made another stand until surrounded, when they fought their way back. The remnants of the DLI Brigade and Pioneers now held Concevreux on the Aisne Canal until they were forced out and ended the day across the canal. Casualties had been very heavy, many taken PoW when their positions were overrun.[71][72] The following morning 8th and 25th Divisions held a position at Jonchery until forced back to Savigny. Here the survivors of 50th Division held the attackers off until French troops arrived, while a 60-strong party of 1/7th DLI made up from details at divisional HQ reinforced 25th Division. At the end of the battle, 50th Division was reduced to a single composite battalion.[73][74]
After the Battle of the Aisne, 50th Division's infantry battalions were reduced to training cadres, and the division was eventually reconstituted with units from other theatres of the war. 1/7th Durham Light Infantry was transferred to 8th Division, where it absorbed that division's existing pioneer battalion, the 22nd DLI.[lower-alpha 1] [17][18][19][75][76][77]
Hundred Days[]
After reorganisation, 8th Division moved to the Arras sector, where the pioneers worked on trenches and railways while the division was engaged in the Battle of the Scarpe in August. A number of casualties were suffered from German Mustard Gas shelling. The division was engaged in diversionary attacks in September.[75][78][79]
By October the Allied Hundred Days Offensive was in full swing, and the 8th Division participated in the forcing of the Rouvroy–Fresnes Line (7–8 October).[75][80] The pioneers' role was to follow the division and improve the roads around Fresnes, many of which were damaged by delayed-action mines. The Germans began to retreat from their positions on 18 October, and the pursuit through Lens and Douai was slowed by road and bridge demolitions that the pioneers had to repair, sometimes under shell or machine-gun fire. Booby traps also caused casualties and work for the pioneers. 8th Division was relieved on the night of 4/5 November, and the Armistice with Germany came into force on 11 November, while the battalion was marching into Tournai behind the front-line troops.[81][82]
After the Armistice, the battalion colours were taken out of St Paul's Church, Hendon, and handed over to Lt-Col Vaux at a parade on 16 December attended by 300 wounded, discharged or repatriated members of the battalion. The colour party consisted almost entirely of men who had landed with the battalion in April 1915, and they took the colours to Belgium to join the 1/7th Bn.[83]
After re-establishing civilian infrastructure at Tournai, the battalion moved with the Division to Ath in December. Demobilisation proceeded rapidly, with mineworkers among the first to be sent home. Others were sent to reinforce battalions of the DLI selected for the Army of Occupation. The cadre of the battalion returned to Sunderland under the command of Lt-Col Birchall on 20 June 1919.[84]
Commanding Officers[]
The following officers commanded 7th and 1/7th battalions during World War I:[85]
- Lt-Col Ernest Vaux, CMG, DSO, 11 September 1911 to 9 April 1918[7][67]
- Acting Lt-Col A.H Birchall, MC 9 April to July 1918[67]
- Lt-Col B.C. James, DSO, (Devonshire Regiment) July to 2 September 1918[76]
- Major J.P. Turcan from 2 September 1918[86]
- Lt-Col A.H Birchall at demobilisation[87]
2/7th Battalion[]
The battalion was formed at Sunderland on 14 September 1914.[18][25][39][88] The 2nd Line TF units of the Northumbrian Division assembled around Newcastle upon Tyne, where 2nd Northumbrian Divisional HQ opened in January 1915. The 2nd DLI Brigade was at Leam Camp, Heworth. By May 1915, all the brigade's Home Service men had been transferred to form 23rd Provisional Bn (later 26th DLI) serving in coast defence and thenceforth the 2nd Line units had the role of training drafts for the 1st Line serving in France. While under training they were responsible for defending the stretch of coast from Seaham Harbour through Sunderland to Newcastle. The 2nd Northumbrian Division was numbered 63rd (2nd Northumbrian) Division and the DLI became 190th (2nd Durham Light Infantry) Brigade on 16 August. In November 1915 the division moved into winter quarters around York and Doncaster.[18][25][88][89][90][91][92]
Early in 1916, 63rd Division was still seriously under strength, and the decision was made to break it up. Its number and ancillary units were transferred to the Royal Naval Division, veterans of Antwerp and Gallipoli, now arriving on the Western Front.[88][89][93] 190th Brigade remained in existence, supplying drafts to the first line in France, until 29 November 1916, when the 2/6th, 2/7th and 2/8th DLI left to form 214th Bde in 71st Division, a new home service division forming in southern England, with 214th Bde at Andover.[25][88][92][94][95] In October, 214th Bde was redesignated 214th Special Bde and filled with men of A1 medical category for overseas service. The brigade was intended to go to Murmansk in North Russia, but this never happened and most of the men were drafted as reinforcements to the Western Front in March 1918 after the German Spring Offensive.[96] 71st Division in turn was broken up on 12 February 1918 and 214th Brigade left to join 67th (2nd Home Counties) Division. The division moved to East Anglia, with 214th Bde at Colchester.[94][95][96][97]
North Russia[]
Most of 67th Division was composed of training battalions but 2/7th DLI was still formally a 2nd Line TF battalion, and a year after initially being selected to form part of the Allied expedition to North Russia it finally went there as a garrison battalion. It entrained at Colchester for Glasgow on 5 October 1918, embarking on HM Transport Goentoer the following day and disembarking at Arkhangelsk on 24 October under the command of Lt-Col W.J. Bowker, CMG, DSO. One detachment (seven officers and 244 other ranks) went to relieve US and White Russian troops guarding stores at Bakaritza. A second detachment (eight officers and 232 ORs) relieved French troops at Constantine Barracks across the Northern Dvina River at Solombala. The third detachment (two officers and 100 men) was at the Detention Barracks at Arkhangelsk and Battalion HQ was established at the Bar Hotel, Arkhangelsk, later at Bakatriza.[25][88][94][96][97][98][99] Apart from guard duties, the battalion carried out raids on outlying villages in search of stolen weapons and stores. On 11 December the White Russian 1st Arkhangelsk Regiment mutinied and all guards were increased. The Solombala detachment was given the task of guarding the ammunition dump and mutiny ringleaders, and escorting the rest of the mutineers to a ship for detention. Several arson attacks on RE and Royal Army Service Corps stores led to firefighting and increased guard duties.[99]
The first draft of demobilised men left the battalion on 17 June 1919. On 29 August only four officers and 226 ORs of the battalion remained in Russia, and these were embarked for home shortly afterwards. During the war, 2/7th Bn had suffered 26 deaths (10 while in Russia, mostly from pneumonia and influenza).[99]
Commanding officers[]
The following officers commanded 2/7th Bn during the North Russia expedition:[85][99]
- Lt-Col W.J. Bowker, CMG, DSO
- Lt-Col T.C.B. Holland from 3 March 1919
- Maj R.A. Swan, OBE (Essex Regiment) from 23 May 1919
3/7th Battalion[]
The 3/7th Bn DLI was formed at Sunderland by June 1915 to supply drafts to the 1/7th Bn. It moved to Catterick Camp as part of the Northumbrian Reserve Group and was renamed the 7th Reserve Bn DLI on 18 April 1916. It was absorbed into 5th Reserve Bn on 1 September 1916.[18][39][100]
Interwar[]
When the TF was reconstituted as the Territorial Army (TA), the 7th DLI reformed at the drill hall in Livingstone Road in February 1920. Once again it was in 151st (DLI) Brigade of 50th (Northumbrian) Division, and Lt-Col Birchall returned as CO.[101][102]
In the coal strike of April 1921 a Defence Force was formed, with one unit being raised from the officers and 90 ORs of 7th DLI. It quickly reached a strength of 680 men and was stationed at Whitburn, South Tyneside, to guard the docks and the oil stores on the River Tyne. This lasted for three months during the political crisis.[103]
The 7th DLI opened a new drill hall at Dykelands Road, Seaburn, on 23 April 1923. This is still in use as an Army Reserve Centre.[104][lower-alpha 2] TA infantry battalions were reorganised in 1930, when D Company was converted into a machine gun company equipped with eight Vickers guns; from 1933 it was designated Support (or S) Company.[105]
47th (DLI) AA Battalion[]

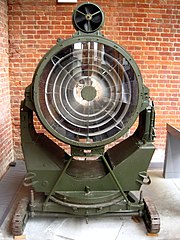
90 cm 'Projector Anti-Aircraft', displayed at Fort Nelson, Portsmouth
During the 1930s the increasing need for anti-aircraft (AA) defence for Britain's cities was addressed by converting a number of TA infantry battalions into AA units. On 10 December 1936, 7th DLI was converted to 47th (DLI) AA Battalion, RE, a searchlight (S/L) unit of the Royal Engineers (RE). Battalion HQ remained at Sunderland, and the four companies were redesignated 386–389 AA Companies, with 389 based at South Shields. New permanent instructors were appointed from the RE and a group of officers and NCOs was temporarily attached to 31st (City of London Rifles) AA Bn, which had already undergone conversion. The new battalion formed part of 30 (Northumbrian) AA Group, also based in Sunderland, within 2 AA Division.[7][106][107][108]
World War II[]
Mobilisation[]
The TA's AA units were mobilised on 23 September 1938 during the Munich Crisis, units manning their emergency positions within 24 hours, even though many did not yet have their full complement of men or equipment. The emergency lasted three weeks, and they were stood down on 13 October.[109] In February 1939 the existing AA defences came under the control of a new Anti-Aircraft Command. In June a partial mobilisation of TA units was begun in a process known as 'couverture', whereby each AA unit did a month's tour of duty in rotation to man selected AA and searchlight positions. On 24 August, ahead of the declaration of war, AA Command was fully mobilised at its war stations.[110]
47th (DLI) AA Battalion now formed part of 43 AA Brigade in a new 7 AA Division that was being organised to take over the defence of North East England. 43 AA Brigade, consisting of one heavy AA gun regiment and three S/L units converted from DLI battalions, had the role of covering the industrial areas of Teesside and Middlesbrough.[111][112][113]
47th (DLI) Searchlight Regiment[]
In August 1940 all the converted S/L units were transferred to the Royal Artillery (RA) as 'regiments' and their companies were redesignated 'batteries'. The battalion therefore became 47th (Durham Light Infantry) Searchlight Regiment, RA.[111][114][115][116]
During the early part of the Battle of Britain, German day and night air raids and mine laying began along the East Coast of England, intensifying through June 1940. Thereafter the Luftwaffe concentrated on Royal Air Force sites in the South of England, with occasional raids on the North East.[117]
Blitz[]


Formation sign of 7 AA Division.
The Battle of Britain was followed by the Luftwaffe 's night Blitz on London and other industrial cities during the winter of 1940–41. Again, NE England escaped the worst of this, but hundreds of people died during the Newcastle Blitz and there were notable air raids on Tyneside on 9 April and Sunderland on 25 April.[118][119]
The S/L layouts had initially been based on a spacing of 3,500 yards (3,200 m), but due to equipment shortages this had been extended to 6,000 yards (5,500 m) by September 1940. In November this was changed to clusters of three lights to improve illumination, but this meant that the clusters had to be spaced 10,400 yards (9,500 m) apart. The cluster system was an attempt to improve the chances of picking up enemy bombers and keeping them illuminated for engagement by AA guns or night fighters. Eventually, one light in each cluster was to be equipped with Searchlight Control (SLC) radar and act as 'master light', but the radar equipment was still in short supply.[120][121]
The main Blitz ended in May 1941, but occasional raids continued. 47th (DLI) S/L Regiment remained in 43 AA Bde in 7 AA Division until late 1941 when it transferred to 57th Light AA Bde in the same division.[122][123][124]
112th (DLI) Light Anti-Aircraft Regiment[]
By this stage in the war, AA Command was suffering a critical shortage of Light AA gun (LAA) units, and had begun a process of converting some S/L units to the role.[125] 47th (DLI) was one of the regiments chosen for conversion, becoming 112th (DLI) Light Anti-Aircraft Regiment in January 1942, with four LAA batteries numbered 364–367.[108][114][115][116][124][126]
After training, the regiment joined 5 AA Bde covering the Severn Valley in 9 AA Division at the beginning of April and then briefly transferred to 61 AA Bde at Swansea in the same division in May before becoming unbrigaded by mid-June. In July, 367 LAA Bty left the regiment and joined a newly-formed 140th LAA Rgt, which served on in AA Command until it was disbanded in March 1945.[115][124][127]
In August 1942, 112 (DLI) LAA Rgt joined 45 AA Bde. This was back in 9 AA Division, but at the end of September the AA Divisions were abolished and 45 AA Bde was assigned to a new 3 AA Group covering a wider area of South Wales and South West England. 364 LAA Battery was temporarily attached to 67 AA Bde in the West Midlands.[127][128]


Bofors gun and crew, summer 1944.
The AA defences of Southern England were severely tested in 1942 by the Luftwaffe's 'hit-and-run' attacks along the South Coast, and there was a pressing need for LAA guns.112th (DLI) LAA Rgt briefly reinforced 27 (Home Counties) AA Bde, 2 AA Group, in Southern England in October–November 1942.[128] Afterwards it returned to 3 AA Group, first with 60 AA Bde, then back with 5 AA Bde by April 1943.[129]
112th (DLI) LAA Regiment left AA Command entirely at the end of May 1943 and joined the field force as part of GHQ Reserve.[129][130] From now on the regiment was training for the planned Allied invasion of Europe (Operation Overlord) by 21st Army Group. The standard organisation for a mobile LAA regiment in the forthcoming campaign would be three batteries (54 guns) equipped with towed or Self-Propelled (SP) Bofors 40 mm guns.[131]
North West Europe[]
The regiment's role in the forthcoming operations was to be a Corps LAA regiment, assigned to the HQ of one of the Army Corps, rather than as part of the main AA defences. It arrived in Normandy by 25 June.[132] After 21st Army Group's breakout from the beachhead there was a rapid advance across Northern France and Belgium, culminating in the attempt to seize Arnhem Bridge (Operation Market Garden). 112th (DLI) LAA Regiment caught up on 7 October, when it arrived to reinforce 100 AA Bde and defended the bridge at Grave,one of those captured in Market Garden. Enemy air attacks against these bridges were frequent, usually carried out by small groups of attackers at dawn and dusk. On 10 November the brigade was relieved of its bridge garrison commitments and moved up to support forward operations with VIII, XII and XXX Corps.[133]


Land Mattress rocket launcher (right) compared to the German Nebelwerfer (left) at the Canadian War Museum.
112th (DLI) LAA Regiment was given special roles by XII Corps in Operation Plunder, the assault crossing of the Rhine for which D-Day was 24 March 1945.[134] 364 LAA Battery was hurriedly trained to operate 'Land Mattress' rocket projectors. These were Canadian-devised Multiple rocket launchers based on the Z Battery AA rocket launcher used by AA Command. 364 LAA Battery took part in the 'Pepperpot' of intense fire by every available gun and mortar (including AA guns) that supported the crossing of 15th (Scottish) Division.[135][136] The divisional historian describes the 'mad crescendo' of the Pepperpot, with the darkness criss-crossed by 'the vivid red of anti-aircraft and anti-tank and machine-gun tracer; the rushing, rending crash of the Mattresses'.[137]


SP Bofors gun preparing to cross the Rhine with 15th (Scottish) Division.
Meanwhile the rest of the regiment was with 100 AA Bde providing close protection for XII Corps Royal Engineers' ferrying and bridging operations against enemy aircraft and swimmers.[135][138] Soon after 15th (Scottish) Division established itself on the far bank, 15th (Kent) GHQ Troops Royal Engineers ferried across the first AA troops to defend the bridgehead, including two Troops of 112th (DLI) LAA Rgt, whose SP Bofors guns could just fit on a Class 9 raft. After dark on D-Day, Junkers Ju 88 bombers appeared and began making medium- and low-level dive-bombing attacks on the bridging operations. On the east bank, 366 LAA Bty fired a series of 40 mm barrages against these attacks. Similar attacks continued over successive nights until 27 March. There was some scattered daylight raiding by Focke Wulf Fw 190 fighter-bombers on 28 March, but thereafter the Rhine crossings remained quiet as the Luftwaffe fell back in the face of 21st Army Group's rapid advance.[139][140]
During the final weeks of the war, 112th (DLI) LAA Rgt was 'grounded', confined to acting as a transport pool, guarding PoWs, and clearing the area around the Rhine battlefields of abandoned equipment and ammunition.[141]
Postwar[]
When the TA was reformed in 1947, the regiment was reconstituted at Sunderland as 582 (The Durham Light Infantry) Light Anti-Aircraft/Searchlight Regiment, RA. Initially, it formed part of 92 (AA) Army Group, Royal Artillery, (AGRA) in Western Command, but this AGRA was disbanded the following year.[114][142][143][144][145] In 1954, the regiment absorbed 325 (Sunderland) LAA Rgt, and the following year, on the disbandment of AA Command, the regiment amalgamated with 463 (Durham) Heavy AA Regiment, RA, to form 463 (7 DLI) LAA/SL Rgt, with P and Q Batteries drawn from the former 582 Rgt.[114][142][146][147] The new regiment was part of 42 AGRA, formed from 69 AA Bde (the former 43 AA Bde, in which the regiment had served in the early years of World War II).[143][148]
There was a further round of mergers in the TA in 1961, with 463 LAA Rgt absorbing two other County Durham RA units: 437 LAA Rgt at West Hartlepool and 885 Locating Battery at Darlington. (437 LAA Rgt had originally been 5th DLI, which had been converted into two S/L regiments in 43 AA Bde in 1938.) The newly merged regiment was going to take the subtitle 'Durham', but this was quickly changed to 'Durham Light Infantry'. RHQ and R Btys came from 463 LAA, P and Q Btys from 437 LAA. In 1964 the LAA designation was updated to 'Light Air Defence'.[114][142][146][147][149]
County of Durham Regiment[]
When the TA was reduced to the Territorial Army and Volunteer Reserve (TAVR) in 1967, 463 (Durham Light Infantry) LAD Rgt became the bulk of the County of Durham Regiment, RA, with the following organisation:[114][146][147][150][151]
- RHQ at Sunderland – from 463 (DLI) LAD Rgt
- P (1st Durham) Bty at Hebburn – from 274 (Northumbrian) Field Rgt
- Q (5DLI) Bty at West Hartlepool – from 463 (DLI) LAD Rgt
- R (7DLI) Bty at Sunderland – from 463 (DLI) LAD Rgt
However, many TAVR units were reduced to cadres in 1969, including the County of Durham Rgt. P Battery returned to become a Troop in 205 (3rd Durham Volunteer Artillery) Battery while the DLI parts of the regiment joined 72 Engineer Rgt, RE, in which part of R Bty formed a Troop of 118 Field Squadron at Sunderland.[151][152]
The TAVR was expanded again in 1971, and the cadre of the County of Durham Rgt formed A (Durham Royal Artillery) Battery at Hordern in a new regiment, the Northumbrian Volunteers.[151][153] This battalion in turn was broken up in 1975, with A (Durham Royal Artillery) and E (6th/8th DLI) Companies transferring to 7th Battalion, The Light Infantry, thus reuniting all the former Volunteer units of the DLI in one battalion.[153][154]
Insignia[]
Upon conversion to artillery, the officers, warrant officers and senior NCOs of the 47th S/L Rgt wore green Lanyards in place of the RA's white, to denote the unit's DLI ancestry. This tradition was continued postwar by 582 and 463 LAA/SL Rgts.[114]
Honorary Colonel[]
The following served as Honorary Colonel of the unit:[7]
- Edward Temperley Gourley appointed 10 July 1869; he later reverted to active command of the battalion and was re-appointed Hon Colonel on 19 January 1881.[155]
- Col Thomas Reed, former CO, appointed 22 November 1905
- George William Hamilton-Russell, 9th Viscount Boyne, appointed 26 April 1913
- Lt-Col Ernest Vaux, CMG, DSO, VD, appointed 20 May 1922, died 21 November 1925[20]
- Lt-Col J. Spain, TD, served with the battalion from 1898 to 1921, invalided after 2nd Battle of Ypres, later commanded 6th DLI, died 12 March 1935[104][106]
- Col William Basil Greenwell, CB, DSO, a former Regular DLI officer, appointed 10 July 1937[106][156]
- Col Sir Robin Chapman, 2nd Baronet, CBE, TD, appointed 1 April 1967[151]
Memorials[]
After World War I the 7th DLI subscribed towards the cost of the DLI Memorial Chapel at Durham Cathedral.[157][158] There is a board inscribed with the WWI Roll of Honour of the 7th DLI and a brass memorial plate to senior NCOs of the battalion at the Army Reserve Centre at Dykelands Road, Sunderland. There is also a plaque to the battalion in Saint George's Memorial Church, Ypres.[159] The old colours of the Sunderland Volunteer Infantry were in the DLI Regimental Museum, (now closed). The colours of the 7th DLI are at Bishop Auckland Army Reserve Centre.[160]
A member of the battalion painted the incident of the men standing up at Bellewaarde to avoid the gas and singing Abide with Me. The painting, entitled The Miracle of Ypres, is in the possession of the Vaux family.[161]
Footnotes[]
- ↑ 22nd (Service) Bn (3rd County Pioneers) Durham Light Infantry was a Kitchener's Army battalion raised in West Hartlepool on 1 October 1915.[18]
- ↑ The old drill hall at Livingstone Road was demolished in the 1970s and the new central police station was built on Garrison Field.[104]
Notes[]
- ↑ Beckett.
- ↑ Spiers, pp. 163–8.
- ↑ Westlake.
- ↑ Beckett, Appendix VII.
- ↑ 5.0 5.1 5.2 5.3 5.4 Westlake, p. 75.
- ↑ Dunn, p. 10.
- ↑ 7.0 7.1 7.2 7.3 7.4 7.5 7.6 7.7 7.8 Army List, various dates.
- ↑ Dunn, pp. 9–11.
- ↑ Training Depots, 1873–1881 at Regiments.org.
- ↑ Dunn, p. 12.
- ↑ Beckett, pp. 135, 185–6.
- ↑ Dunlop, pp. 60–1.
- ↑ Dunn, pp. 12–3; Appendix 1..
- ↑ Leslie.
- ↑ London Gazette 20 March 1908.
- ↑ 16.0 16.1 Dunn, pp. 13–7.
- ↑ 17.0 17.1 17.2 17.3 17.4 17.5 17.6 Becke, Pt 2a, pp. 93–100.
- ↑ 18.0 18.1 18.2 18.3 18.4 18.5 18.6 DLI at Long, Long Trail.
- ↑ 19.0 19.1 19.2 50 Division at Regimental Warpath.
- ↑ 20.0 20.1 Dunn, pp. 208–9.
- ↑ Wyrall, p. 2.
- ↑ Dunn, pp. 23–8.
- ↑ Wyrall, pp. 3–4.
- ↑ Becke, Pt 2b, p. 6.
- ↑ 25.0 25.1 25.2 25.3 25.4 Dunn, p. 196.
- ↑ Dunn, pp. 29–35.
- ↑ Wyrall, pp. 4–5.
- ↑ Dunn, pp. 36–48.
- ↑ Wyrall, pp. 5, 10–11, 20–1, 34–5, 40.
- ↑ 30.0 30.1 50th Division at Long, Long Trail.
- ↑ Dunn, pp. 48–52.
- ↑ Wyrall, pp. 52–4.
- ↑ Dunn, pp. 52–68.
- ↑ Wyrall, pp. 59–70.
- ↑ Dunn, pp. 69–76.
- ↑ Wyrall, pp. 72–4.
- ↑ Dunn, pp. 79–87.
- ↑ Wyrall, pp. 90–2.
- ↑ 39.0 39.1 39.2 DLI at Regimental Warpath.
- ↑ Dunn, p. 88.
- ↑ Wyrall, p. 101.
- ↑ Dunn, pp. 90–5.
- ↑ Wyrall, pp. 100–4, 118.
- ↑ Dunn, pp. 98–108.
- ↑ Wyrall, pp. 138–45, 148–54, 160–4.
- ↑ Dunn, pp. 109–10.
- ↑ Wyrall, pp. 164–6, 170.
- ↑ Dunn, pp. 112–4.
- ↑ Wyrall, pp. 171–81.
- ↑ Dunn, pp. 115–22.
- ↑ Wyrall, pp. 183–98.
- ↑ Dunn, pp. 122–9.
- ↑ Wyrall, pp. 205–25.
- ↑ Dunn, pp. 130–7.
- ↑ Wyrall, pp. 228-37.
- ↑ Dunn, pp. 138–44.
- ↑ Wyrall, pp. 239–48.
- ↑ Dunn, pp. 144–8.
- ↑ Wyrall, pp. 249–53.
- ↑ Dunn, p. 149.
- ↑ Wyrall, pp. 253–4.
- ↑ Dunn, pp. 149–51.
- ↑ Wyrall, pp. 259–72.
- ↑ Dunn, pp. 151–2.
- ↑ Wyrall, pp. 274–6, 284–6.
- ↑ Dunn, pp. 152–3.
- ↑ 67.0 67.1 67.2 Dunn, pp. 156–7.
- ↑ Wyrall, p. 305.
- ↑ Dunn, pp. 158–64.
- ↑ Wyrall, pp. 309–34.
- ↑ Dunn, pp. 165–71.
- ↑ Wyrall, pp. 335–43.
- ↑ Dunn, pp. 171–7.
- ↑ Wyrall, pp. 344–9.
- ↑ 75.0 75.1 75.2 Becke, Pt 1, pp. 89–95.
- ↑ 76.0 76.1 Dunn, p. 177.
- ↑ Wyrall, p. 359.
- ↑ Dunn, pp. 180–2.
- ↑ Edmonds & Maxwell-Hyslop, pp. 18, 28.
- ↑ Edmonds & Maxwell-Hyslop, pp. 227, 244.
- ↑ Dunn, pp. 182–8.
- ↑ Edmonds & Maxwell-Hyslop, pp. 345, 348.
- ↑ Dunn, pp. 190–2.
- ↑ Dunn, pp. 189–8=95.
- ↑ 85.0 85.1 Dunn, Appendix 4.
- ↑ Dunn,p. 181.
- ↑ Dunn, p. 193.
- ↑ 88.0 88.1 88.2 88.3 88.4 Becke, Pt 2b, pp. 49–54.
- ↑ 89.0 89.1 63 Division at Long, Long Trail.
- ↑ 10th Provisional Brigade War Diary, The National Archives, Kew file WO 95/5458.
- ↑ Porter
- ↑ 92.0 92.1 63 Division at Regimental Warpath.
- ↑ Becke, Part 3b, pp. 117–28.
- ↑ 94.0 94.1 94.2 Becke, Pt 2b, pp. 101-5.
- ↑ 95.0 95.1 71 Division at Regimental Warpath.
- ↑ 96.0 96.1 96.2 Becke, Pt 2b, pp. 75–82.
- ↑ 97.0 97.1 67 Division at at Regimental Warpath.
- ↑ Overseas Garrisons at Regimental Warpath.
- ↑ 99.0 99.1 99.2 99.3 Dunn, pp. 197–200.
- ↑ TF Training Bns at Regimental Warpath.
- ↑ Dunn, p. 201.
- ↑ Titles and Designations, 1927.
- ↑ Dunn, p. 202.
- ↑ 104.0 104.1 104.2 Dunn, p. 210.
- ↑ Dunn, pp. 211–2.
- ↑ 106.0 106.1 106.2 Dunn, p. 213.
- ↑ Dunn, p. 214.
- ↑ 108.0 108.1 2nd AA Division at Btitish Military History
- ↑ Routledge, pp. 62–3.
- ↑ Routledge, pp. 65–6, 371.
- ↑ 111.0 111.1 7 AA Division 1939 at British Military History.
- ↑ AA Command 3 September 1939 at Patriot Files
- ↑ Routledge, Table LX, p. 378.
- ↑ 114.0 114.1 114.2 114.3 114.4 114.5 114.6 Litchfield, p. 56–7.
- ↑ 115.0 115.1 115.2 Farndale, Annex M.
- ↑ 116.0 116.1 47 S/L Rgt at RA 39–45.
- ↑ Routledge, Table LXII, pp. 379–80.
- ↑ Basil Collier, Appendices XXX and XXXI.
- ↑ Routledge, pp. 387–404.
- ↑ Routledge, pp. 388-9, 393.
- ↑ Pile's despatch.
- ↑ Routledge, Table LXV, p. 397.
- ↑ Order of Battle of Non-Field Force Units in the United Kingdom, Part 27: AA Command, 12 May 1941, TNA file WO 212/79.
- ↑ 124.0 124.1 124.2 Order of Battle of Non-Field Force Units in the United Kingdom, Part 27: AA Command, 2 December 1941, with amendments, TNA file WO 212/80.
- ↑ Routledge, p. 400.
- ↑ 112 LAA Rgt at RA 39–45.
- ↑ 127.0 127.1 Order of Battle of Non-Field Force Units in the United Kingdom, Part 27: AA Command, 14 May 1942, with amendments, TNA file WO 212/81.
- ↑ 128.0 128.1 Order of Battle of Non-Field Force Units in the United Kingdom, Part 27: AA Command, 1 October 1942, with amendments, TNA file WO 212/82.
- ↑ 129.0 129.1 Order of Battle of Non-Field Force Units in the United Kingdom, Part 27: AA Command, 13 March 1943, with amendments, TNA file WO 212/83.
- ↑ Order of Battle of the Field Force in the United Kingdom, Part 3: Royal Artillery (Non-Divisional Units), 18 February 1943, TNA files WO 212/9 and WO 33/1987.
- ↑ Routledge, p. 306.
- ↑ Routledge, Table XLIX, p. 319.
- ↑ Routledge, p. 325; Table LII, p. 332.
- ↑ Routledge, Table LVI, p. 365.
- ↑ 135.0 135.1 Routledge, pp. 353–7.
- ↑ Saunders, p. 147.
- ↑ Martin, p. 282.
- ↑ Saunders, p. 149.
- ↑ Routledge, pp. 357–60.
- ↑ Pakenham-Walsh, pp. 486–7.
- ↑ Routledge, p. 361.
- ↑ 142.0 142.1 142.2 564–591 Rgts RA at British Army 1945 on.
- ↑ 143.0 143.1 AGRAs at British Army 1945 on.
- ↑ Litchfield, Appendix 5.
- ↑ Watson, TA.
- ↑ 146.0 146.1 146.2 Litchfield, pp. 55–61.
- ↑ 147.0 147.1 147.2 444–473 Rgts RA at British Army 1945 on.
- ↑ Routledge, Table LXXV, p. 442.
- ↑ 414–443 Rgts RA at British Army 1945 on.
- ↑ 266–288 Rgts RA at British Army 1945 on.
- ↑ 151.0 151.1 151.2 151.3 County of Durham Rgt at Regiments.org.
- ↑ Tyne Electrical Engineers at Regiments.org.
- ↑ 153.0 153.1 Northumbrian Volunteers at Regiments.org.
- ↑ 6th/8th Bn DLI at Regiments.org.
- ↑ Dunn, p. 11.
- ↑ Greenwell at DLI Medal Collection
- ↑ IWM War Memorials Register ref 10230.
- ↑ Dunn, p. 204.
- ↑ Dunn, pp. 213–4.
- ↑ Dunn, pp. 220–1.
- ↑ Dunn, p. 67.
References[]
- Maj A.F. Becke,History of the Great War: Order of Battle of Divisions, Part 1: The Regular British Divisions, London: HM Stationery Office, 1934/Uckfield: Naval & Military Press, 2007, ISBN 1-847347-38-X.
- Maj A.F. Becke,History of the Great War: Order of Battle of Divisions, Part 2a: The Territorial Force Mounted Divisions and the 1st-Line Territorial Force Divisions (42–56), London: HM Stationery Office, 1935/Uckfield: Naval & Military Press, 2007, ISBN 1-847347-39-8.
- Maj A.F. Becke,History of the Great War: Order of Battle of Divisions, Part 2b: The 2nd-Line Territorial Force Divisions (57th–69th), with the Home-Service Divisions (71st–73rd) and 74th and 75th Divisions, London: HM Stationery Office, 1937/Uckfield: Naval & Military Press, 2007, ISBN 1-847347-39-8.
- Ian F.W. Beckett, Riflemen Form: A study of the Rifle Volunteer Movement 1859–1908, Aldershot: Ogilby Trusts, 1982, ISBN 0 85936 271 X.
- Clive Dunn, The Fighting Pioneers: the Story of the 7th Durham Light Infantry, Barnsley: Pen & Sword, 2015, ISBN 978-1-47382-348-8.
- Brig-Gen Sir James E. Edmonds & Lt-Col R. Maxwell-Hyslop, History of the Great War: Military Operations, France and Belgium 1918, Vol V, 26th September–11th November, The Advance to Victory, London: HM Stationery Office, 1947/Imperial War Museum and Battery Press, 1993, ISBN 1-870423-06-2.
- Gen Sir Martin Farndale, History of the Royal Regiment of Artillery: The Years of Defeat: Europe and North Africa, 1939–1941, Woolwich: Royal Artillery Institution, 1988/London: Brasseys, 1996, ISBN 1-85753-080-2.
- N.B. Leslie, Battle Honours of the British and Indian Armies 1695–1914, London: Leo Cooper, 1970, ISBN 0-85052-004-5.
- Lt-Gen H.G. Martin, The History of the Fifteenth Scottish Division 1939–1945, Edinburgh: Blackwood, 1948/Uckfield: Naval & Military Press, 2014, ISBN 978-1-78331-085-2.
- Maj-Gen R.P. Pakenham-Walsh, History of the Corps of Royal Engineers, Vol IX, 1938–1948, Chatham: Institution of Royal Engineers, 1958.
- Brig N.W. Routledge, History of the Royal Regiment of Artillery: Anti-Aircraft Artillery 1914–55, London: Royal Artillery Institution/Brassey's, 1994, ISBN 1-85753-099-3.
- Tim Saunders, Operation Plunder: The British and Canadian Rhine Crossing, Barnsley: Pen & Sword Books, 2006, ISBN 1-84415-221-9.
- Titles and Designations of Formations and Units of the Territorial Army, London: War Office, 7 November 1927; RA sections also reprinted in Litchfield Appendix IV.
- Ray Westlake, Tracing the Rifle Volunteers, Barnsley: Pen and Sword, 2010, ISBN 978 1 84884 211 3.
- Everard Wyrall, The Fiftieth Division 1914–1919, 1939/Uckfield: Naval & Military, nd, ISBN 1-84342-206-9.
External sources[]
The original article can be found at Sunderland Rifles and the edit history here.