| Indefatigable-class battlecruiser | |
|---|---|
 | |
| Class overview | |
| Name: | Indefatigable class |
| Operators: |
|
| Preceded by: | Invincible class |
| Succeeded by: | Lion class |
| Subclasses: | New Zealand |
| Built: | 1909–1913 |
| In service: | 1911–1923 |
| In commission: | 1911–1923 |
| Completed: | 3 |
| Lost: | 1 |
| Scrapped: | 2 |
| General characteristics | |
| Type: | Battlecruiser |
| Displacement: |
18,500 long tons (18,800 t) at load 22,130 long tons (22,490 t) at deep load |
| Length: | 590 ft (179.8 m) |
| Beam: | 80 ft (24.4 m) |
| Draught: | 27 ft (8.2 m) |
| Installed power: | 43,000 ihp (32,000 kW) |
| Propulsion: | Four-shaft Parsons direct-drive steam turbines, 31 Babcock & Wilcox boilers |
| Speed: | 25.8 knots (47.8 km/h; 29.7 mph) |
| Range: | 6,690 nmi (12,390 km; 7,700 mi) at 10 knots (19 km/h; 12 mph) |
| Complement: | 800 |
| Armament: |
4 × 2 - BL 12-inch (305 mm) Mk X guns 16 × 1 - BL 4-inch (102 mm) Mk VII guns 2 × 1 - submerged 17.7-inch (450-mm) torpedo tubes |
| Armour: |
Belt: 4–6 in (102–152 mm) Decks: 1.5–2.5 in (38–64 mm) Barbettes: 7 in (178 mm) Turrets: 7 in (178 mm) Conning tower: 4–10 in (102–254 mm) Torpedo bulkheads: 2.5 in (64 mm) |
The Indefatigable class were the second class built of British battlecruisers[Note 1] which served in the Royal Navy and the Royal Australian Navy during World War I. The design represented a modest reworking of the preceding Invincible class, featuring increased endurance and an improved cross-deck arc of fire for their midships wing turrets achieved by a lengthening of the hull. Like its predecessor, the design resembled the contemporary dreadnought of the Royal Navy, but sacrificed armour protection and one turret from the main battery for a 4-knot (7.4 km/h; 4.6 mph) speed advantage.
Originally Indefatigable was the only ship of the class, but Australia and New Zealand were later built as part of a scheme to improve the defense of the Dominions by having each Dominion purchase a 'fleet unit' of one battlecruiser, three light cruisers and six destroyers. Only Australia fully acceded to the idea, forming the Royal Australian Navy, but New Zealand agreed to fund one battlecruiser. A modified Indefatigable design was chosen rather than the Lion-class battlecruiser then building for the Royal Navy.
They spent most of the war patrolling the North Sea, and participated in most of the battles there, although only New Zealand was in the United Kingdom when the war began. Indefatigable was in the Mediterranean where she pursued the German warships Goeben and Breslau as they fled towards Turkey and Australia was flagship of the Royal Australian Navy in Australian waters where she helped to secure the German Pacific colonies and searched, unsuccessfully, for the German East Asia Squadron before sailing for the United Kingdom in December 1914. New Zealand participated in a number of the early actions in the North Sea including the Battle of Heligoland Bight and the inconclusive Scarborough Raid. Australia was still under repair after a collision with New Zealand before the Battle of Jutland so only Indefatigable and New Zealand were present where the former was destroyed by a magazine explosion. Both Australia and New Zealand spent much uneventful time at sea after Jutland waiting for the next appearance of the High Seas Fleet, but that had been forbidden by the Kaiser. New Zealand conducted Admiral Jellicoe on his tour of India and the Dominions after the war while Australia returned home where she again became the flagship of the Royal Australian Navy. New Zealand was sold for scrap in 1922 while Australia only lasted two years more before being scuttled to comply with the terms of the Washington Naval Treaty.
Background[]
Indefatigable was the successor to the Invincible-class battlecruisers. A number of options for large cruisers were considered for the 1906 Naval Programme, including the X4 design of 22,500 long tons (22,861 t) with 11-inch (280 mm) armour and 25-knot (46 km/h; 29 mph) speed, but in the end this programme consisted only of three ships of the Dreadnought type. A number of options were considered for the 1907–08 programme, ranging from 18,100 long tons (18,390 t) to 21,400 long tons (21,743 t), but in the end battleships were again favoured and no battlecruisers were ordered until the subsequent programme year.[1]
At the time the final design of Indefatigable was approved, the Admiralty was already moving on, Fisher writing in September 1908 "I've got Sir Philip Watts into a new Indomitable that will make your mouth water when you see it", a design that was to eventually emerge as HMS Lion. In August 1909 the self-governing dominions met at the 1909 Imperial Conference, and in discussion of Imperial defense, the Admiralty proposed the creation of indigenous fleet units, each to consist of one Invincible-class battlecruiser, three light cruisers of the Bristol class, and six destroyers. These were to be based in Australia, New Zealand, Canada and South Africa in attempt to secure the naval defence of the Dominions while the Royal Navy concentrated in home waters to meet the German threat. While the scheme was rejected by Canada and South Africa, Australia and New Zealand subscribed, each ordering a modified version of the Indefatigable, rather than the originally proposed Invincible class.[2] Australia became a ship of the newly formed Royal Australian Navy, while New Zealand was retained in European waters as a wholly RN unit.[3] Eventually, only one fleet unit was formed, the Australian squadron in 1913.[4]
Design[]


The layout depicted in this diagram is in reality that of the Invincible class. Armour thicknesses were those claimed by the Admiralty;[5] actual thicknesses were in some places the same as claimed, but in many places less.
The Indefatigable was ordered as the lone battlecruiser of the 1908–9 programme. Her outline design was prepared in March 1908, and the final design was approved in November 1908. This design was essentially an enlarged Invincible with revised arrangements of protection and main armament.[6]
General characteristics[]
Indefatigables were slightly larger than their predecessors of the Invincible class. They had an overall length of 590 ft (179.8 m), a beam of 80 ft (24.4 m), and a draught of 29 ft 9 in (9.1 m) at deep load. They displaced 18,500 long tons (18,800 t) at load and 22,130 long tons (22,490 t) at deep load, over 1,500 long tons (1,524 t) more than the earlier ships. They had a metacentric height of 4.78 feet (1.5 m) at deep load.[7]
Propulsion[]
Each paired set of Parsons direct-drive steam turbines was housed in a separate engine-room and drove two shafts. The wing shaft was coupled to the high-pressure ahead and astern turbines and the low-pressure turbines to the inner shafts. Each wing shaft drove a propeller 10 feet 10 inches (3.30 m) in diameter and the propellers on the inner shafts were 10 feet 3 inches (3.12 m) in diameter. The turbines were powered by thirty-one Babcock and Wilcox water-tube boilers in five boiler rooms.[8] Indefatigable's turbines were designed to produce a total of 43,000 shaft horsepower (32,065 kW), but reached over 55,000 shp (41,013 kW) on forced draught during trials in 1911. The turbines of Australia and New Zealand were slightly more powerful at 44,000 shp (32,811 kW). They were designed for 25.8 knots (47.8 km/h; 29.7 mph), but all three bettered 26 knots (48 km/h; 30 mph) during trials.[9]
The ships carried approximately 3,200 long tons (3,251 t) of coal, and an additional 850 long tons (864 t) of fuel oil that was to be sprayed on the coal to increase its burn rate.[10] At full capacity, the ships could steam for 3,330 nautical miles (6,170 km; 3,830 mi) at a speed of 10 knots (19 km/h; 12 mph).[11]
Armament[]
Each ship carried eight BL 12-inch (305 mm) Mk X guns in four BVIII* twin turrets. Two turrets were mounted fore and aft on the centreline, identified as 'A' and 'X' respectively. Two wing turrets were mounted amidships en echelon between the funnels, identified as 'P' and 'Q'. 'P' turret was mounted on the port side and normally faced forward, 'Q' turret was mounted on the starboard side and normally faced aft (rearwards). 'P' and 'Q' turrets were staggered—'P' was forward of 'Q', enabling 'P' to fire in a 70° arc to the starboard side and 'Q' to likewise fire towards the port side. These were the same guns as those mounted in Dreadnought, the Lord Nelson class and Bellerophon class.[12]

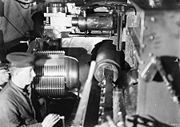
A 12-inch shell being rammed in HMAS Australia; note the interrupted screw of the breech
The guns could initially be depressed to −3° and elevated to 13.5°, although the turrets were modified to allow 16° of elevation during World War I. They fired 850-pound (390 kg) projectiles at a muzzle velocity of 2,725 ft/s (831 m/s); at 13.5°, this provided a maximum range of 16,450 m (17,990 yd) with armour-piercing (AP) 2 crh shells. At 16° elevation, the range was extended to 20,435 yd (18,686 m) using the more aerodynamic, but slightly heavier 4 crh AP shells. The rate of fire of these guns was 1–2 rounds per minute.[13] The ships carried a total of 880 rounds during wartime for 110 shells per gun.[14]
The secondary armament consisted of sixteen 4 in (102 mm) BL Mk VII guns positioned in the superstructure. All of the guns were enclosed in casemates and given blast shields during refits in 1914 and 1915 to better protect the gun crews from weather and enemy action, although two guns were removed at the same time.[15] The guns on their PII* mounts had a maximum depression of 7° and a maximum elevation of 15°. They fired 31-pound (14 kg) projectiles at a muzzle velocity of 2,864 ft/s (873 m/s); this gave a maximum range of 11,600 yd (10,600 m). Their rate of fire was 6–8 rounds per minute.[16] They were provided with 100 rounds per gun.[17]
An additional 4-inch gun was fitted in the surviving ships during 1917 as an anti-aircraft (AA) gun. It was mounted on a Mark II high-angle mounting with a maximum elevation of 60°. It had a reduced propellant charge with a muzzle velocity of only 2,864 ft/s (873 m/s).[16] Earlier anti-aircraft guns included a single QF 3-inch (76.2 mm) 20 cwt AA gun on a high-angle Mark II mount that was added during refits in 1914–15.[14] This had a maximum depression of 10° and a maximum elevation of 90°. It fired a 12.5-pound (5.7 kg) shell at a muzzle velocity of 2,500 ft/s (760 m/s) at a rate of fire of 12–14 rounds per minute. They had a maximum effective ceiling of 23,500 ft (7,200 m).[18] It was provided with 500 rounds.[17] New Zealand carried a single QF 6 pounder Hotchkiss AA gun on a HA MkIc mounting from October 1914 to the end of 1915.[14] This had a maximum depression of 8° and a maximum elevation of 60°. It fired a 6-pound (2.7 kg) shell at a muzzle velocity of 1,765 ft/s (538 m/s) at a rate of fire of 20 rounds per minute. It had a maximum ceiling of 10,000 ft (3,050 m), but an effective range of only 1,200 yards (1,097 m).[19]
They mounted two 17.7-inch (450-mm) submerged torpedo tubes, one on each side aft of 'X' barbette, for which twelve torpedoes were carried.[20]
Fire control[]

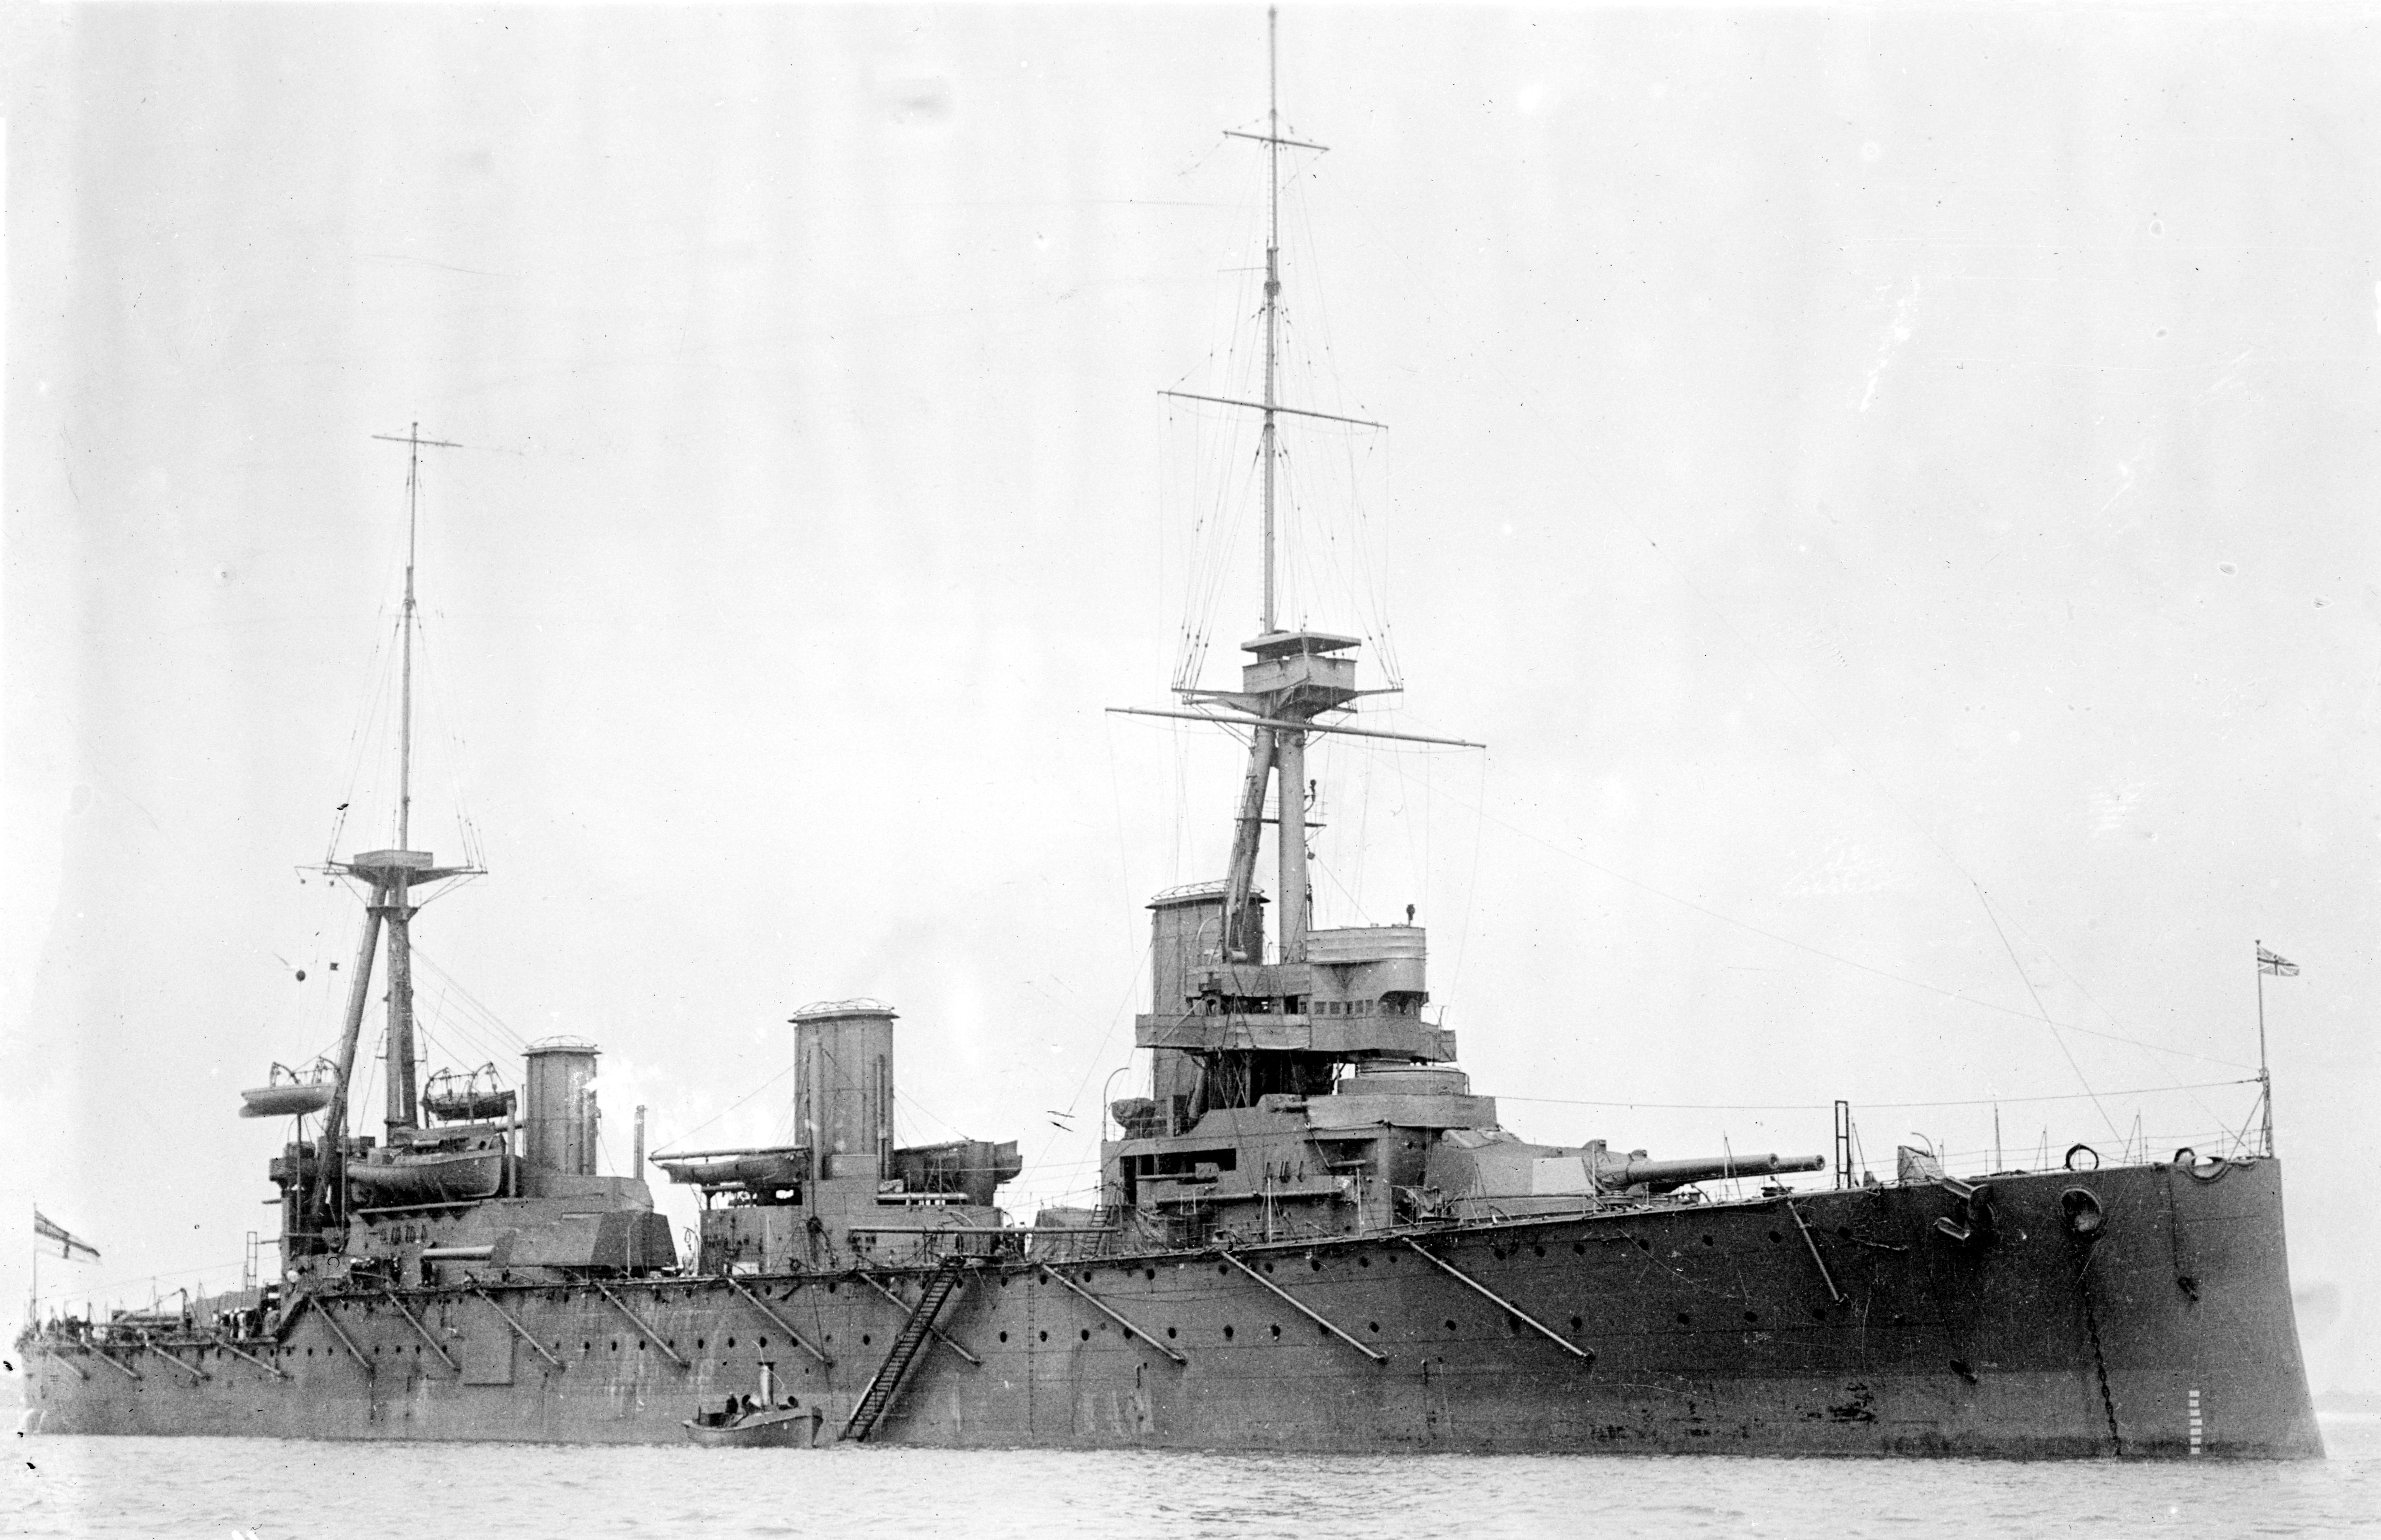
Australia; note the large spotting tops above each tripod mast
The spotting tops, a modern equivalent of the sailing ship's fighting top, at the head of the tripod fore and main masts controlled the fire of the Indefatigable's main guns. Data from a 9-foot (2.7 m) Barr and Stroud rangefinder was input into a Dumaresq mechanical computer and electrically transmitted to Vickers range clocks located in the Transmitting Station (TS) located beneath each spotting top where it was converted into range and deflection data for use by the guns. The target's data was also graphically recorded on a plotting table to assist the gunnery officer in predicting the movement of the target. Each gun turret had its own transmission equipment and the turrets, Transmitting Stations, and spotting tops could be connected in almost any combination. Firing trials against Hero in 1907 revealed this system's vulnerability to gunfire as the spotting top was hit twice and a large splinter severed the voice pipe and all wiring running along the mast. To guard against this possibility 'A' turret of Indefatigable was fitted with a 9-foot (2.7 m) rangefinder at the rear of the turret roof and it was equipped to control the entire main armament during a refit between 1911 and 1914.[21]
Australia and New Zealand were built with a different arrangement. The spotting top on the main mast was deleted and an armoured spotting tower was built instead into the conning tower where it was better protected, had an improved field of vision and direct access to the primary conning position. The rear Transmitting Station was also deleted and the forward TS was consequently enlarged. Their 'A' turrets were built with the improvements listed above.[22]
Fire control technology advanced quickly during the years immediately preceding World War I and the development of the Dreyer Fire Control Table was one such advance. It combined the functions of the Dumaresq and the range clock and a simplified version, the Mk I, was fitted to the Indefatigables during refits in 1915–16. The more important development was the director firing system. This consisted of a fire-control director mounted high in the ship which electrically transmitted training and elevation angles to the gun turrets via pointers, which the turret crewmen had only to follow. The director layer's trigger fired the guns simultaneously which aided in spotting the shell splashes and minimized the effects of the roll on the dispersion of the shells. A gun within the 'Y' turret was also equipped with transmitters so that, as a backup, it could function as a "directing gun",[23] but there was no provision for the gun battery to be split between the main director and this directing gun.[24] The Indefatigables received their director equipment between mid-1915 and May 1916.[25]
Armour[]
In some ways the armour protection given to the Indefatigables was weaker than that of their predecessors as the armour was reduced in thickness in a number of places, but it was spread out to a greater extent. The main belt ran from stem to stern; it was 6 inches (152 mm) thick for the middle 298 feet (91 m) of the ship, but was reduced to 4 inches (102 mm) abreast the end 12-inch gun barbettes and magazines and thinned still further to 2.5 inches (64 mm) at the ends of the ship. A 4.5 inches (114 mm) bulkhead met the barbette of X turret while the forward bulkhead was 3–4 inches (76–102 mm) in thickness. The gun turrets and barbettes were protected by 7 in (178 mm) of armour, except for the turret roofs which used 3 in (76 mm) of Krupp non-cemented armour (KNC).[26] The supporting beams for the turret roofs were reinforced over those of the Invincibles based on lessons learned in firing trials conducted during 1907.[27] The thickness of the main deck was generally 1 in (25 mm) of nickel steel, but increased to 2 inches (51 mm) around the base of the barbettes. The lower deck armour of nickel steel was 1.5 in (38 mm) on the flat and 2 inches thick on the slope, but increased to two inches at the ship's ends. The sides of the forward conning tower were 10 in (254 mm) thick while the spotting tower had four inches. The roof and floor of both towers were KNC armour 3 inches thick while the conning tower's communication tube was four inches of KNC. The torpedo director tower 1 inch of nickel steel all around. Nickel steel torpedo bulkheads of 2.5-inch thickness were fitted abreast the magazines and shell rooms. The funnel uptakes were protected with 1.5 inches of nickel steel on the sides and 1 inch on the ends. Krupp cemented armour was used throughout, unless otherwise mentioned.[28]
Australia and New Zealand were built with a different arrangement. The waterline belt did not extend to the ends, but terminated 60 feet (18.3 m) short of the bow and 55 feet (16.8 m) short of the stern. The sections abreast the barbettes were thickened to 5 inches (127 mm) and the sections at each end were increased to four inches. The main deck armour was increased to 2.5 inches around the barbettes and was extended 55 feet past the rear barbette.[29] The lower deck armour was decreased from 1.5–2 inches to one inch, both on the flat and slope, except at the ends where it was thickened to 2.5 inches.[26] After Jutland one inch of armour was added to the magazine crowns and the turret roofs[30] with a total weight of 110 long tons (112 t)[31]
Construction[]
The following table gives the build details and purchase cost of the members of the Indefatigable class. Whilst standard British practice at that time was for these costs to exclude armament and stores, for some reason the cost quoted in The Naval Annual for Indefatigable includes the armament.
| Ship | Builder | Engine builder |
Laid down | Launched | Completed | Cost according to | ||
|---|---|---|---|---|---|---|---|---|
| BNA (1914)[32] | Parkes[33] | Gillett[34] | ||||||
| Indefatigable | Devonport Dockyard | John Brown, Parsons turbines | 23 February 1909 | 28 October 1909 | 24 February 1911 | £1,536,769* | £1,547,500 guns £94,200 |
not stated |
| New Zealand | Fairfield, Govan | Fairfield, Parsons turbines | 20 June 1910 | 1 July 1911 | November 1912 | not stated | £1,684,990 guns £94,200 |
not stated |
| Australia | John Brown, Clydebank | John Brown, Parsons turbines | 23 June 1910 | 25 October 1911 | 21 June 1913 | not stated | not stated | £2,000,000 |
* = estimated cost, including guns
In service[]
Indefatigable was initially assigned to the 1st Cruiser Squadron of the Home Fleet upon her commissioning in 1911. She was transferred to the 2nd Battlecruiser Squadron in the Mediterranean Fleet in December 1913. New Zealand was only briefly assigned to the Home Fleet before she sailed for New Zealand in February 1912. She returned to Portsmouth the following December and was assigned again to the Home Fleet. She made a number of port visits to France and Russia before the war began. Australia set sail for Australia almost immediately after she was commissioned in June 1913 to assume her duties as the first flagship of the Royal Australian Navy.[4][35]
Pursuit of Goeben and Breslau[]
Indefatigable, accompanied by Indomitable, under the command of Admiral Sir Archibald Berkeley Milne, encountered the German battlecruiser Goeben and the light cruiser Breslau on the morning of 4 August 1914 headed east after a cursory bombardment of the French Algerian port of Philippeville, but Britain and Germany were not yet at war so Milne turned to shadow the Germans as they headed back to Messina to recoal. All three battlecruisers had problems with their boilers, but Goeben and Breslau were able to break contact and reached Messina by the morning of the 5th. By this time war had been declared, after the German invasion of Belgium, but an Admiralty order to respect Italian neutrality and stay outside a six-mile (10 km) limit from the Italian coast precluded entrance into the passage of the Strait of Messina where they could observe the port directly. Therefore Milne stationed Inflexible and Indefatigable at the northern exit of the Straits of Messina, still expecting the Germans to break out to the west where they could attack French troop transports, the light cruiser Gloucester at the southern exit and sent Indomitable to recoal at Bizerte where she was better positioned to react to a German sortie into the Western Mediterranean.[36]
The Germans sortied from Messina on 6 August and headed east, towards Constantinople, trailed by Gloucester. Milne, still expecting Rear Admiral Wilhelm Souchon to turn west, kept the battlecruisers at Malta until shortly after midnight on 8 August when he set sail for Cape Matapan, where Goeben had been spotted eight hours earlier, at a leisurely 12 knots (22 km/h). At 2:30 p.m. he received an incorrect signal from the Admiralty stating that Britain was at war with Austria — war would not be declared until 12 August and the order was countermanded four hours later, but Milne followed his standing orders to guard the Adriatic against an Austrian breakout attempt, rather than seek Goeben. Finally on 9 August Milne was given clear orders to "chase Goeben which had passed Cape Matapan on the 7th steering north-east." Milne still did not believe that Souchon was heading for the Dardanelles, and so he resolved to guard the exit from the Aegean, unaware that the Goeben did not intend to come out.[37]
On 3 November 1914, Churchill ordered the first British attack on the Dardanelles following the opening of hostilities between Turkey and Russia. The attack was carried out by Indomitable and Indefatigable, as well as the French pre-dreadnought battleships Suffren and Vérité. The intention of the attack was to test the fortifications and measure the Turkish response. The results were deceptively encouraging. In a twenty minute bombardment, a single shell struck the magazine of the fort at Sedd el Bahr at the tip of the Gallipoli peninsula, displacing (but not destroying) 10 guns and killing 86 Turkish soldiers. The most significant consequence was that the attention of the Turks was drawn to strengthening their defences, and they set about expanding the mine field.[38] This attack actually took place before a formal declaration of war had been made by Britain against the Ottoman Empire which did not happen until 6 November. Indefatigable was remained in the Mediterranean until she was relieved by Inflexible on 24 January 1915 and proceeded to Malta to refit. Having completed her refit she sailed to England on 14 February where she joined the 2nd Battlecruiser Squadron (BCS) upon her arrival.[39]
Australia in the Pacific[]

.jpg)
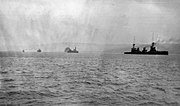
Australia leading the Australian Squadron into Simpson Harbour, Rabaul on 12 September 1914
Following the declaration of war, Australia was assigned to find the German East Asia Squadron, the only Central Powers naval force of note in the Pacific. During this hunt, she was attached to the Australian Naval and Military Expeditionary Force and provided support during the Force's invasion of Rabaul, in case the German squadron was present.[40] The squadron's commander, Vice Admiral Maximilian von Spee, was wary of Australia, which he described as being superior to his squadron.[41]
Following von Spee's withdrawal from the Pacific, Australia was belatedly ordered on 8 November 1914 to join with several Japanese cruisers off Mexico to resume the hunt for the German cruisers. By this time, the German squadron had made its way to the South Atlantic, and in early December was destroyed by a British squadron in the Battle of the Falkland Islands.[42] Australia was sent to join the 2nd Battlecruiser Squadron at Rosyth, Scotland, and was made flagship of the squadron after a short refit.[43]
Battle of Heligoland Bight[]
New Zealand's first action was as part of the battlecruiser force under the command of Admiral Beatty during the Battle of Heligoland Bight operation on 28 August 1914. Beatty's ships had originally been intended as distant support of the British cruisers and destroyers closer to the German coast in case large units of the High Seas Fleet sortied in response to the British attacks. They turned south at full speed at 11:35 AM when the British light forces failed to disengage on schedule and the rising tide meant that German capital ships would be able to clear the bar at the mouth of the Jade estuary. The brand-new light cruiser Arethusa had been crippled earlier in the battle and was under fire from the light cruisers Strassburg and Cöln when Beatty's battlecruisers loomed out of the mist at 12:37 PM. Strassburg was able to duck into the mists and evade fire, but Cöln remained visible and was quickly crippled by fire from the squadron. But Beatty was distracted from the task of finishing her off by the sudden appearance of the elderly light cruiser Ariadne directly to his front. He turned in pursuit, but reduced her to a flaming hulk in only three salvos at a range under 6,000 yards (5.5 km). At 1:10 PM Beatty turned north and made a general signal to retire. Shortly after turning north, Beatty's main body encountered the crippled Cöln and she was sunk by two salvos from Lion.[44]
Raid on Scarborough[]
The German Navy had decided on a strategy of bombarding British towns on the North Sea coast in an attempt to draw out the Royal Navy and destroy elements of it in detail. An earlier Raid on Yarmouth on 3 November had been partially successful, but a larger-scale operation was devised by Admiral Franz von Hipper afterwards. The fast battlecruisers would actually conduct the bombardment while the entire High Seas Fleet was to station itself east of Dogger Bank to provide cover for their return and to destroy any elements of the Royal Navy that responded to the raid. But what the Germans did not know was that the British were reading the German naval codes and were planning to catch the raiding force on its return journey, although they were not aware that the High Seas Fleet would be at sea as well. Admiral Beatty's 1st Battlecruiser Squadron, now reduced to four ships, including New Zealand, as well as the 2nd Battle Squadron with six dreadnoughts, was detached from the Grand Fleet in an attempt to intercept the Germans near Dogger Bank.[45]
Admiral Hipper set sail on 15 December 1914 for another such raid and successfully bombarded several English towns, but British destroyers escorting the 1st BCS had already encountered German destroyers of the High Seas Fleet at 5:15 and fought an inconclusive action with them. Vice Admiral Sir George Warrender, commanding the 2nd Battle Squadron, had received a signal at 5:40 that Lynx was engaging enemy destroyers although Beatty had not. The destroyer Shark spotted the German armoured cruiser Roon and her escorts at about 7:00, but could not transmit the message until 7:25. Admiral Warrender received the signal, as did New Zealand, but Beatty did not, despite the fact that New Zealand had been specifically tasked to relay messages between the destroyers and Beatty. Warrender attempted to pass on Shark's message to Beatty at 7:36, but did not manage to make contact until 7:55. Beatty reversed course when he got the message and dispatched New Zealand to search for Roon. She was being overhauled by New Zealand when Beatty received messages that Scarborough was being shelled at 9:00. Beatty ordered New Zealand to rejoin the squadron and turned west for Scarborough.[46]


Relative positions of the British and German forces at about 12:00
The British forces split going around the shallow Southwest Patch of the Dogger Bank; Beatty's ships passed to the north while Warrender passed to the south as they headed west to block the main route through the minefields defending the English coast. This left a 15 nautical miles (28 km) gap between them through which the German light forces began to move. At 12:25, the light cruisers of the II Scouting Group began to pass the British forces searching for Hipper. Southampton spotted the light cruiser Stralsund and signalled a report to Beatty. At 12:30 Beatty turned his battlecruisers towards the German ships. Beatty presumed that the German cruisers were the advance screen for Hipper's ships, however, those were some 50 km (31 mi) behind. The 2nd Light Cruiser Squadron, which had been screening for Beatty's ships, detached to pursue the German cruisers, but a misinterpreted signal from the British battlecruisers sent them back to their screening positions.[Note 2] This confusion allowed the German light cruisers to escape, and alerted Hipper to the location of the British battlecruisers. The German battlecruisers wheeled to the northeast of the British forces and made good their escape.[47]
Battle of Dogger Bank[]
On 23 January 1915, a force of German battlecruisers under the command of Admiral Franz von Hipper sortied to clear the Dogger Bank of any British fishing boats or small craft that might be there to collect intelligence on German movements. But the British were reading their coded messages and sailed to intercept them with a larger force of British battlecruisers under the command of Admiral Beatty, which included New Zealand. Contact was initiated at 7:20 AM on the 24th when the British light cruiser Arethusa spotted the German light cruiser SMS Kolberg. By 7:35 the Germans had spotted Beatty's force and Hipper ordered a turn to the south at 20 knots (23 mph; 37 km/h), believing that this would suffice if the ships that he saw to his northwest were British battleships and that he could always increased speed to Blücher's maximum speed of 23 knots (26 mph; 43 km/h) if they were British battlecruisers.[48]
Beatty ordered his battlecruisers to make all practicable speed to catch the Germans before they could escape. New Zealand and Indomitable were the slowest of Beatty's ships and gradually fell behind the newer and faster battlecruisers, but New Zealand was able to open fire on Blücher by 9:35. She continued to engage Blücher after the other, faster, battlecruisers had switched targets to the German battlecruisers. After about an hour New Zealand had knocked out Blücher's forward turret and Indomitable began to fire on her as well at 10:31. Two 12-inch shells pierced her armoured deck and exploded in an ammunition room at 10:35. This started a fire amidships that destroyed her two port 21 cm (8.3 in) turrets and the concussion damaged her engines so that her speed had dropped to 17 knots (20 mph; 31 km/h) and her steering gear jammed. At 10:48 Beatty ordered Indomitable to attack her. But due to a combination of a mistake by Beatty's flag lieutenant in signalling and heavy damage to Beatty's flagship Lion which had knocked out her radio and caused enough smoke to obscure her signal halyards so that Beatty could not communicate with his ships that caused the rest of the battlecruisers, temporarily under the command of Rear-Admiral Sir Gordon Moore in New Zealand, to think that that signal applied to them. So they turned away from Hipper's main body and engaged Blücher.[49] New Zealand fired 147 shells at Blücher before she capsized and sank at 12:07 PM after being torpedoed.[50]
Battle of Jutland[]
On 31 May 1916 the 2nd BCS consisted of New Zealand (Flagship of Rear Admiral William Christopher Pakenham) and Indefatigable as Australia was still under repair following her collision with New Zealand on 22 April.[43] It was assigned to Admiral Beatty's Battlecruiser Fleet which had put to sea to intercept a sortie by the High Seas Fleet into the North Sea. The British were able to decode the German radio messages and left their bases before the Germans put to sea. Hipper's battlecruisers spotted the Battlecruiser Fleet to their west at 3:20,[Note 3] but Beatty's ships did not spot the Germans to their east until 2:30. Almost immediately afterwards, at 3:32, he ordered a course change to east south-east to position himself astride the German's line of retreat and called his ships' crews to action stations. He also ordered the 2nd BCS, which had been leading, to fall in astern of the 1st BCS. Hipper ordered his ships to turn to starboard, away from the British, to assume a south-easterly course, and reduced speed to 18 knots (33 km/h; 21 mph) to allow three light cruisers of the 2nd Scouting Group to catch up. With this turn Hipper was falling back on the High Seas Fleet, then about 60 miles (97 km) behind him. Around this time Beatty altered course to the east as it was quickly apparent that he was still far too north to cut off Hipper.[51]
This began what was to be called the 'Run to the South' as Beatty changed course to steer east south-east at 3:45, paralleling Hipper's course, now that the range closed to under 18,000 yards (16,000 m). The Germans opened fire first at 3:48, followed almost immediately afterwards by the British. The British ships were still in the process of making their turn as only the two leading ships, Lion and Princess Royal had steadied on their course when the Germans opened fire. The British formation was echeloned to the right with Indefatigable in the rear and the furthest to the west, and New Zealand ahead of her and slightly further east. The German fire was accurate from the beginning, but the British overestimated the range as the German ships blended into the haze. Indefatigable aimed at Von der Tann while New Zealand aimed at Moltke while remaining unengaged herself. By 3:54 the range was down to 12,900 yards (11,800 m) and Beatty ordered a course change two points to starboard to open up the range at 3:57. Around 4:00 Indefatigable was hit by two or three shells from Von der Tann around the rear turret and almost immediately fell off to starboard and was down by the stern and listing to port. She was hit twice more on the next volley, once on forecastle and on the forward turret, and blew up at about 4:03 when her magazines exploded.[52] The most likely cause of her loss was a low-order explosion in 'X' magazine that blew out her bottom and severed the control shafts between the steering engines and the steering gear, followed by the explosion of her forward magazines from the second volley.[53] Von der Tann only fired 52 28 cm (11 in) shells at Indefatigable before she exploded, taking 1017 men with her. Only two survivors were rescued by the German torpedo boat S68.[54]

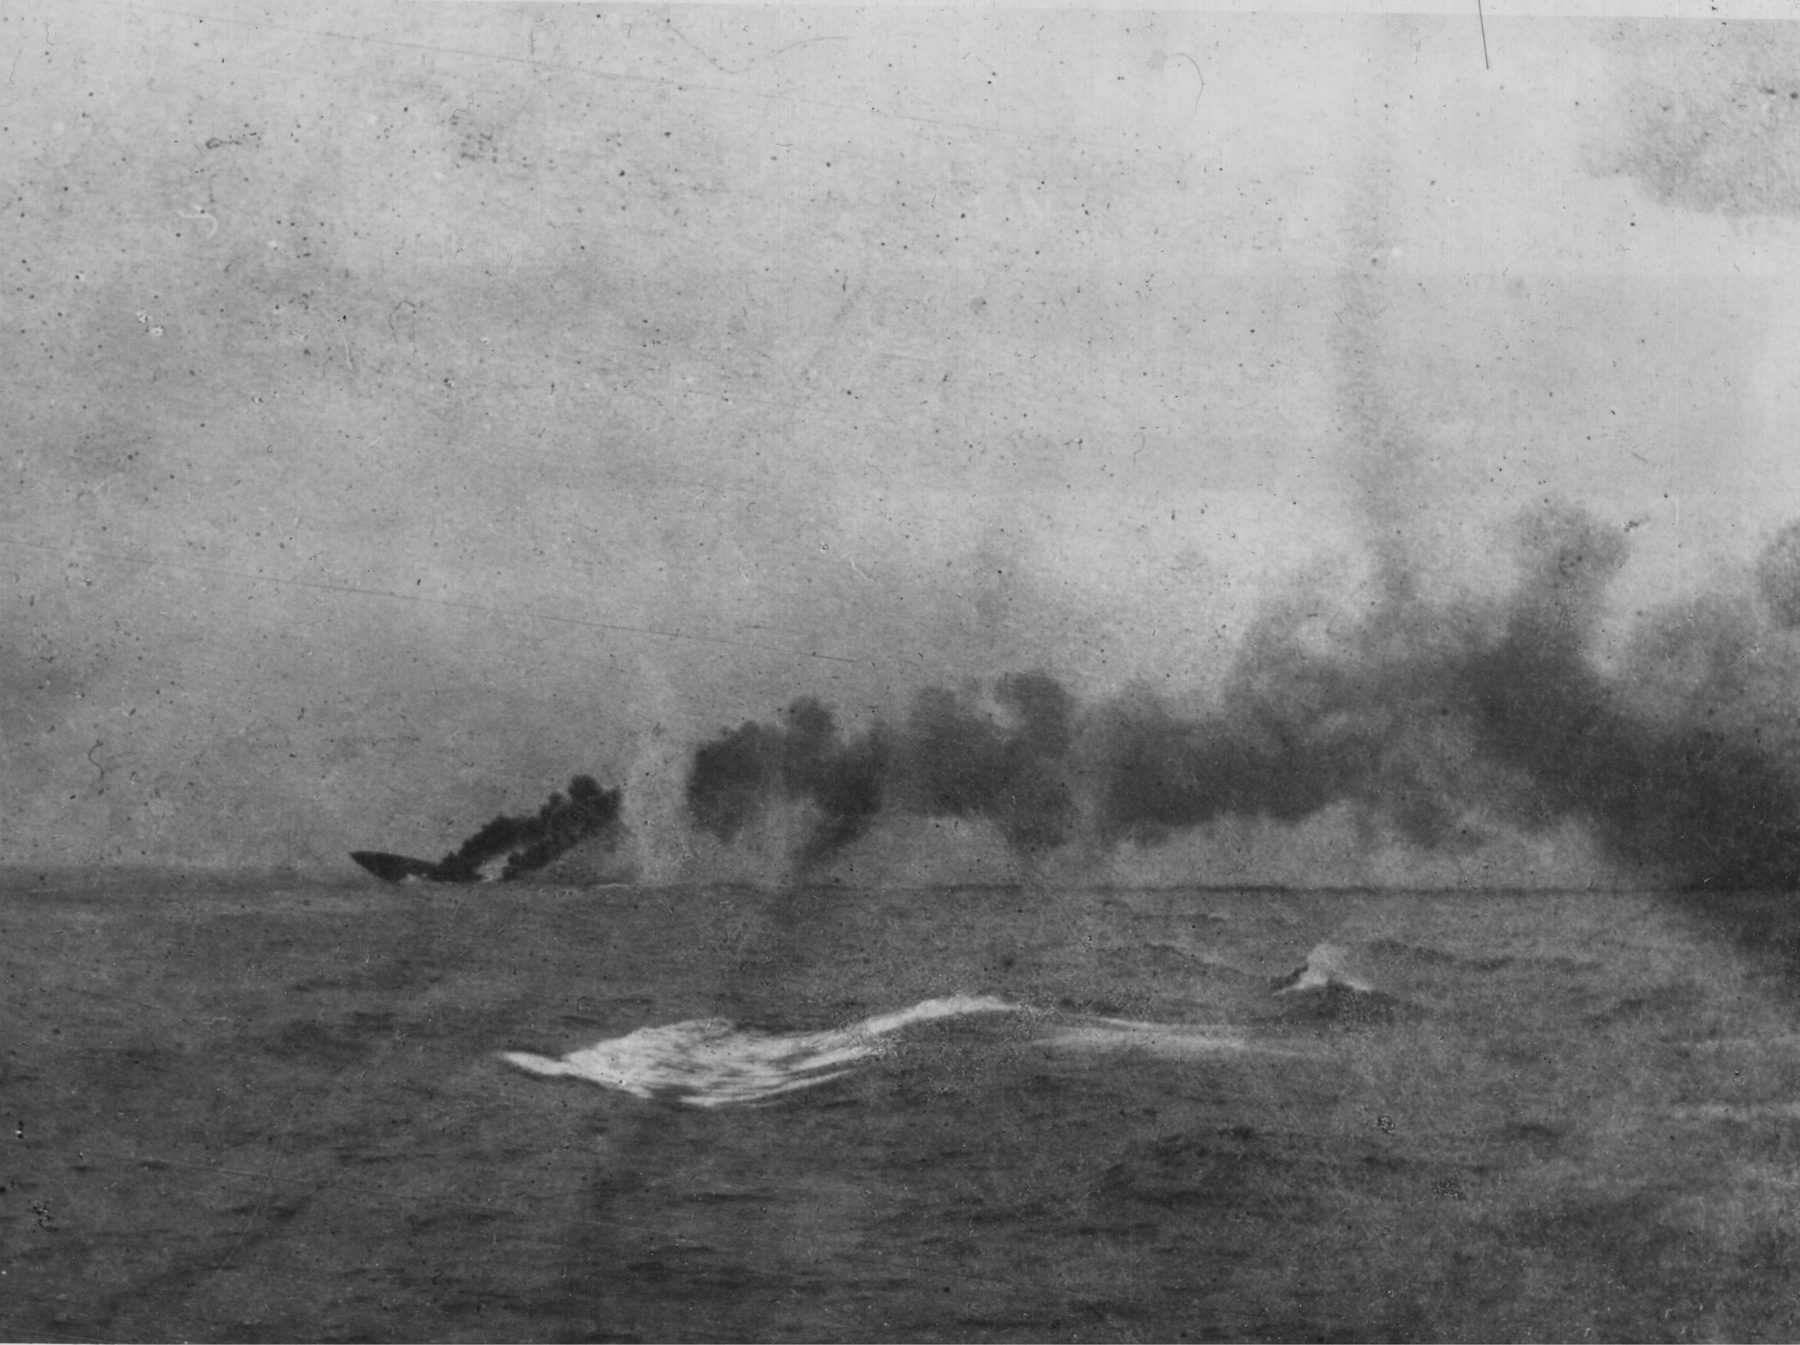
Indefatigable sinking in the distance at the Battle of Jutland
After Indefatigable's loss New Zealand shifted her fire to Von der Tann in accordance with Beatty's standing instructions. The range had grown too far for accurate shooting so Beatty altered course four points to port to close the range again between 4:12 and 4:15. By this time the 5th Battle Squadron of four Queen Elizabeth-class battleships had close up and was engaging Von der Tann and Moltke. At 4:23 a 13.5-inch (340 mm) shell from Tiger hit near Von der Tann's rear turret and started a fire among the practice targets stowed there that completely enveloped the ship and caused New Zealand to shift fire to Moltke.[55] At 4:30 the light cruiser Southampton, scouting in front of Beatty's ships, spotted the lead elements of the High Seas Fleet charging north at top speed. Three minutes later she sighted the topmasts of Vice-Admiral Reinhard Scheer's battleships, but did not transmit a message to Beatty for another five minutes. Beatty continued south for another two minutes to confirm the sighting himself before ordering a sixteen point turn to starboard in succession. New Zealand, last ship in the fleet, turned prematurely to stay outside the range of the oncoming battleships.[56] During the entire 'Run to the South' she was hit only once, in 'Y' turret by a 28 cm shell with little effect.[39]
New Zealand was engaged by the battleship Prinzregent Luitpold beginning at 5:08 during what came to be called the 'Run to the North', but she was not hit, although she was straddled several times.[57] Beatty's ships maintained full speed to try and put some separation between them and the High Seas Fleet and gradually moved out of range. They turned north and then northeast to try and rendezvous with the main body of the Grand Fleet. At 5:40 they opened fire again on the German battlecruisers. The setting sun blinded the German gunners and they could not make out the British ships and turned away to the northeast at 5:47.[58] Beatty gradually turned more towards the east to allow him to cover the deployment of the Grand Fleet into its battle formation and to move ahead of it, but he mistimed his maneuvre and forced the leading division to fall off towards the east, further away from the Germans. By 6:35 Beatty was following Indomitable and Inflexible of the 3rd BCS as they were steering east-southeast, leading the Grand Fleet, and continuing to engage Hipper's battlecruisers to their southwest. A few minutes earlier Scheer had ordered a simultaneous 180° starboard turn and Beatty lost sight of them in the haze.[59] Twenty minutes later Scheer ordered another 180° turn which put them on a converging course again with the Grand Fleet, which had altered course itself to the south. This allowed the Grand Fleet to cross Scheer's T and they badly damaged his leading ships. Scheer ordered yet another 180° turn at 7:13 in an attempt to extricate the High Seas Fleet from the trap in which he had sent them.[60]
This was successful and the British lost sight of the Germans until 8:05 when Castor spotted smoke bearing west-northwest. Ten minutes later she'd closed the range enough to identify German torpedo boats and engaged them. Beatty turned west upon hearing the sounds of gunfire and spotted the German battlecruisers only 8,500 yards (7,800 m) away. Inflexible opened fire at 8:20, followed almost immediately by the rest of Beatty's battlecruisers.[61] New Zealand and Indomitable concentrated their fire on Seydlitz and hit her five times before she turned west to disengage.[62] Shortly after 8:30 the pre-dreadnought battleships of Rear Admiral Mauve's II Battle Squadron were spotted and fire switched to them. The Germans only were able to fire a few rounds at them due to the poor visibility and turned away to the west. The British battlecruisers hit the German ships several times before they blended into the haze around 8:40.[63] After this Beatty changed course to south-southeast and maintained that course, ahead of both the Grand Fleet and the High Seas Fleet, until 2:55 the next morning when the order was given to reverse course.[64]
Post-Jutland careers[]
Australia rejoined the 2nd BCS on 9 June 1916 as the squadron flagship, but there was little significant naval activity for the Indefatigables, other than routine patrolling, thanks to the Kaiser's order that his ships should not be allowed to go to sea unless assured of victory. Australia collided with Repulse on 12 December 1917 and was under repair through the following month. She was present at the internment of the High Seas fleet at Scapa Flow on 21 November 1918. New Zealand was refitted between December 1918 and February 1919 for Admiral Jellicoe's year-long tour of India and the Dominions and she was paid off upon her return on 15 March 1920 into reserve. She was sold for scrap on 19 December 1922. Australia sailed for Australia on 23 April 1921 and became flagship of the Royal Australian Navy upon her arrival. Pursuant to the terms of the Washington Naval Treaty she was scuttled east of Sydney on 12 April 1924.[65]
References[]
- Notes
- ↑ The Indefatigable-class ships were formally known as armoured cruisers until 1911 when they were redesignated as battlecruisers by an Admiralty order of 24 November 1911. Unofficially a number of designations were used until then, including cruiser-battleship, dreadnought cruiser and battle-cruiser. See Roberts, pp. 24–25
- ↑ Beatty had intended on retaining only the two rearmost light cruisers from Goodenough's squadron; however, Nottingham's signalman misinterpreted the signal, thinking that it was intended for the whole squadron, and thus transmitted it to Goodenough, who ordered his ships back into their screening positions ahead of Beatty's battlecruisers.
- ↑ The times used in this section are in UTC, which is one hour behind CET, which is often used in German works.
- Footnotes
- ↑ Roberts, pp. 28–29
- ↑ Lambert, pp. 64–67
- ↑ Roberts, p. 29
- ↑ 4.0 4.1 Bell and Elleman, p. 124
- ↑ The Naval Annual 1923, diagram of Indefatigable class, which states "the diagrams show also the obsolescent ships Indomitable and Inflexible; but in the New Zealand and Australia the centre turrets are more en echelon than in the two earlier ships."
- ↑ Roberts, p. 28
- ↑ Roberts, pp. 43–44
- ↑ Roberts, pp. 70–75
- ↑ Roberts, pp. 76, 80
- ↑ Roberts, p. 76
- ↑ Conway's, p. 26
- ↑ Roberts, pp. 81–84
- ↑ "Britain 12"/45 (30.5 cm) Mark X". navweaps.com. 30 January 2009. http://www.navweaps.com/Weapons/WNBR_12-45_mk10.htm. Retrieved 11 November 2009.
- ↑ 14.0 14.1 14.2 Roberts, p. 83
- ↑ Roberts, p. 97
- ↑ 17.0 17.1 Campbell (1978), p. 13
- ↑ "British 12-pdr [3"/45 (76.2 cm) 20cwt QF HA Marks I, II, III and IV"]. navweaps.com. 27 February 2007. http://www.navweaps.com/Weapons/WNBR_3-45_mk1.htm. Retrieved 11 November 2009.
- ↑ "Britain 6-pdr / 8cwt [2.244"/40 (57 mm) QF Marks I and II"]. navweaps.com. 16 May 2008. http://www.navweaps.com/Weapons/WNBR_6pounder_m1.htm. Retrieved 11 November 2009.
- ↑ Burt, p. 91
- ↑ Roberts, pp. 90–91
- ↑ Roberts, p. 91
- ↑ The Director Firing Handbook, 1917. pp. 88, 142.
- ↑ The Director Firing Handbook, 1917. p. 88.
- ↑ Roberts, pp. 92–93
- ↑ 26.0 26.1 Roberts, p. 112
- ↑ Brown, p. 57
- ↑ Roberts, pp. 109, 112
- ↑ Burt, p. 94
- ↑ Roberts, p. 113
- ↑ Campbell (1978), p. 14
- ↑ Brassey's Naval Annual 1914, pp. 192–99, 206
- ↑ Parkes, pp. 513–17
- ↑ Gillett, p. 128
- ↑ "HMAS Australia (I)". http://www.navy.gov.au/hmas-australia-i. Retrieved 5 October 2012.
- ↑ Massie, p. 39
- ↑ Massie, pp. 45–46
- ↑ Carlyon, p. 47
- ↑ 39.0 39.1 Burt, p. 103
- ↑ Jose, pp. 78-81
- ↑ Jose, p. 25
- ↑ Jose, pp. 125–27
- ↑ 43.0 43.1 Burt, p. 104
- ↑ Massie, pp. 109–13
- ↑ Massie, pp. 333–34
- ↑ Massie, pp. 342–43
- ↑ Tarrant, p. 34
- ↑ Massie, pp. 376–384
- ↑ Massie, pp. 385–406
- ↑ Conway's, p. 27
- ↑ Tarrant, pp. 69, 71, 75
- ↑ Tarrant, pp. 80–85
- ↑ Roberts, p. 116
- ↑ Tarrant, p. 85
- ↑ Tarrant, pp. 89–90
- ↑ Massie, pp. 595–600
- ↑ Tarrant, p. 100
- ↑ Tarrant, p. 109
- ↑ Tarrant, p. 130–38
- ↑ Tarrant, pp. 149, 157
- ↑ Tarrant, p. 175
- ↑ Campbell (1998), p. 272
- ↑ Tarrant, pp. 177–78
- ↑ Tarrant, p. 178, 224
- ↑ Roberts, p. 123
- Bibliography
- Bell, Christopher M.; Elleman, Bruce A. (2003). Naval Mutinies of the Twentieth Century: An International Perspective. London: Frank Cass. ISBN 0-7146-5460-4.
- Brown, David K. (2003). The Grand Fleet: Warship Design and Development 1906–1922 (reprint of the 1999 ed.). London: Caxton Editions. ISBN 1-84067-531-4.
- Burt, R. A. (1986). British Battleships of World War One. Annapolis, MD: Naval Institute Press. ISBN 0-87021-863-8.
- Campbell, John (1998). Jutland: An Analysis of the Fighting. New York: Lyons Press. ISBN 1-55821-759-2.
- Campbell, N. J. M. (1978). Battle Cruisers. Warship special. 1. Greenwich: Conway Maritime Press. ISBN 0-85177-130-0.
- Carlyon, Les (2001). Gallipoli. London: Transworld Publishers. ISBN 0-385-60475-0.
- Gardiner, Robert; Gray, Randal, eds (1984). Conway's All the World's Fighting Ships: 1906-1922. Annapolis: Naval Institute Press. ISBN 0-85177-245-5.
- Hythe, Viscount, ed (1914). The Naval Annual 1914. London: Brassey's.
- Gillett, Ross (1977). Warships of Australia. Rigby Limited. ISBN 0-7270-0472-7.
- Jose, Arthur W. (1941). The Royal Australian Navy, 1914–1918. Official History of Australia in the War of 1914–1918, Volume X (9th ed.). Sydney: Angus and Robertson. http://www.awm.gov.au/histories/first_world_war/volume.asp?levelID=67895.
- Lambert, Nicholas (1996). "Economy or Empire?: The Fleet Unit Concept and the Quest for Collective Security in the Pacific, 1909–14". Far-Flung Lines: Essays on Imperial Defense in Honour of Donald Mackenzie Schurman. London: Frank Cass. ISBN 0-7146-4216-9.
- Massie, Robert (2004). Castles of Steel: Britain, Germany and the winning of the Great War. London: Random House. ISBN 0-224-04092-8.
- Parkes, Oscar (1990). British Battleships (reprint of the 1957 edition ed.). Annapolis, MD: Naval Institute Press. ISBN 1-55750-075-4.
- Roberts, John (1997). Battlecruisers. Annapolis, MD: Naval Institute Press. ISBN 1-55750-068-1.
- Tarrant, V. E. (1999). Jutland: The German Perspective: A New View of the Great Battle, 31 May 1916 (reprint of the 1995 ed.). London: Brockhampton Press. ISBN 1-86019-917-8.
- Admiralty, Gunnery Branch. (1917). The Director Firing Handbook. O.U. 6125 (late C.B. 1259). Copy No. 322 at The National Archives at Kew..
External links[]
| Wikimedia Commons has media related to Indefatigable class battlecruiser. |
- Dreadnought Project Technical material on the weaponry and fire control for the ships
| |||||||||||
| ||||||||||||||||||||||||||||||||||||||||||||||||||
The original article can be found at Indefatigable-class battlecruiser and the edit history here.