| Kaiten | |
|---|---|
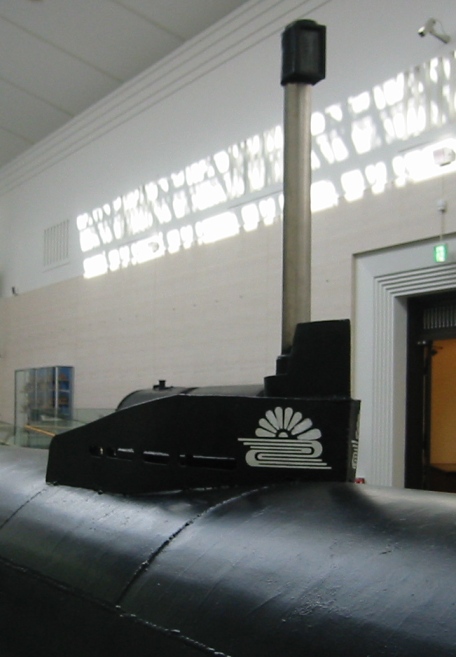
 A Kaiten, Type 1, Tokyo Yasukuni War Memorial Museum | |
| Type | Human torpedo |
| Place of origin | Empire of Japan |
| Service history | |
| In service | 1944–1945 |
| Used by | Imperial Japanese Navy |
| Wars | World War II |
| Production history | |
| No. built | approx. 420 |
| Variants |
Type 1 Type 1 Mod.1 Type 1 Mod.2 Type 2 (prototype only) Type 3 (only a project) Type 4 (approx. 50 produced) Type 5 (only a project) Type 6 (only a project) Type 10 (1+2 or 1+6 produced) |
| Specifications | |
|
| |
Guidance system | Manually piloted with gyroscopic stabilisation and automatic running. |
Launch platform | Submarine, surface ship, and coastal bunker |
Kaiten (回天, literal translation: "Return to the sky", commonly rendered as: "The turn toward heaven", "The Heaven Shaker" or "Change the World"[1]) were manned torpedoes and suicide craft, used by the Imperial Japanese Navy in the final stages of World War II.
History[]

Kaiten Type 1 periscope, Tokyo Yasukuni War Memorial.
In recognition of the unfavorable progress of the war, towards the end of 1943 the Japanese high command considered suggestions for various suicide craft. These were initially rejected, but later deemed necessary.[2] Various suicide mission vehicles were developed in the Japanese Special Attack Units.
For the Navy this meant Kamikaze planes, Shinyo suicide boats, Kaiten submarines and Fukuryu suicide divers or human mines. The Kamikazes were somewhat successful, and the second most successful were the Kaitens.[3]
Research on the first Kaiten began in February 1944, followed on 25 July of the same year by the first prototype. By 1 August, an order for 100 units had been placed.[4]
Development[]
The very first Kaiten was nothing much more than a Type 93 torpedo engine compartment attached to a cylinder that would become the pilot's compartment with trimming ballast in place of the warhead and other electronics and hydraulics. The torpedo's pneumatic gyroscope was replaced by an electric model and controls were linked up to give the pilot full control of the weapon.
The original designers and testers of this new weapon were Lieutenant Hiroshi Kuroki and Lieutenant Sekio Nishina. They were both to die at the controls of Kaitens, Lieutenant Kuroki in a very early training prototype.[5][6][7][8]
In total six models of Kaiten were designed, Types 1, 2, 4, 5 and 6 being based on the Type 93 torpedo. The Type 10 was the only model based on the Type 92 torpedo. Types 2, 4, 5, 6 and 10 were only manufactured as prototypes and never used in combat.[2]
Early designs allowed the pilot to escape after the final acceleration toward the target. There is no record of any pilot attempting to escape or intending to do so, and this provision was dropped from later Kaitens, so that, once inside, the pilot could not unlock the hatches. The Kaiten was fitted with a self-destruct control, intended for use if an attack failed or the impact fuse failed.[9][10]
Pilots[]
Kaiten pilots were all men aged between 18 and about 26. In the event of their being killed in action, their families were promised a ¥10000 reward.[citation needed] It is thought[by whom?] that because of the wartime economy and political climate there was often little choice but to volunteer for Kaiten (or other suicide) duty[citation needed].
The island of Otsushima in the Inland Sea was used as a training site. It was equipped with cranes, torpedo testing pits and launch ramps, and had a large shallow bay for test running and firing. The Kaiten Memorial Museum is now situated there.
Initial training consisted of sailing fast surface boats by periscope and instrument readings alone. When a pilot had advanced past this basic training, he would begin training on Kaitens. Training craft were fitted with a dummy warhead that contained telemetry equipment and an emergency blowing tank that could return the craft to the surface should the trainee dive to a dangerous depth. Kaiten training started with basic circular runs to and from a fixed landmark at a reduced speed; the training advanced to faster and more hazardous runs around rocks and through channels in deeper waters. The more difficult runs required the pilot to surface and check the periscope repeatedly and also required conscientious adjusting of trim tank levels because of the reducing weight as oxygen was used up. When the instructors were confident of the pilot's abilities, he would be advanced to training in open waters against target ships. Training at this level was often done at full attack speed and at night or in twilight. The final phase of training would be a submarine launch and more open water attack runs on target ships.[2][11]
Training was dangerous, and 15 men died in accidents, the most common being from collision with the target vessel. Although the warheads were only dummies, the impact at ramming speed was enough to not only cripple the Kaiten but also severely injure the pilot.[12]
In action, the Kaiten was always operated by one man, but the larger training models (Types 2, 4 and 5) could carry two or even four.
Kaiten pilots who were leaving for their final missions would leave testaments and messages behind for their loved ones.[13]
Deployment[]


Map of known Kaiten base locations at the end of World War II.


Kaiten Type 1 being 1st trial launched from the light cruiser Kitakami.
Kaitens were designed to be launched from the deck of a submarine or surface ship, or from coastal installations as a coastal defence weapon. The only surface ship recorded as equipped to launch Kaitens was the cruiser Kitakami, which took part in sea launch trials of Type 1 Kaitens.[14][15]
In practice, only the Type 1 craft, using the submarine delivery method, were ever used in combat. Specially equipped submarines carried two to six Kaiten, depending on their class. The Kaitens were lashed to the host vessel on wooden blocks with a narrow access tube connecting the submarine to the lower hatch of the Kaiten. This allowed the Kaiten crew to enter from the host submarine while submerged.
Kaitens had a very limited diving depth, which in turn limited the diving depth of the host submarine. This is one of several factors blamed for the very poor survival rate of submarines using them, eight submarines being lost for the sinking of only two enemy ships and damage to several others.
Once the target was acquired and the host submarine was within range the pilot was briefed, the Kaiten's starting air bottles were charged and the cockpit was ventilated. The pilot then entered the vessel, the gyroscope was programmed with the correct bearing and depth and the pilot was given his final briefing.
The Kaiten separated from the host submarine and headed at speed in the direction fed into the gyroscope. Once within final attack range the Kaiten would surface and the pilot would check his range and bearing via periscope and make any adjustments necessary. He would then submerge to a suitable depth, arm the warhead and proceed on his final attack run. If he missed he could make adjustments and try again. If the mission failed he would detonate his vessel as a last resort.[2]
Types[]
Of the six different type classes created, only four were ever significant enough to be noted by the American technical missions to post-war Japan.
Type 1[]
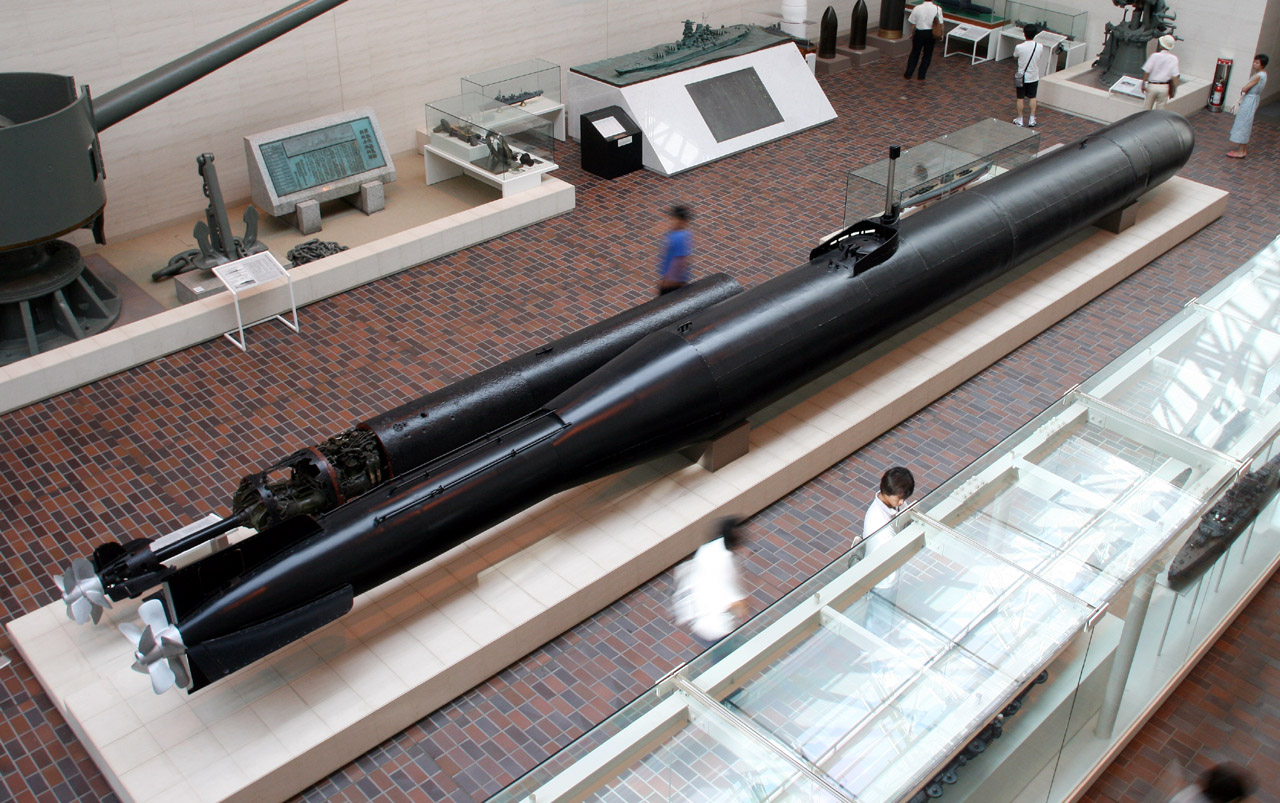
Only the Type 1, a one-man model with a 1,550 kg (3,420 lb) warhead, was used operationally. Over 300 were built, more than 100 of which were sent on suicide missions.[2][16]
General arrangement[]


Schematic of a Kaiten type 1.
The Type 93 torpedo formed the majority of this model of Kaiten with the only alterations being the warhead yield being increased from 490 kg (1,080 lb) and the control planes enlarged and altered to allow both gyroscope and pilot control. Between the torpedo warhead and the engine section is the torpedo compressed air flask, 6 (or 8 in later models) steering air bottles and the forward trim tank, followed by the control area and the pilot's seat. In later models the 5.5 l (9.7 imp pt) Tetrachloromethane starting air bottle is located in the cockpit and a further smaller trimming tank is supplied for use at initial launch. The engine section is slotted in above the aft trim tank with the joint protected by a sheet metal cowl.
The pilot's compartment was entered from below through the lower hatch, which was mated to the host submarine. There was a small hand-operated periscope with a vertical range of about 70 cm, controls to arm and detonate the weapon if the attack failed and steering, velocity and depth controls. Batteries to power the 20,000rpm gyroscope were located under the pilot's seat.
The air was filtered by sodium peroxide stored in the pilot's compartment.
The Type 6 Kaiten was a Type 1 with a modified forward air tank.
Performance[]
After initial trials in water it was decided to have a maximum surface cruising speed and, for technical reasons, a minimum running speed at any depth of 9.5 km/h (5.1 kn) and a submerged running trim of 1–3° nose-down.
During development and use several problems were encountered, the most pressing being major water leaks into the pilot's chamber during transport and deep diving and explosions caused by ingress of water into the torpedo engine. These were never fully eliminated during the weapon's active service.
Specifications[]

A Kaiten Type I, Tokyo Yasukuni War Memorial Museum.
- Total weight: 8.3 t (9.1 short tons)
- Length: 14.75 m (48.4 ft)
- Diameter:: 1 m (3.3 ft)
- Warhead 1,550 kg (3,420 lb)
- Detonation mechanism: Contact, Manual electric fuze
- Engine: Type 93 torpedo engine. Wet heater Double action Reciprocating 2 cylinder 410 kW (550 hp)
- Propellant: Kerosene and oxygen
- Maximum range: 78 km (42 nmi)
- Cruising speed: 22 km/h (12 kn)
- Maximum speed: 56 km/h (30 kn)
- Maximum operating depth: 80 m (260 ft)
- Number built: approx. 330 produced
Type 2[]
[2][16] In late 1944, Type 2 prototypes were tested in dry-dock and in controlled submerged conditions, however they never met a standard satisfactory for open water running.
General arrangement[]


Schematic of a Kaiten type 2.
The Type 2 was fueled by diesel fuel oxidized by the product of the reaction between hydrogen peroxide and hydrazine hydrate catalyzed by potassium cuprocyanide (potassium cuprocyanide), water was also used as a diluent in the combustion cycle. The engine was a bespoke design specifically created to satisfy the requirements of the Kaiten. It was of a U8 configuration and was in the aft compartment of the vessel. This compartment was open to the sea, with seawater used as coolant. The complete operation of the engine had to be simple for a pilot who was already under immense stress, so it was designed to be controlled by a single lever.
The general construction of the Type 2 is substantially different than that of the Type 1. In the forward part of the vessel is the warhead, followed by the fuel, trimming and 2 steering air tanks. The forward part of the midsection is occupied by the 2,600 l (570 imp gal) hydrogen peroxide chamber. This cylindrical tank required a complicated construction of welding 5 ribs evenly spaced around the circumference, then coating the inside of the tank with tin, then asphalt and finally with a thick tin plating. Construction of each tank took on average 2 weeks and the skill required was very high.
Behind the peroxide chamber is the pilot's compartment. This is much more complex with more controls than that of the Type 1. From fore to aft controls available to the pilot are: depth control gear, trim tank controls, electric switches, gyroscope, rudder control, engine control lever, gauges for various applications, warhead safety gear, engine starter, fuel flow control, and lights with their respective switches.
In the aft quarter of the vessel are found the battery for the gyroscope and other electrics, the aft trim tanks and 2 hydrazine hydrate containers. These containers are made of steel lined with a rubber bag to prevent sea water (which is used to force the hydrazine hydrate to the engine) and the hydrazine hydrate from coming into contact with each other. Immediately behind these tanks is an auxiliary water tank, then the engine compartment.
The engine compartment is always completely filled with sea-water, so has only mechanical components. Immediately after the midsection is the generator, then the engine, followed by the reduction gears and finally the propeller and control planes.
Performance[]
The Type 2 had several improvements over the Type 1. It could stay relatively reliably on course with no pilot input and could withstand depths twice as deep as those of the Type 1.
Many problems were encountered in the design and engineering of the Type 2, mostly relating to the engine. In initial tests water pressure caused deformation and seizing of the engine; although strengthening was added the problem was never fully resolved. Once the engine was installed in a prototype Type 2 it was unable to reach the required power rating and this, along with the complexity of the manufacturing process of the Type 2 itself, led to the abandonment of the project.
Specifications[]


Inside the hydrogen peroxide chamber of a type 2 kaiten.
- Total weight: 18.37 t (18.08 long tons)
- Length: 16.5 m (54 ft)
- Diameter:: 1.35 m (4.4 ft)
- Warhead 1,500 kg (3,300 lb)
- Detonation mechanism: Contact, manual electric fuze
- Engine: 4.3 l (260 cu in) U8 engine. Wet heater 1,110 kW (1,490 hp)
- Propellant: Diesel, hydrogen peroxide, hydrazine hydrate, and sea water
- Maximum range: 83 km (45 nmi)
- Maximum speed: 75 km/h (40 kn)
- Maximum operating depth: 100 m (330 ft)
- Number built: 1 prototype (Hiro Naval Arsenal: 1)[17]
Type 4[]
[2][16] In early 1945, concerned with the slow pace of development and the unreliability of the supply of hydrogen peroxide, the Japanese admiralty decided to pursue another line of Kaiten development. Engineers responsible for Kaiten development were opposed to any new work and wished to continue their efforts on development and production of the Type 1.
In all about fifty Type 4 prototypes were made, however they never went into full-scale production and were ultimately abandoned.
General arrangement[]


Schematic of a Kaiten type 4.
The Type 4 was an attempt to modify the Kaiten Type 2, to be fueled by the same kerosene and oxygen combination as the Type 93, Model 3 torpedo. The dimensions, equipment and engine were all identical to the Type 2 although the arrangement differed in several key areas.
The warhead is identical to the Type 2, although some later models had an access cover at the after end of the warhead.
The forward end of the forward section contains the air vessels, there are four in this section, one Type 93 torpedo air vessel flanked either side by 2 small trim tanks on the keel and three smaller vessels directly above it. The vessels are held in place simply with wood packing. The smaller air vessels are a proprietary design that took some heavy research to perfect. They are sealed by the pressure of the gas, as the pressure rises, a slackly threaded cap presses up against a sealing ring which is screwed down with another cap, thus making an airtight seal. Directly aft of the air vessels is the fuel tank which is ringed by the main forward trim tanks. The fuel tank is lightly constructed and contains baffles to prevent sloshing. Just behind this are the 4 steering air bottles.
The pilot's space is identical to that of the Type 2 (minus hydrogen peroxide specific circuit controls). Immediately behind the pilot are three more of the smaller oxygen cylinders however in some models these are omitted and chairs are placed for training purposes. Between the bulkheads joining this section with the engine section are two Type 93 generators, feeding the same Type 6 engine as in the Type 2 kaiten.
The Type 5 Kaiten was a Type 4 with a modified forward air vessels.
Performance[]
The first unmanned test runs of the Type 4 at cruising speed were made in early 1945, and it was noted that oxygen efficiency was very low. The same problem occurred in the first test run with a pilot, with sensor readings indicating a large percentage of unburned oxygen in the exhaust gasses.
The weapon made little progress in development and never exceeded a speed of 40 km/h in open sea trials; this combined with untraceable leaks in the engine and the consequent inefficiency of the propulsion system led to this design being filed as a failure and its eventual abandonment. The fact that by now the Kaiten Type 1 was in mass production was also a factor in the cancellation of the Type 4.
Specifications[]
- Total weight: 18.17 t (20.03 short tons)
- Length: 16.5 m (54 ft)
- Diameter: 1.35 m (4.4 ft)
- Warhead 1,800 kg (4,000 lb)
- Detonation mechanism: Contact, manual electric fuze
- Engine: 4.3 l (260 cu in) U8 engine. Wet heater 900 kW (1,200 hp)
- Propellant: Kerosene and oxygen
- Maximum range: 38 km (21 nmi)
- Maximum speed: 37 km/h (20 kn)
- Maximum operating depth: 100 m (330 ft)
- Number built: approx. 50 produced[18]
Type 10[]
[2][16] The abandonment of the Types 2, 4 and their intermediaries, development of higher capacity batteries, abundance of Type 92 torpedoes and the ever increasing urgency to be able to defend the Japanese mainland led to a change of methodology for the Kaiten design teams. The Type 10 is the result. It is essentially a Type 92 electric torpedo with a pilot chamber in-between the warhead and drive unit.
Over 500 units were ordered to be produced between August and October 1945, however, only around 6 (including prototypes) were ever completed.
General arrangement[]


Schematic of a Kaiten type 10.
The Type 10 is significantly smaller than the Type 1 and consequently has a much smaller warhead of 300 kg (660 lb). The forward section of the weapon contains the warhead and the manual electric fuze, but no contact detonator unlike other kaiten types. The midsection contains the first set of Type 92 batteries as well as a steering air bottle strapped to the underneath of the weapon. The pilot's compartment contains firing, starting and gyroscope starting switches as well as a fixed periscope that could only be rotated but not raised or lowered, the rudder control, trim gauge and a sodium peroxide tin for air purification. The latter part of the weapon contained the remainder of the batteries and a small external steering air bottle. The control planes are identical to the Type 92 torpedo's other than having a manually operated rudder fitted.
Unlike all previous Kaitens the Type 10 only had an upper hatch, so could not be entered from within a host submarine. This reflects the design and operation purpose of the weapon as a land-launched coastal defense weapon.
Performance[]
On paper this model had several advantages over the previous types. Firstly it was very simple to construct and maintain. Because it had no pilot controls other than to start and steer it was not complicated to train pilots to use it. It was powered by electricity and consequently had no issue of weight reduction as the fuel was used up, a problem that had caused headaches for test pilots and combat pilots of all previous models. Unlike other models the engine of the Type 10 could be stopped and even reversed, although this would be of little practical value in a combat situation. Finally, it was very light and small, so it was easily transported to different bases of operation should the need arise.[19]
In practice however, the Type 10 proved to be troublesome. Water leaks into the battery compartments and pilot's compartment were commonly reported by test pilots. It was also very cramped and uncomfortable for the pilot. The war ended before development could really iron out these problems so the type never went into mass production.
Deployment plans[]
The Type 10 was designed and intended as a coastal defense weapon to counter the expected invasion of the Japanese mainland by Allied troops. On 16 July 1945 the Imperial Japanese Naval command ordered the construction of over 500 Type 10s to be stationed and readied for launch from several existing and new kaiten bases. Details available in the Deployment section above.[19]
Specifications[]


A kaiten type 10 on display at the Yamato Museum.
- Total weight: 3 t (3.3 short tons)
- Length: 9.0 m (29.5 ft)
- Diameter: 0.70 m (2.3 ft)
- Warhead 300 kg (660 lb)
- Detonation mechanism: Manual electric fuze
- Engine: Electric motor 6 kW (8.0 hp)
- Propellant: 112 (28×4) battery cells producing 54 V at 120 A
- Maximum range: 3.5 km (1.9 nmi)
- Maximum speed: 13 km/h (7.0 kn)
- Maximum operating depth: 20 m (66 ft)
- Number built: 1 prototype and 2 or 6 produced[20]
Effectiveness[]


_20_November_1944.jpg)
USS Mississinewa, victim of a kaiten attack, 20 November 1944.
When compared with the Type 93 torpedo which was surface-vessel–launched, Kaitens had the obvious advantages of having a pilot to guide the weapon, and of being launched from a submerged submarine. Despite these advantages, however, they were not nearly as effective on a one-for-one basis as the highly successful Type 93 torpedo on which they were based. United States sources claim that the only sinkings achieved by Kaiten attacks were the fleet oiler USS Mississinewa on 20 November 1944, with the loss of 63 men,[21] a small infantry landing craft (LCI-600), with the loss of three men[22] and the destroyer escort USS Underhill on 24 July 1945, with the loss of 113 men.[23]
Contrary to the above, some Japanese sources give much larger numbers of Kaiten successes. Reasons given for this discrepancy are the fact that the submarine launching the Kaiten could only estimate success by listening for the detonation of their weapons, also that the size of the explosion after the attack on the USS Mississinewa gave the impression of a much larger number of ships sunk.
American losses credited to Kaiten attacks came to a total of 187 officers and men. The losses of Kaiten crews and support staff were much higher. In total 106 Kaiten pilots lost their lives (including 15 killed in training accidents and two suicides after the war). In addition to the pilots, 846 men died when eight Japanese submarines carrying Kaiten were sunk, and 156 maintenance and support personnel were also killed.[24] This contrasts markedly with the success of the Kamikaze pilots.[25]
Deployments[]
First[]
The Kikusui group (菊水隊) of kaitens was launched against hostile vessels near Ulithi on 20 November 1944. The group consisted of two submarines, I-47 and I-36, carrying a total of eight Kaiten.
This mission gave the Kaitens their first sinking, the USS Mississinewa, but at the cost of all eight Kaiten pilots. The first Kaiten launched from I-47 was piloted by Sekio Nishina, one of the original designers of the weapon. He carried with him the ashes of the other creator, Hiroshi Kuroki, who died in a training accident very early in the Kaiten's development.[26][27]
At the same time, submarine I-37 was sighted and engaged by US ships off of Leyte Island. The boat, together with her Kaitens, was sunk by hedgehog attack from the destroyers USS Conklin and USS McCoy Reynolds, resulting in the loss of 117 officers and men.[24]
Second[]
The Kongō group (金剛隊) of Kaiten operation was undertaken on 9 January 1945 against the U.S. anchorage at Hollandia, Ulithi, Manus and Kossol Roads.
I-47 launched a further four Kaitens but only succeeded in damaging the SS Pontus H Ross, a small "Liberty ship".[26][28]
At Ulithi I-48 was sunk by USS Conklin. None of the 122 men aboard survived.[24]
I-36 engaged US ships with Kaitens at Ulithi on 12 January 1945. One was destroyed by depth charges from VPB-21 but the others succeeded in damaging USS Mazama (With 8 fatalities) and sinking an infantry landing craft (USS LCI(L)-600) (With 3 deaths).[22]
I-53 succeeded in launching her four Kaitens, but only 2 traveled any distance and none reached their targets.
I-58 launched all four Kaiten, of which one exploded immediately after launch. Sometime after deployment, pillars of smoke were seen in the distance along their general bearing.
I-56 failed to even reach the launching areas for her Kaitens and returned home without firing a single shot.[27][29]
Third[]
The Chihaya group (千早隊) departed on 20 February 1945 for Iwo Jima.
I-44 was sighted and hunted for over two days underwater; crew compartment carbon dioxide saturation reached 6% before she managed to escape.
I-368 was detected and attacked by a Grumman TBF Avenger on approaching Iwo Jima on 26 February and was sunk by Mark 24 Mines with the loss of all 85 hands.[24]
I-370 was detected and attacked by USS Finnegan on 26 February. After an initial hedgehog and depth charge run a final depth charge run was commenced and shortly after small explosions and bubbles were observed. I-370 was lost with all 84 officers and men aboard as well as all Kaitens and pilots.[24][27]
Fourth[]
The Shimbu group (神武隊) was originally intended to supplement the previous attacks on Iwo Jima and launched on 1 March 1945. I-58 and I-36 were within a day of reaching Iwo Jima when they were recalled for a new operation. Both returned home safely.[27]
Fifth[]
The Tatara group (多々良隊) consisted of I-44, I-47, I-56 and I-58 and was to attack the US anchorage at Okinawa. It sailed on 28 March 1945.
On 29 March I-47 was attacked by a squadron of Grumman TBF Avengers and forced to dive. She was pursued for several hours until she had to surface. On surfacing she was hit by shrapnel which damaged the periscope and fuel tanks. She was forced to limp home for repairs.[26]
I-56 was detected on approaching Okinawa and hunted by the light carrier USS Bataan and destroyers USS Heermann, USS Uhlmann, USS Collett, USS McCord and USS Mertz. Heavy depth charging by aircraft from the carrier and the latter three destroyers sank her with all 122 hands on board.[24]
I-58 was hounded by aircraft and anti-submarine fire and arrived at her destination late. She returned without engaging the enemy.
I-44s location and actions are unknown for the entirety of the mission. A submarine likely to be I-44 was attacked in the vicinity of Okinawa on 29 April by an aircraft from USS Tulagi. The submarine was hit first by a depth charge and finally by a mark 24 mine. All 129 hands were lost.[27]
Sixth[]
The Tembu group (天武隊) consisted of I-47 and I-36. They were to attack cargo and troop ships between Ulithi and Okinawa. I-47 sailed on 20 April and I-36 on 22 April.
On 27 April I-36 attempted to attack a convoy of 28 US ships with Kaitens, but with no results. Two of the Kaitens could not be launched. While cruising east of Okinawa I-36 sighted a supply vessel sailing unescorted. The commander attempted to launch Kaitens but failed, and a torpedo attack also failed when the torpedoes detonated prematurely.
On 2 May I-47 launched two Kaitens against two US ships, and explosions were heard an hour later, after which I-47 launched one Kaiten at an escort vessel. Later research indicates none of the Kaitens launched were successful and the explosions heard were probably from Kaiten pilots self-destructing or anti-submarine action.[24][27]
Seventh[]
The Shimbu group (振武隊) consisted solely of I-367 and sailed on 5 May 1945 for north-west Saipan. She was damaged by a mine on the 6 May and was unable continue her mission until 17 May. On 27 May I-367 sighted a four-ship logistics support convoy and launched two Kaitens. At least one was destroyed by gunfire from USS Sioux. The other Kaitens carried suffered mechanical failures and were unable to be launched. I-367 returned to base safely.[27]
Eighth[]
The Todoroki group (轟隊) of Kaiten-equipped submarines sailed on 24 May to patrol east of Guam.
I-36 sighted a lone oil tanker on 22 June and opened an attack with her Kaitens, which both failed, four conventional torpedoes fired exploded early, damaging USS Endymion, a landing craft repair ship. On 28 June I-36 launched a single Kaiten against USS Antares, which the Antares sank with shellfire and called in a nearby destroyer, the (USS Sproston). After the destroyer arrived and began depth charging, the submarine managed to launch one of the faulty Kaitens. Although the pilot failed to hit the destroyer, his actions helped the host submarine slip away. Further ships later arrived to hunt I-36, but she managed to escape with only a minor leak in the forward torpedo room and a damaged rudder. She would not see any further action in the war, and surrendered to the Allies after the official surrender was announced.[30]
On 16 June the US submarine USS Devilfish fired two torpedoes at the I-165, both of which missed. On 27 June, a patrolling Lockheed Ventura sighted I-165 and dropped three Mark 47 depth charges which sank her with her crew of 106.[24]
I-361 was detected by a minesweeper on 26 May, which alerted the aircraft carrier USS Anzio to search for the submarine. Five days later a patrolling Grumman TBF Avenger detected her and launched a volley of rocket fire, following up with a Mark 24 mine as the boat dived, the explosion of which was felt by the crew of USS Oliver Mitchell 30 km (16 nmi) away. The crew of 81 were all lost.[24]
On 28 May I-363 sighted several ships but was unable to get close enough to launch Kaiten. On 15 June a convoy was attacked with conventional torpedoes because Kaiten could not be launched due to heavy weather. I-363 returned to base safely.[27]
Ninth[]
The Tamon group (多聞隊) was the last Kaiten-equipped group to go into combat. It was a large force consisting of I-47, I-53, I-58, I-363, I-366 and I-367. They departed on 14 July headed for an area south-east of Okinawa. I-363 and I-367 engaged in no further action before the announcement of unconditional surrender and an end to all hostilities.
The I-47 launched a kaiten at a lone merchant on 21 July, but without result. She saw no further action.[27]
Sinking of the USS Underhill[]


_underway,_circa_in_late_1943.jpg)
The USS Underhill (DE-682)
- For more complete information, please see: Underhill sinking.
Arguably the most successful attack by Kaitens was that on the USS Underhill commenced on 24 July 1945. She was a unit of the numerous Buckley class and at the time of sinking was escorting several supply and troop ships. Subsequent to being spotted by a Japanese naval reconnaissance plane; submarine I-53 attached to the Tamon group and carrying six Kaitens was redirected to the expected location of the convoy.
The submarine launched a decoy mine ahead of the convoy's position causing the convoy to shift bearing to avoid the mine. This, however, was just diversionary and the mine was a dummy. The USS Underhill after realising this noticed several sonar contacts, which were later revealed to be a Japanese submarine and several Kaitens. A depth charge run was made which did not succeed in killing the submarine although it is suspected that it did succeed in neutralizing one of the Kaitens. The depth charge run was followed by a ramming attempt on a submarine at periscope depth.
As the Underhill rammed the surfaced vessel (later revealed to be a Kaiten) it was struck by a second Kaiten waiting in ambush. Both pilots detonated their charges, one of which led to the detonation of the destroyer's boilers, which led to her being torn in half by the explosions. The sinking resulted in the loss of almost half of her complement, including most of the officers.
One of the attacking Kaitens also attempted an attack on a cargo vessel, LST-991, but for some reason passed under the ship's keel. This may have been the same Kaiten which successfully rammed and sank the Underhill.[23][31]
Yutaka Yokota, a Kaiten pilot whose three missions were canceled due to mechanical failure, and who wrote a memoir of his kaiten experiences,[32] witnessed the attack on the Underhill. Following the successful attack on the Underhill, I-53 launched a further Kaiten at an unnamed vessel 6 days later. The attack was unsuccessful. On 3 August I-53 was detected by USS Earl V. Johnson and the destroyer began a series of unsuccessful Hedgehog attacks. I-53 launched two Kaitens separated by 30 minutes, explosions were heard, and it was confirmed that the destroyer was damaged in the attack. She escaped pursuit and returned home.
I-58 was patrolling the Guam-Leyte route on 28 July when she was forced to dive by an aircraft. A tanker and a destroyer, USS Lowry were sighted and the commander decided to attack. Two Kaitens were launched, one of which was sunk by gunfire and the other by ramming, damaging the destroyer slightly in the process. A day later, I-58 sighted the USS Indianapolis and the commander ordered two Kaitens prepared for attack. Once in firing range the commander realised it would be a waste of a Kaiten to attack such an easy target, and instead launched a spread of six Type 95 torpedoes, three of which hit, causing the cruiser to sink rapidly. On 9 August I-58 came across a convoy led by the USS Salamaua and readied three of her Kaitens to attack, of which only one could be launched. This was followed by another rapidly prepared, and both made for the USS Johnnie Hutchins. Although one narrowly missed the destroyer, both were destroyed by gunfire and depthcharging. The convoy searched for other submarines, but I-58 escaped. On 12 August a Kaiten was launched against USS Oak Hill and her escort USS Thomas F. Nickel. The kaiten passed under the destroyer, then surfaced and self-detonated. A second object was spotted by the destroyer and depth charges were launched, after which an explosion occurred. Whether this was a Kaiten is unknown, as all six of I-58's weapons were accounted for, but with two failures, perhaps one was repaired and launched later.[33]
On 11 August I-366 attacked a convoy north of Palau. The commander attempted to launch all of the Kaitens, but two failed, and the ones that were launched didn't score a hit or even explode. Less than a week later, Japan surrendered and all submarines were ordered home, and I-366 saw no further action.
Tenth[]
The Shinshū group (神州隊) consisting solely of I-159, sailed on 16 August 1945 to attack Russian convoys in the Sea of Japan. The mission was cancelled by headquarters before any action and I-159 returned with all of her Kaiten on 18 August 1945.
Kaiten carriers[]
Japanese naval vessels adapted to carry Kaiten were:
- Light cruiser: Kitakami
- Destroyer: Shiokaze, Namikaze, Hanazuki, Take, Kiri, Sugi, Maki, Kashi, Kaya, Kaede, Tsuta, Hagi, Nire, Nashi, Shii
- Submarine: I-36, I-37, I-38, I-41, I-44, I-46, I-47, I-48, I-53, I-56, I-58, I-156, I-157, I-158, I-159, I-162, I-165, I-361, I-363, I-366, I-367, I-368, I-370, I-372
")
")
")
")
")
")
")
")
")
")
")
")
")
")
")
")
Exhibits[]
Although there are very few intact Kaitens left, some have been restored and form part of various exhibitions around the world.
- Kure Maritime Museum, Kure, Hiroshima Prefecture. A restored Type 10.
- History and Folklore Museum, Yamaguchi, Yamaguchi Prefecture. A Type 2 hull section in the World War II exhibition.
- Yasukuni War Memorial Museum, Tokyo. A Type 1 and section of hull from a Type 4, in the main hall.
- New Jersey Naval Museum, Hackensack, New Jersey, United States. A preserved Type 4.
- Keyport Naval Submarine Museum, Seattle, Washington, United States. A cut open Type 1.
- USS Bowfin museum, Oahu, Hawaii, United States. A preserved Type 4 with windows cut into it for inspection.
- The Royal Navy Submarine Museum, Gosport, United Kingdom. A section of a Type 4.
Further reading[]
- Midget submarine
- Human torpedo
- Living torpedo
- Type 92 torpedo
- Type 93 torpedo
- Kamikaze
- Shinyo
- Fukuryu
- Kairyu
External links[]
| Wikimedia Commons has media related to Kaiten. |
- US Navy Historical Center Account of the kaiten program.
- Kaitens in action. Details of battles and accounts of kaitens type 1 and 2.
- Stories and Battle Histories of the IJN's Submarines
- HNSA Web Page: IJN Kaiten
- Human torpedo 回天 Kaiten (Japanese)
- Development and history. Information about kaitens, their history, crews, bases, and technical information. (Japanese).
Books[]
- Sheftall, M.G. (2005). Blossoms in the Wind: Human Legacies of the Kamikaze. NAL Caliber. pp. 480pp. ISBN 0-451-21487-0.
- Carpenter and Polmar, Dorr and Norman (1986). Submarines of the Imperial Japanese Navy. Annapolis, Maryland: Naval Institute Press. ISBN 0-87021-682-1.
- Kemp, Paul (2003). Midget Submarines of the Second World War. Caxton Editions, London.. pp. 54–58pp. ISBN 1-84067-521-7.
- Gardiner, Robert (2006). All the World's Fighting Ships. Conway Maritime Press, London.. pp. 197–205pp. ISBN 0-85177-146-7.
- Yokota, Yutaka and Harrington, Joseph D. (1968). Suicide Submarine! (originally The Kaiten Weapon). Ballantine, New York..
References[]
- ↑ Hashimoto, Mochitsura (1954). Sunk: The Story of the Japanese Submarine Fleet, 1914–1945. Translated by Commander E.H.M. Colegrave. New York: Henry Holt and Company.
- ↑ 2.0 2.1 2.2 2.3 2.4 2.5 2.6 2.7 Japanese suicide craft. US Navy. 1946.
- ↑ "Japanese suicide attacks at sea". http://www.ww2pacific.com/suicide.html. Retrieved 11 September 2010.
- ↑ "Kaiten "Kamikaze"". http://www.asahi-net.or.jp/~un3k-mn/kaiten-dainyuu.htm. Retrieved 15 September 2010.
- ↑ Bull, Stephen (2004). Encyclopaedia of technology and innovation. Greenwood Press. pp. 370pp. ISBN 1-57356-557-1.
- ↑ "Lieutenant Hiroshi Kuroki". http://www.asahi-net.or.jp/~un3k-mn/kai-kuroki.htm. Retrieved 17 September 2010.
- ↑ "Lieutenant Sekio Nishina". http://www.asahi-net.or.jp/~un3k-mn/kai-nisina.htm. Retrieved 17 September 2010.
- ↑ "Kaiten.html". http://online.sfsu.edu/~amkerner/Kaiten/Kaiten.html. Retrieved 17 September 2010.
- ↑ "Escape system". http://www.asahi-net.or.jp/~un3k-mn/konadaa-girei.htm. Retrieved 18 September 2010.
- ↑ "Hatches". http://www.asahi-net.or.jp/~un3k-mn/konadaa-huchi.htm. Retrieved 18 September 2010.
- ↑ "Kaiten training". http://www.asahi-net.or.jp/~un3k-mn/konadaa-toujyoukunren.htm. Retrieved 18 September 2010.
- ↑ "Kaiten training deaths". http://www.asahi-net.or.jp/~un3k-mn/kaiten-junshoku.htm. Retrieved 18 September 2010.
- ↑ "Pilot testaments and diaries". http://www.asahi-net.or.jp/~un3k-mn/konadaa-isho.htm. Retrieved 18 September 2010.
- ↑ "Cruiser Kitakami". http://www.combinedfleet.com/kitakami_t.htm. Retrieved 12 September 2010.
- ↑ "Surface launch". http://www.asahi-net.or.jp/~un3k-mn/konadaa-suijoukan.htm. Retrieved 18 September 2010.
- ↑ 16.0 16.1 16.2 16.3 "Kaiten type 10". http://www.asahi-net.or.jp/~un3k-mn/kai-kaiten10.htm. Retrieved 15 September 2010.
- ↑ Rekishi Gunzo, History of the Pacific War Volume 36, Kairyu and Kaiten, P. 104, Gakken, Tokyo, Japan, 2002, ISBN 4-05-602693-9.
- ↑ Rekishi Gunzo, History of the Pacific War Volume 36, Kairyu and Kaiten, P. 106, Gakken, Tokyo, Japan, 2002, ISBN 4-05-602693-9.
- ↑ 19.0 19.1 "Kaiten type 10". http://www.asahi-net.or.jp/~un3k-mn/konadae-juugata.htm. Retrieved 15 September 2010.
- ↑ Rekishi Gunzo, History of the Pacific War Volume 36, Kairyu and Kaiten, P. 108, Gakken, Tokyo, Japan, 2002, ISBN 4-05-602693-9.
- ↑ "USS Mississinewa memorial page". http://www.ussmississinewa.com/home.html. Retrieved 12 September 2010.
- ↑ 22.0 22.1 "LCI Losses". http://www.usslci.com/html/memorialnames.html. Retrieved 17 September 2010.
- ↑ 23.0 23.1 "USS Underhill memorial page". http://www.ussunderhill.org/. Retrieved 12 September 2010.
- ↑ 24.0 24.1 24.2 24.3 24.4 24.5 24.6 24.7 24.8 "Japanese submarine losses". http://www.asahi-net.or.jp/~un3k-mn/kai-sen.htm. Retrieved 16 September 2010.
- ↑ Dr Richard P. Hallion, 1999, "Precision Weapons, Power Projection, and The Revolution In Military Affairs" (USAF Historical Studies Office). Access date: 15 September 2007.
- ↑ 26.0 26.1 26.2 "I-47 Japanese Submarine". http://www.pacificwrecks.com/ships/subs/I-47.html. Retrieved 12 September 2010.
- ↑ 27.0 27.1 27.2 27.3 27.4 27.5 27.6 27.7 27.8 "Japanese submarine TROMs". http://www.combinedfleet.com/sensuikan.htm. Retrieved 12 September 2010.
- ↑ "U.S. Ships Sunk or Damaged in Pacific Area during World War II". http://www.usmm.org/pacific.html. Retrieved 18 September 2010.
- ↑ "USS Snook". http://aimm.museum/snook.asp. Retrieved 12 September 2010.
- ↑ "久家 稔". http://www.asahi-net.or.jp/~un3k-mn/kai-kuge.htm. Retrieved 17 September 2010.
- ↑ "KAITEN SPECIAL ATTACK SUBMARINE". http://combinedfleet.com/ships/kaiten. Retrieved 12 September 2010.
- ↑ Yokota, Yutaka and Harington, Joseph D., "Suicide Submarine!" (originally "The Kaiten Weapon") (1968) New York, Ballantine.
- ↑ "I-58". http://www.history.navy.mil/photos/sh-fornv/japan/japsh-i/i58.htm. Retrieved 13 September 2010.
The original article can be found at Kaiten and the edit history here.