- This article is about the actual events. For the book, see Bravo Two Zero (1993 book). For the film, see film.
Bravo Two Zero was the call sign of an eight-man British Army SAS patrol, deployed into Iraq during the First Gulf War in January 1991. According to one patrol member's account, the patrol were given the task of "gathering intelligence;... finding a good LUP (lying up position) and setting up an OP [observation post]"[1] on the Iraqi Main Supply Route (MSR) between Baghdad and North-Western Iraq, while according to another, the task was to find and destroy Iraqi Scud missile launchers along a 250 km (160 mi) stretch of the MSR.[2]
The patrol was the subject of several books. Accounts in the first two books, by patrol commander Andy McNab's Bravo Two Zero (1993) followed by Chris Ryan's The One That Got Away (1995), as well as those by the SAS's RSM at the time of the patrol, Peter Ratcliffe (Eye of the Storm, 2000), did not always correspond, leading to accusations from the media of lying.[citation needed] The investigative book The Real Bravo Two Zero (2002) by Michael Asher, followed the patrol route and interviewed witnesses. The subsequent book, Soldier Five by patrol member Mike Coburn (Kiwi Mike), was released in 2004. For McNab's conduct during the patrol, he was awarded the Distinguished Conduct Medal, whilst Ryan, and two other patrol members (Steven Lane and Robert Consiglio)[3] were awarded the Military Medal.
Patrol members[]
.jpg)
Bravo Two Zero patrol members. From left to right: Ryan, Consiglio, MacGown (obscured), Lane, Coburn (obscured), McNab (obscured), Phillips, Pring (obscured).
- Sergeant 'Andy McNab' (pseudonym), DCM, MM, patrol commander
- [4] former Royal Green Jackets.[5] Captured by the enemy, later released. Author of Bravo Two Zero (1993).
- Sergeant Vincent (Vince) David Phillips,[6] patrol 2IC
- [7] former Royal Army Ordnance Corps.[8] Died of hypothermia during action, 25 January 1991.[9]
- Corporal 'Chris "Geordie" Ryan',[10] (pseudonym), MM
- former 23(R) SAS. The only member of the patrol to escape capture. Author of The One That Got Away (1995).
- Lance Corporal[11] Ian Robert "Dinger" Pring (pseudonym)
- [12][13] former Parachute Regiment. Captured by the enemy, later released.
- Trooper Robert (Bob) Gaspare Consiglio, MM (posthumous)
- [3] former Royal Marine[10][14] or Parachute Regiment.[3] Killed in action, 27 January 1991.[15]
- Trooper Steven John "Legs" Lane, MM (posthumous)
- [3] former Lance Corporal of 9 Parachute Squadron, Royal Engineers[16] and former Parachute Regiment.[10] Died of hypothermia during action, 27 January 1991.[17][18]
- Trooper Malcolm (Mal) Graham MacGown, BDSc
- [19] former Australian 1st Commando Regiment.[19] Captured by the enemy, later released. Referred to as 'Stan' in the books.
- Trooper 'Mark "Kiwi"[20] Coburn' (pseudonym)
- [21][22] former NZSAS.[23] Captured by the enemy, later released. Author of Soldier Five (2004). Referred to as 'Mark the Kiwi' in the books.
The patrol[]
Background[]
In January 1991, during the prelude to the Coalition ground invasion of Iraq, B Squadron 22 SAS were stationed at a forward operating base in Saudi Arabia. The Squadron provided a number of long-range, similarly tasked teams deep into Iraq including three eight-man patrols; Bravo One Zero, Bravo Two Zero and Bravo Three Zero.[24] Asher lists one of the three patrols as Bravo One Niner,[25] though it is not clear whether this is one of the same three listed by Ryan. This article refers to the Bravo Two Zero patrol.
Insertion[]
On the night of 22/23 January, the patrol were transported into Iraqi airspace by a RAF Chinook helicopter, along with Bravo One Zero and their Land Rover 110 vehicles.[26] Unlike Bravo One Zero, the patrol had decided not to take vehicles. According to McNab's account, the patrol walked 20 km (12 mi)[27] during the first night to the proposed location of the observation post. However, both Ryan's and Coburn's accounts put the distance at 2 km (1.2 mi). Eye-witness accounts of Bedouin tribesmen, and Asher's re-creation support the Ryan/Coburn estimate of 2 km (1.2 mi). Whilst Ryan states the patrol was intentionally dropped only 2 km (1.2 mi) from the observation post because of heavy pack weights,[28] Coburn's account suggests that the patrol was dropped closer than intended to the observation post, due to a navigational error made by the Royal Air Force.[citation needed] This could account for the differences in the patrol members' estimates.
According to both Ryan and McNab, the weight of their equipment required the patrol to 'shuttle' the equipment to the observation post.[29] Four members would walk approximately 300 m, then drop their Bergens and wait. The next four would move up and drop their Bergens, then the first four would return for their jerry cans of water and bring them back to the group, followed by the second four doing the same.[30] In this manner, each member of the patrol covered three times the distance from the drop off to the observation post.
Soon after the patrol landed on Iraqi soil, Lane discovered that they had communication problems and could not receive messages on the patrol's radio. McNab later claimed that the patrol had been issued incorrect radio frequencies;[31] however a 2002 BBC report discovered that there was no error with the frequencies because the patrol's transmissions had been noted in the SAS daily record log.[32] Ratcliffe lays the blame for the faulty radios on McNab as, being the patrol commander, it was his job to make sure the patrol's equipment was working.[33]
Compromise[]
In the late afternoon of 24 January, the patrol was stumbled upon by a herd of sheep and a young shepherd. Believing themselves compromised, the patrol decided to withdraw, leaving behind excess equipment. As they were preparing to leave, they heard what they thought to be a tank approaching their position. The patrol took up defensive positions, prepared their LAW rockets, and waited for it to come into sight. However, the vehicle turned out to be a bulldozer, which reversed rapidly after seeing the patrol. Realising that they had now definitely been compromised the patrol withdrew from their position. Shortly afterwards, as they were exfiltrating (according to McNab's account), a firefight with Iraqi Armoured Personnel Carriers and other forces developed.
In 2001, Asher interviewed the Bedouin family that discovered the patrol.[34] The family stated the patrol had been spotted by the driver of the bulldozer, not the young shepherd. According to the family, they were not sure who the men were and followed them a short distance, eventually firing several warning shots, whereupon the patrol returned fire and moved away. Asher's investigation into the events, the terrain and position of the Iraqi Army did not support McNab's version of events, and excludes an attack by Iraqi soldiers and Armoured Personnel carriers. Coburn's version, Soldier Five, partially supports McNab's version of events (specifically the presence of one armoured personnel carrier) and describes being fired upon by a 12.7 mm DShK heavy machine gun and numerous Iraqi soldiers. In Ryan's version, "[MacGown] also saw an armoured car carrying a .50 caliber machine gun pull up. Somehow, I never saw that.'"[35] Ryan later estimated that he fired 70 rounds during the incident.
Emergency pickup[]
The British standard operating procedures (SOP) state that in the case of an emergency or no radio contact the patrol should return to their original infiltration point, where a helicopter would land briefly every 24 hours. This plan was complicated by the incorrect location of the initial landing site; the patrol reached the designated emergency pickup point, but the helicopter never appeared. Ratcliffe later revealed that this was due to an illness suffered by the pilot, while en route, necessitating his abandoning his mission on this occasion.
Because of a malfunctioning emergency radio, that allowed them only to send messages and not receive them, the patrol did not realise that while trying to reach overhead allied jets, they had in fact been heard by a US jet pilot. The jet pilots were aware of the patrol's problems but were unable to raise them. Many sorties were flown to the team's last known position and their expected exfiltration route in an attempt to locate them and to hinder attempts by Iraqi troops trying to capture them.
Exfiltration route[]
Standard operating procedures mandate that before an infiltration of any team behind enemy lines, an exfiltration route should be planned so that members of the patrol know where to go if they get separated or something goes wrong. The plans of the patrol indicated a southern exfiltration route towards Saudi Arabia. According to the SAS daily record log kept during that time, a TACBE transmission from the patrol was received on 24 January. The log read "Bravo Two Zero made TACBE contact again, it was reasonable to assume that they were moving south,"[32] though in fact the patrol headed north-west towards the Syrian border. Coburn's account suggests that during the planning phase of the mission, Syria had been the agreed destination should an escape plan need to be implemented. He also suggests that this was on the advice of the Officer Commanding B Squadron at that time.
According to Ratcliffe, the change in plan nullified all efforts over the following days by allied forces to locate and rescue the team. McNab has also been criticised for refusing advice from superiors to include vehicles in the mission (to be left at an emergency pickup point) which would have facilitated an easier exfiltration. Another SAS team used Land Rovers in this role when they also had to abandon a similar mission. However, it is also suggested that the patrol jointly agreed not to take vehicles because they felt they were too few in number and the vehicles too small (only short-wheelbase Land Rovers were available) to be of use and were ill-suited to a mission that was intended to be conducted from a fixed observation post.
Separation[]
During the night of 24/25 January,[36] whilst McNab was trying to contact a passing Coalition aircraft using a TACBE communicator, the patrol inadvertently became separated into two groups. Whilst the others waited for a response on the TACBE, Phillips, Ryan and MacGown continued to move through the darkness.[37] Neither of the two resultant groups followed the standard emergency rendezvous (ERV) procedure they had been trained to follow—and had previously followed the night before.[38] Instead, both groups independently continued north towards the Syrian border.[39]
After the separation, Phillips, Ryan and MacGown were equipped with two M16/M203 assault rifles and a Browning Hi-Power pistol between them,[40] as well as at least one TACBE, and the night sight around Ryan's neck.[41] McNab, Pring, Lane, Consiglio, and Coburn were equipped with their original weapons (three Minimis and two M16/M203s between them) as well as MacGown's Minimi (which MacNab was carrying, but soon discarded).[42] The larger group carried at least one TACBE, and the Magellan GPS.
According to Ryan, he was also carrying a 66 mm LAW rocket which he had struggled to free from his Bergen during the initial contact.[43] According to McNab however, the only item removed by Ryan from his Bergan was a silver hipflask,[44] and it was McNab who was the only one carrying a 66 after this contact. This can be backed up by McNab's book Bravo Two Zero in which he stated he left the 66 in the bergen and was the only one to do so.[44] Despite conflicting accounts, it is possible that Ryan may have in fact eventually ended up with McNab's LAW rocket, an item that Ryan later claimed to have used against an Iraqi 'Land-Rover type' vehicle,[45] though this event is discounted by Ratcliffe who states that, at the Regimental debrief, "[Ryan] made no mention at all of encountering enemy troops on his trek."[46]
Death of Phillips[]
In the evening of 25 January, Ryan, MacGown and Phillips left the tank berm they had stayed in during the day and headed north.[47] Phillips was already suffering from hypothermia, and could not hold his M16/M203, which was handed to MacGown.[47] As they continued, Phillips' condition worsened to the point where he mistook his black gloves for the colour of his own hands, and began yelling out loud.[48] Eventually, Phillips lost contact with the other two somewhere around 2000 hrs, and died a short time later.[49] According to Ryan[50] and MacGown,[51] they both searched for Phillips for about twenty minutes before deciding to continue without him, while according to General Sir Peter de la Billière, only Ryan searched while MacGown waited.[52] Ryan also indicated that he didn't know Phillips was necessarily dead when he wrote: "I hoped to God that [Phillips] was doing the same. That he would find his way down ..."[53] and later "there were still five to account for,"[54] though MacGown admitted he knew Phillips was dead at the time.[55] Sergeant Vince Phillips, a nineteen-year veteran of the British Armed Forces, and eight-year veteran of the Special Air Service,[56] was 36 when he died of hypothermia in the evening of 25 January 1991 in North Western Iraq.[57] According to the SAS regimental roll of honour, it states that Phillips died of exposure while evading capture in Iraq on the 22nd of January 1991 at the age of 36.
Capture of MacGown[]
At about midday on 26 January,[58] Ryan and MacGown were stumbled upon by an ‘old’ (according to MacGown)[51] goat herder tending a flock of goats. After discussions involving killing the man, MacGown decided to go with him to locate a vehicle, while Ryan decided it was not safe to do so and remained where he was under the agreement that MacGown would return by 1830 hrs. MacGown took with him Phillips' M16/M203, but left his belt kit, in order to not "cut such an aggressive figure."[59] MacGown walked with the goat herder for about four hours, before encountering a group of men, with a Toyota Landcruiser vehicle.[60] According to Ryan, MacGown shot and killed an unarmed Arab as he ran towards the vehicle, followed by two more armed with AK-47s. Without his belt kit, he had run out of ammunition, and was captured as he attempted to take the vehicle.[60] According to McNab's account, the old goat herder left MacGown with directions to a hut, where he found two vehicles.[61] After killing a uniformed Iraqi soldier attempting to reach one of the vehicles, "six or seven" more came from the hut, three of whom were killed before MacGown's M16/M203 jammed, and he was captured as he sat in one of the vehicles.[61] According to an interview given by MacGown in 2002, he came across the first soldier near a vehicle: "I brought up my trump card which was "mohaba" and he said nothing, and I carried on talking and he then made a dash for the vehicle. I shot him in the head. A single shot."[62] As more soldiers came out of the hut, MacGown aimed his rifle and fired but heard a click, indicating he was out of ammunition. It was apparent that Phillips had never reloaded the weapon after the initial contact on 24 January.[63] For reasons unknown to MacGown, the soldiers did not return fire, but instead took him captive.
Hijack of vehicle by McNab's group[]
During the evening of 26 January, McNab's group of five commandeered a taxi by having Consiglio pretend to be wounded in McNab's arms whilst lying on the side of a road.[64] When the car approached, Pring, Lane, and Coburn came up from behind cover and surrounded the vehicle.[65] According to McNab's account, the group evicted all occupants from the taxi and drove until they reached a check point, where Lane shot and killed one soldier, while the others in the group killed two more.[66] According to Ryan's second-hand account (presumably taken from the Regimental debriefing), the group were driven to the checkpoint by one of the Iraqi occupants of the taxi. They exited the vehicle with plans to rendezvous on the other side of the checkpoint, but the driver alerted the Police, and the group were forced to continue on foot.[65] Asher's investigation supported Ryan's version of events with no reported armed contact and no reported Iraqi casualties.[67]
Capture of McNab's group[]
In the early morning of 27 January, McNab's group of five came into contact with local civilians and Police. Consiglio was shot and killed by armed civilians at approximately 0200 hrs.[68] Lane died of hypothermia later that same morning after swimming the Euphrates with Pring,[69] who along with McNab and Coburn was subsequently captured. During an exchange of gun fire prior to capture, Coburn was shot in both the arm and ankle.[70]
According to McNab, the four captured patrol members (McNab, Pring, MacGown and the wounded Coburn) were moved numerous times, enduring torture and interrogation at each successive location.[71] According to MacGown however, "incidents such as teeth extraction and burning with a heated spoon did not happen. It is inconceivable that any such incidents could have occurred without them being discussed or being physically obvious."[72] News footage of MacGown and Pring taken at the time of their release on 5 March, showed no evidence of any facial injuries and the members were described as 'in good shape' by a Red Cross representative.[13]
They were last held at Abu Ghraib Prison before their release.
Ryan's escape to Syria[]
Ryan made SAS history with the "longest escape and evasion by an SAS trooper or any other soldier," to make it to Syria, covering 180 miles (290 km), more than SAS trooper Jack Sillito had in the Sahara Desert in 1942.[73]
Equipment[]

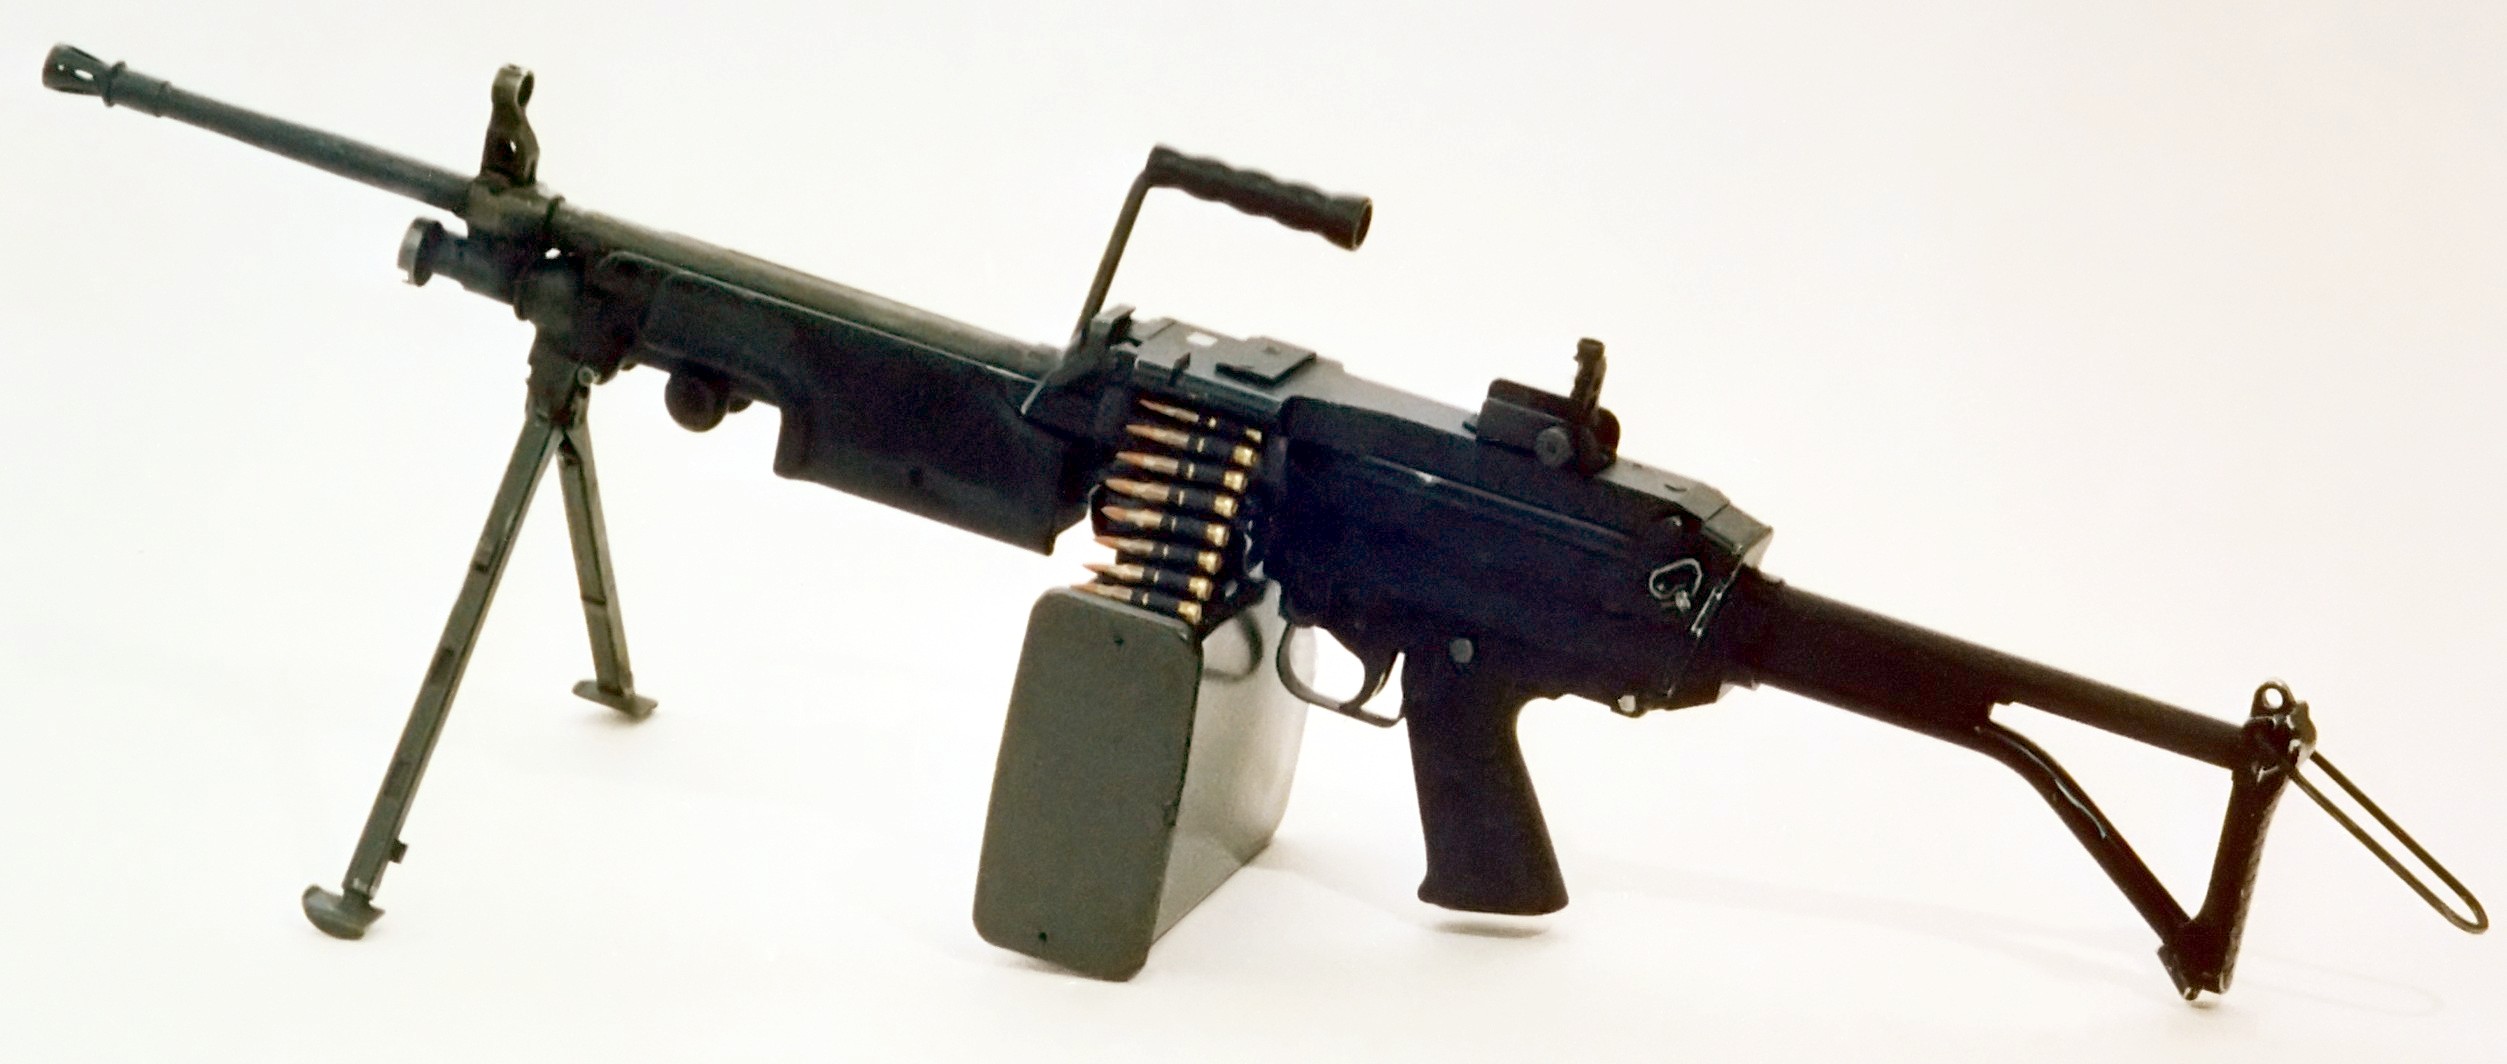
FN Minimi light support machine gun
Each member of the patrol wore a two-shade Desert DPM uniform, with a World War II era sand-coloured desert smock.[74] While the other members had regular issue army boots, Ryan (the only member to avoid eventual capture) wore a pair of £100, "brown Raichle Gore-Tex-lined walking boots."[75]
Each member carried a belt kit, 'Bergen' rucksack, one sandbag of food, one sandbag containing two NBC suits, extra ammunition bandoliers and a 5 imp gal (23 l) jerry can of water.[28][76] "The belt kit contained ammunition, water, food and trauma-care equipment."[77] The rucksack contained 25 kilos of sandbags and observation post equipment, seven days worth of rations, spare batteries for the radio, demolition equipment (including PE4 plastic explosive, detonators, and both Claymore and Elsie anti-personnel mines),[78] and intravenous drips and fluids for emergencies.[79]
The patrol also had a PRC 319 HF patrol radio carried by Lane,[80] four TACBE communication devices (carried by McNab,[81] Ryan,[43] and two others) to communicate with allied aircraft, a Magellan GPS carried by Coburn[82] and a night sight (referred to as a 'kite-site') carried by MacGown.[41] The total weight of each member's kit was estimated at 95 kg (209 lb) by McNab[76] and 120 kg (260 lb) by Ryan.[28]
McNab,[83] Phillips,[40] Ryan,[75] and Lane[75] carried M16/M203 assault rifles,[84] while Pring,[85] Consiglio,[85] MacGown,[86] and Coburn[87] carried FN Minimi light support machine guns.[88] Each member carried a 66 mm LAW rocket on his back.[89][90] Due to a missing shipment within the squadron,[91] Phillips was the only member who carried a backup weapon, a Browning Hi-Power pistol.[92]
Literary accounts[]
- The first public literary mention of the patrol was in the autobiography of Lieutenant-General Peter de la Billière, the commander of the British Forces during the Gulf War. Storm Command (ISBN 0002551381) only mentioned the patrol in passing, but broke the ground for further books to be written on the subject. The book was released in 1992.
- The patrol commander authored an account of the patrol in a book titled Bravo Two Zero (ISBN 0-440-21880-2) under the pseudonym 'Andy McNab'. McNab used pseudonyms and nicknames for the patrol members who survived, but controversially used the full names of those who died.[93] The book was released in 1993.
- A second member of the patrol authored The One That Got Away (ISBN 0-09-946015-7) under the pseudonym 'Chris Ryan'. It criticized McNab's leadership of the patrol and was particularly hostile in tone to the conduct of Phillips. In a later TV appearance Ryan (and perhaps in partial retraction) may have alluded to Phillips' memory saying he had once seen 'a very brave man' dying of hypothermia.[94] As with McNab's account, Ryan used the same pseudonyms for those who survived, but referred to Phillips, Lane and Consiglio by their real names. Ratcliffe said of this move, "[It is] insensitive on [Ryan's] and [McNab's] parts to hide behind pseudonyms when they named their dead colleagues in their books, in deliberate contravention of the Regiment's traditions."[93] The book was released in 1995.
- Peter Ratcliffe (The SAS's Regimental Sergeant Major at the time of the patrol) wrote Eye of the Storm (ISBN 1930983018) which refers the controversy surrounding the differing accounts of the patrol in some detail. The book was released in 2000.
- Both McNab's and Ryan's earlier accounts were critiqued by SAS reserve veteran Michael Asher in The Real Bravo Two Zero (ISBN 0-304-36554-8). In 2001, Asher followed the original path of the patrol, interviewing local Iraqis who witnessed the events. The book was released in 2003.
- The Gulf War Chronicles (ISBN 0595296696) by Richard Lowry recounted much of the patrol's story, though appeared to borrow heavily from the earlier story published by McNab. The book was released in 2003.
- A third member of the patrol authored Soldier Five (ISBN 1-84018-907-X) under the pseudonym 'Mike Coburn,'[21][22] aimed to "set the story straight", in reference to criticism of patrol member Vince Phillips in previous publications. The book was released in 2004. The account also levelled damning accusations against the army, and the Ministry of Defence went to great lengths to attempt to prevent its publication, which they failed to do, although they were granted all of the book´s profits.[95][96][97]
- W. A. Harbinson under the writing pseudonym "Shaun Clarke" presents a strikingly similar story to that told in the accounts of McNab and Ryan in the first book of his SAS adventure series, Soldier A: SAS - Behind Iraqi Lines (ISBN 1-898125-00-7). Events that seem to be the same include the crossing of the Euphrates and subsequent death of "Legs" Lane in a hut nearby; the drinking of radioactive/contaminated water by a lone SAS member running for Syria; the patrol being split into 3 and 5; the group of 3 splitting up after one dies of hypothermia, and the incident regarding a member who thought his hands had turned black when he was indeed wearing gloves, the remaining two of that group splitting up after one decides to follow a goat-herder. However, Harbinson's book was published in July 1993,[98] pre-dating the publication of McNab's account in October 1993,[99] and Ryan's two years later. The character who makes a run for Syria is given the name Danny Porter, while MacGown is called Stan, and Phillips, Taff. The source of Harbinson's apparent knowledge of detailed information relating to the real Bravo Two Zero patrol is unknown.
- Will Fowler writes of the patrol over a number of pages in SAS Behind Enemy Lines: Covert Operations 1941-2005 (ISBN 0-00-719990-2), however he names the patrol commander as Sergeant "Mitch" Mitchell,[100] whilst naming the other members as per previous literary accounts. His account follows the same basic story line, however at one point he states that there were only two LAW rockets between the whole patrol,[100] not one each as per McNab's and Ryan's accounts.
Dramatic and documentary accounts[]
- ITV produced a one-off dramatic version of Ryan's book, also titled The One That Got Away, in 1996. The film starred Paul McGann as 'Ryan', and was directed by Paul Greengrass, director of the television drama Bloody Sunday, and the feature films United 93, The Bourne Supremacy and The Bourne Ultimatum.
- The BBC produced a two-part adaptation of McNab's book, also titled Bravo Two Zero, in 1998. It starred Sean Bean as 'McNab' and was directed by Tom Clegg. In addition to using all of McNab's characters' pseudonyms, the names of the three deceased patrol members, Phillips, Consiglio and Lane were also changed for the film.
- In 2002, Channel 4 aired Asher's documentary (which accompanied his book), also titled The Real Bravo Two Zero directed and produced by Gavin Searle.[101]
- In 2003, the TV-series JAG ran an episode (The One That Got Away, S9, EP04) loosely based on the story of Bravo Two Zero involving US Marines Force Recon in Iraq. The name of the team that was involved was Bravo Two One.
- The Video Game Conflict: Desert Storm is very loosely based on the events of Bravo Two Zero.
- The Third mission loosely depicts the Insertion of McNab's Team.
- The Video Game Conflict: Desert Storm II is a sequel of Conflict: Desert Storm, and is very loosely based on the events of Bravo Two Zero.
- The 6th mission of the game, POW, is a clear depiction of the Abu Ghraib Prison Break.
- The Video Game I.G.I.-2: Covert Strike had Chris Ryan as a consultant for game development.
References[]
- ↑ Ryan, Chris (1995). The One That Got Away. London: Century. p. 16. ISBN 978-0-09-964161-2.
- ↑ McNab, Andy (1993). Bravo Two Zero. Great Britain: Bantom Press. p. 35. ISBN 0-552-14127-5.
- ↑ 3.0 3.1 3.2 3.3 ""Honours and Awards" Supplement to ''The London Gazette'' of Thursday, 9 May 1996. Number 54393, Published: 9 May 1996. Page 6549". Gazettes-online.co.uk. 9 May 1996. http://www.gazettes-online.co.uk/issues/54393/pages/6549. Retrieved 2011-10-25.
- ↑ Asher, Michael (2003). The Real Bravo Two Zero. England: Cassell. p. 1. ISBN 0-304-36554-8.
- ↑ McNab, Andy (1993). Bravo Two Zero. Great Britain: Bantom Press. p. 21. ISBN 0-552-14127-5.
- ↑ Asher, Michael (2003). The Real Bravo Two Zero. England: Cassell. p. 208. ISBN 0-304-36554-8.
- ↑ Asher, Michael (2003). The Real Bravo Two Zero. England: Cassell. p. 3. ISBN 0-304-36554-8.
- ↑ McNab, Andy (1993). Bravo Two Zero. Great Britain: Bantom Press. p. 30. ISBN 0-552-14127-5.
- ↑ Asher, Michael (2003). The Real Bravo Two Zero. England: Cassell. p. 213. ISBN 0-304-36554-8.
- ↑ 10.0 10.1 10.2 Coburn, Mike (2004). Soldier Five. Great Britain: Mainstream Publishing. p. 19. ISBN 978-1-84018-907-0.
- ↑ Ryan, Chris (1995). The One That Got Away. London: Century. p. 22. ISBN 978-0-09-964161-2.
- ↑ Lowry, Richard S (2003). The Gulf War Chronicles. iUniverse. p. 27.
- ↑ 13.0 13.1 "Cowell, Alan, "AFTER THE WAR: P.O.W.'S; 6 Americans, Including Woman, Among 10 Released by Baghdad" ''New York Times'' 5 March 1991". Nytimes.com. 5 March 1991. http://www.nytimes.com/1991/03/05/world/after-the-war-pow-s-6-americans-including-woman-among-10-released-by-baghdad.html. Retrieved 2011-10-25.
- ↑ McNab, Andy (1993). Bravo Two Zero. Great Britain: Bantom Press. p. 32. ISBN 0-552-14127-5.
- ↑ Asher, Michael (2003). The Real Bravo Two Zero. England: Cassell. p. 172. ISBN 0-304-36554-8.
- ↑ ""Honours and Awards" Supplement to ''The London Gazette'', Number 54393, 10 May 1996" (PDF). http://www.gazettes-online.co.uk/issues/54393/pages/6549/page.pdf. Retrieved 2011-10-25.
- ↑ Ryan, Chris (1995). The One That Got Away. London: Century. p. 226. ISBN 978-0-09-964161-2.
- ↑ "Steven John (Legs) Lane - 22 SAS - Special Forces - Roll Of Honour". Specialforcesroh.com. http://www.specialforcesroh.com/browse.php?mode=viewiroll&rollid=4667. Retrieved 2011-10-25.
- ↑ 19.0 19.1 "torinternational". http://www.torinternational.com/pdfs/DrMalMacgownBioMay2005.pdf. Retrieved 2011-10-25.
- ↑ Coburn, Mike (2004). Soldier Five. Great Britain: Mainstream Publishing. ISBN 978-1-84018-907-0.
- ↑ 21.0 21.1 Stephen Moss (12 March 2004). "Moss, Stephen "Mission: the truth" ''The Guardian'', 12 March 2004". Guardian. http://www.guardian.co.uk/books/2004/mar/12/biography.stephenmoss. Retrieved 2011-10-25.
- ↑ 22.0 22.1 "NZPA "Kiwi commando loses legal-fees battle over book", ''NZ Herald'' - Armed Forces, 19 Dec 2006". Nzherald.co.nz. 19 December 2006. http://www.nzherald.co.nz/topic/story.cfm?c_id=123&objectid=10415950. Retrieved 2011-10-25.
- ↑ Maguire, Kevin. "Davis, S "The SAS story they want to suppress". ''The New Statesman'', 26 Nov 2001". Newstatesman.com. http://www.newstatesman.com/200111260017. Retrieved 2011-10-25.
- ↑ Ryan, Chris (1995). The One That Got Away. London: Century. p. 16. ISBN 978-0-09-964161-2.
- ↑ Asher, Michael (2003). The Real Bravo Two Zero. England: Cassell. p. 37. ISBN 0-304-36554-8.
- ↑ Ryan, Chris (1995). The One That Got Away. London: Century. p. 39. ISBN 978-0-09-964161-2.
- ↑ Asher, Michael (2003). The Real Bravo Two Zero. England: Cassell. p. 55. ISBN 0-304-36554-8.
- ↑ 28.0 28.1 28.2 Ryan, Chris (1995). The One That Got Away. London: Century. p. 29. ISBN 978-0-09-964161-2.
- ↑ McNab, Andy (1993). Bravo Two Zero. Great Britain: Bantom Press. p. 95. ISBN 0-552-14127-5.
- ↑ Ryan, Chris (1995). The One That Got Away. London: Century. p. 42. ISBN 978-0-09-964161-2.
- ↑ McNab, Andy (1993). Bravo Two Zero. Great Britain: Bantom Press. p. 393. ISBN 0-552-14127-5.
- ↑ 32.0 32.1 "Taylor, Peter: "BRAVO TWO ZERO A Question of Betrayal" ''BBC Panorama'', 10 Feb 2002". BBC News. http://news.bbc.co.uk/hi/english/static/audio_video/programmes/panorama/transcripts/transcript_10_02_02.txt. Retrieved 2011-10-25.
- ↑ Asher, Michael (2003). The Real Bravo Two Zero. England: Cassell. p. 5245. ISBN 0-304-36554-8.
- ↑ Asher, Michael (2003). The Real Bravo Two Zero. England: Cassell. ISBN 0-304-36554-8.
- ↑ Ryan, Chris (1995). The One That Got Away. London: Century. p. 53. ISBN 978-0-09-964161-2.
- ↑ Asher, Michael (2003). The Real Bravo Two Zero. England: Cassell. p. 118. ISBN 0-304-36554-8.
- ↑ McNab, Andy (1993). Bravo Two Zero. Great Britain: Bantom Press. p. 133. ISBN 0-552-14127-5.
- ↑ McNab, Andy (1993). Bravo Two Zero. Great Britain: Bantom Press. p. 96. ISBN 0-552-14127-5.
- ↑ McNab, Andy (1993). Bravo Two Zero. Great Britain: Bantom Press. p. 134. ISBN 0-552-14127-5.
- ↑ 40.0 40.1 Ryan, Chris (1995). The One That Got Away. London: Century. p. 66. ISBN 978-0-09-964161-2.
- ↑ 41.0 41.1 Ryan, Chris (1995). The One That Got Away. London: Century. p. 62. ISBN 978-0-09-964161-2.
- ↑ Asher, Michael (2003). The Real Bravo Two Zero. England: Cassell. p. 119. ISBN 0-304-36554-8.
- ↑ 43.0 43.1 Ryan, Chris (1995). The One That Got Away. London: Century. p. 55. ISBN 978-0-09-964161-2.
- ↑ 44.0 44.1 McNab, Andy (1993). Bravo Two Zero. Great Britain: Bantom Press. p. 125. ISBN 0-552-14127-5.
- ↑ Ryan, Chris (1995). The One That Got Away. London: Century. p. 102. ISBN 978-0-09-964161-2.
- ↑ Asher, Michael (2003). The Real Bravo Two Zero. England: Cassell. p. 246. ISBN 0-304-36554-8.
- ↑ 47.0 47.1 Ryan, Chris (1995). The One That Got Away. London: Century. p. 73. ISBN 978-0-09-964161-2.
- ↑ Ryan, Chris (1995). The One That Got Away. London: Century. p. 74/75. ISBN 978-0-09-964161-2.
- ↑ Asher, Michael (2003). The Real Bravo Two Zero. England: Cassell. p. 215. ISBN 0-304-36554-8.
- ↑ Ryan, Chris (1995). The One That Got Away. London: Century. p. 76. ISBN 978-0-09-964161-2.
- ↑ 51.0 51.1 McNab, Andy (1993). Bravo Two Zero. Great Britain: Bantom Press. p. 343. ISBN 0-552-14127-5.
- ↑ Asher, Michael (2003). The Real Bravo Two Zero. England: Cassell. p. 214. ISBN 0-304-36554-8.
- ↑ Ryan, Chris (1995). The One That Got Away. London: Century. p. 77. ISBN 978-0-09-964161-2.
- ↑ Ryan, Chris (1995). The One That Got Away. London: Century. p. 214. ISBN 978-0-09-964161-2.
- ↑ McNab, Andy (1993). Bravo Two Zero. Great Britain: Bantom Press. p. 339. ISBN 0-552-14127-5.
- ↑ "Vincent David (Vince) Phillips - 22 SAS - Special Forces - Roll Of Honour". Specialforcesroh.com. http://www.specialforcesroh.com/browse.php?mode=viewiroll&rollid=4952. Retrieved 2011-10-25.
- ↑ "The truth that Vince wasn't Gulf War coward". 7 May 2002. http://www.thisiswiltshire.co.uk/archive/2002/05/07/Wiltshire+Archive/7350983.The_truth_that_Vince_wasn_t_Gulf__War_coward/. Retrieved 29 October 2011.
- ↑ Ryan, Chris (1995). The One That Got Away. London: Century. p. 95. ISBN 978-0-09-964161-2.
- ↑ Ryan, Chris (1995). The One That Got Away. London: Century. p. 98. ISBN 978-0-09-964161-2.
- ↑ 60.0 60.1 Ryan, Chris (1995). The One That Got Away. London: Century. p. 221. ISBN 978-0-09-964161-2.
- ↑ 61.0 61.1 McNab, Andy (1993). Bravo Two Zero. Great Britain: Bantom Press. p. 344. ISBN 0-552-14127-5.
- ↑ "MacGown, Malcolm "BRAVO TWO ZERO A Question of Betrayal" ''BBC Panorama'', 10 Feb 2002". BBC News. http://news.bbc.co.uk/hi/english/static/audio_video/programmes/panorama/transcripts/transcript_10_02_02.txt. Retrieved 2011-10-25.
- ↑ Ryan, Chris (1995). The One That Got Away. London: Century. p. 222. ISBN 978-0-09-964161-2.
- ↑ Asher, Michael (2003). The Real Bravo Two Zero. England: Cassell. p. 131. ISBN 0-304-36554-8.
- ↑ 65.0 65.1 Ryan, Chris (1995). The One That Got Away. London: Century. p. 224. ISBN 978-0-09-964161-2.
- ↑ McNab, Andy (1993). Bravo Two Zero. Great Britain: Bantom Press. p. 165. ISBN 0-552-14127-5.
- ↑ Asher, Michael (2003). The Real Bravo Two Zero. England: Cassell. p. 137. ISBN 0-304-36554-8.
- ↑ Asher, Michael (2003). The Real Bravo Two Zero. England: Cassell. pp. 172–173. ISBN 0-304-36554-8.
- ↑ Asher, Michael (2003). The Real Bravo Two Zero. England: Cassell. p. 163. ISBN 0-304-36554-8.
- ↑ Ryan, Chris (1995). The One That Got Away. London: Century. p. 225. ISBN 978-0-09-964161-2.
- ↑ McNab, Andy (1993). Bravo Two Zero. Great Britain: Bantom Press. ISBN 0-552-14127-5.
- ↑ "Boggon, S "How one SAS patrol launched a fusillade of 'kill-and-tell' books, then a fierce war of words". ''The Independent'', 7 Dec 2000". Independent.co.uk. 7 December 2000. Archived from the original on 2009-07-04. http://web.archive.org/web/20090704113100/http://www.independent.co.uk/arts-entertainment/books/news/how-one-sas-patrol-launched-a-fusillade-of-killandtell-books-then-a-fierce-war-of-words-629532.html. Retrieved 2011-10-25.
- ↑ Ryan, Chris (1995). The One That Got Away. London: Century. p. 233. ISBN 978-0-09-964161-2.
- ↑ Ryan, Chris (1995). The One That Got Away. London: Century. p. 37. ISBN 978-0-09-964161-2.
- ↑ 75.0 75.1 75.2 Ryan, Chris (1995). The One That Got Away. London: Century. p. 38. ISBN 978-0-09-964161-2.
- ↑ 76.0 76.1 McNab, Andy (1993). Bravo Two Zero. Great Britain: Bantom Press. p. 66. ISBN 0-552-14127-5.
- ↑ McNab, Andy (1993). Bravo Two Zero. Great Britain: Bantom Press. p. 66. ISBN 0-552-14127-5.
- ↑ McNab, Andy (1993). Bravo Two Zero. Great Britain: Bantom Press. p. 62. ISBN 0-552-14127-5.
- ↑ Asher, Michael (2003). The Real Bravo Two Zero. England: Cassell. p. 55. ISBN 0-304-36554-8.
- ↑ Ryan, Chris (1995). The One That Got Away. London: Century. p. 24. ISBN 978-0-09-964161-2.
- ↑ Ryan, Chris (1995). The One That Got Away. London: Century. p. 55. ISBN 978-0-09-964161-2.
- ↑ Ryan, Chris (1995). The One That Got Away. London: Century. p. 41. ISBN 978-0-09-964161-2.
- ↑ McNab, Andy (1993). Bravo Two Zero. Great Britain: Bantom Press. p. 114. ISBN 0-552-14127-5.
- ↑ McNab, Andy (1993). Bravo Two Zero. Great Britain: Bantom Press. p. 88. ISBN 0-552-14127-5.
- ↑ 85.0 85.1 McNab, Andy (1993). Bravo Two Zero. Great Britain: Bantom Press. p. 172. ISBN 0-552-14127-5.
- ↑ Ryan, Chris (1995). The One That Got Away. London: Century. p. 62. ISBN 978-0-09-964161-2.
- ↑ McNab, Andy (1993). Bravo Two Zero. Great Britain: Bantom Press. p. 119. ISBN 0-552-14127-5.
- ↑ Asher, Michael (2003). The Real Bravo Two Zero. England: Cassell. p. 56. ISBN 0-304-36554-8.
- ↑ McNab, Andy (1993). Bravo Two Zero. Great Britain: Bantom Press. p. 90. ISBN 0-552-14127-5.
- ↑ Ryan, Chris (1995). The One That Got Away. London: Century. p. 38. ISBN 978-0-09-964161-2.
- ↑ Ryan, Chris (1995). The One That Got Away. London: Century. p. 18. ISBN 978-0-09-964161-2.
- ↑ Asher, Michael (2003). The Real Bravo Two Zero. England: Cassell. p. 56. ISBN 0-304-36554-8.
- ↑ 93.0 93.1 Asher, Michael (2003). The Real Bravo Two Zero. England: Cassell. p. 247. ISBN 0-304-36554-8.
- ↑ http://www.youtube.com/watch?v=mR-gpN-WyzM&feature=relmfu
- ↑ New Statesman Special Report - The SAS story they want to suppress, 26 November 2001.
- ↑ The New Zealand Herald Commando still able to publish and be damned, Thursday 20 Mar 2003.
- ↑ The New Zealand Herald Kiwi commando loses legal-fees battle over book, Tuesday 19 Dec 2006.
- ↑ Clarke, Shaun (1993). Soldier A: SAS - Behind Iraqi Lines. Great Britain: 22 books. ISBN 978-1-898125-00-6.
- ↑ McNab, Andy (1993). Bravo Two Zero. Great Britain: Bantom Press. ISBN 0-552-14127-5.
- ↑ 100.0 100.1 Fowler, Will (2005). SAS Behind Enemy Lines: Covert Operations 1941-2005. London: Collins. p. 179. ISBN 0-00-719990-2.
- ↑ BFI Film & TV Database The REAL BRAVO TWO ZERO, British Film Institute
The original article can be found at Bravo Two Zero and the edit history here.