| Blythswood Rifles 7th (Blythswood) Battalion, Highland Light Infantry 83rd (Blythswood) Heavy Anti-Aircraft Regiment, Royal Artillery 483rd (Blythswood) Heavy Anti-Aircraft Regiment, Royal Artillery | |
|---|---|
| Active | 24 September 1859–10 March 1955 |
| Country |
|
| Branch |
|
| Role |
Infantry Air Defence |
| Part of |
52nd (Lowland) Division 65th (2nd Lowland) Division 3 Anti-Aircraft Division 12 Anti-Aircraft Division Tenth Army |
| Garrison/HQ | Glasgow |
| Engagements |
Second Boer War Gallipoli Campaign Sinai and Palestine Campaign Western Front The Blitz |
| Commanders | |
| Notable commanders | Col Archibald Campbell, 1st Baron Blythswood |
The Blythswood Rifles was a Scottish Volunteer unit of the British Army. Raised in Glasgow from 1859, it later became a battalion of the Highland Light Infantry. During World War I it served at Gallipoli, in Egypt and Palestine, in Ireland, and on the Western Front. Converted into an anti-aircraft artillery regiment just before World War II, it served in The Blitz and in the Middle East during the war, and continued in the postwar Territorial Army until 1955.
Origin[]
An invasion scare in 1859 led to the emergence of the Volunteer Movement, and Rifle Volunteer Corps (RVCs) composed of part-time soldiers eager to supplement the Regular British Army in time of need began to be organised throughout Great Britain.[1][2][3] The 2nd Administrative Battalion of Lanarkshire RVCs (shown in the Army List as the 4th Admin Bn until March 1861) was formed in Glasgow, Lanarkshire, on 4 July 1860 to administer 11 company-sized RVCs that had been raised in that city:[4][5][6][7]
- 30th (1st Central) Lanarkshire RVC – recruited in the East Central district of Glasgow, services accepted 28 December 1859, disbanded 1865
- 31st (Central Blythswood) Lanarkshire RVC – recruited from leather trade workers, services accepted 21 December 1859
- 38th (Rifle Rangers) Lanarkshire RVC – recruited from mechanics in the Central district of Glasgow, services accepted 29 December 1859
- 45th (Grocers) Lanarkshire RVC – recruited from grocers, services accepted 10 January 1860
- 46th (Grocers) Lanarkshire RVC – recruited from grocers, services accepted 10 January 1860
- 47th (Grocers) Lanarkshire RVC – recruited from grocers, services accepted 10 January 1860
- 75th (2nd Company, Leather and Boot Trade) Lanarkshire RVC – recruited from leather workers, services accepted 29 February 1860
- 84th Lanarkshire RVC – recruited from members of the grain and provisions trades, services accepted 24 April 1860
- 86th (Tailors) Lanarkshire RVC – recruited from tailors, services accepted 7 May 1860
- 88th (Fleshers) Lanarkshire RVC – recruited from butchers, services accepted 9 May 1860, disbanded 1864
- 96th Lanarkshire RVC – services accepted 29 November 1860, later increased to two companies
- 97th (Glasgow Guards) Lanarkshire RVC – four companies recruited from men of exceptional physique, services accepted 30 July 1861; transferred to 1st Lanarkshire Engineer Volunteer Corps 1863[8]
In May 1865 the 2nd Admin Battalion was consolidated as the 31st Lanarkshire RVC (taking the number of its senior surviving company) with headquarters (HQ) in North Frederick Street, Glasgow. In June 1869 it received the additional title The Blythswood Rifles in honour of its Commanding Officer (CO), Archibald Campbell of Blythswood House, who later took the title of Lord Blythswood. Campbell had served with the Scots Fusilier Guards in the Crimean War and had retired with the rank of 'Captain and Lieutenant–Colonel'. He was commissioned as Lt-Col in command of the 31st RVC on 1 December 1864.[5][7][9][10][11]
In 1873, the Blythswood Rifles absorbed the 5th Lanarkshire RVC, previously the 7th Admin Bn formed in September 1860 to administer the following Glasgow RVCs:[4][5][6][7]
- 5th (1st Eastern) Lanarkshire RVC – services accepted 24 September 1859
- 21st (Parkhead Artisans) Lanarkshire RVC – recruited in the Parkhead district, services accepted 5 December 1859
- 34th (1st Rifle Rangers) Lanarkshire RVC – services accepted 27 December 1859
- 35th (2nd Rifle Rangers) Lanarkshire RVC – services accepted 27 December 1859
- 58th (1st Eastern Artisans) Lanarkshire RVC – services accepted 10 February 1860
- 59th (2nd Eastern Artisans) Lanarkshire RVC – services accepted 21 February 1860
- 64th (1st Rutherglen) Lanarkshire RVC – recruited at Rutherglen, services accepted 18 February 1860
- 65th (2nd Rutherglen) Lanarkshire RVC – recruited at Rutherglen, services accepted 18 February 1860
- 66th (Eastern Rifle Rangers) Lanarkshire RVC – services accepted 17 February 1860
- 90th (Whitevale) Lanarkshire RVC – recruited in the Whitevale district, services accepted 24 May 1860
The initial 12 companies in the 7th Admin Bn (consolidated as the 5th Lanarkshire RVC in 1860) had been reduced to 10 in 1864 and dwindled thereafter until it was absorbed into the 31st.[5][6][7]
Volunteer Force[]
Cap badge of the Higland Light Infantry.
When the RVCs were consolidated in 1880, the battalion was renumbered as the 5th (Blythswood Rifles) Lanarkshire RVC.[5][6][7][9] Under the 'Localisation of Forces' scheme introduced in 1872 by the Cardwell reforms, the 31st Lanarkshire RVC had been grouped with the 73rd (Perthshire) Regiment of Foot, the 90th Regiment of Foot (Perthshire Volunteers) and the 2nd Royal Lanark Militia in Brigade No 60.[9] However, this affiliation was broken up in the Childers Reforms, under which the battalion became a volunteer battalion of the Highland Light Infantry (The Glasgow Regiment) (HLI) on 1 July 1881. It was formally redesignated as the 3rd (Blythswood) Volunteer Battalion, Highland Light Infantry in December 1887.[5][6][7][9]
The Stanhope Memorandum of December 1888 introduced a Mobilisation Scheme for Volunteer units, which would assemble in their own brigades at key points in case of war. In peacetime these brigades provided a structure for collective training.[12][13][14] Under this scheme the Volunteer Battalions of the HLI were included in the Clyde Brigade, later the Glasgow Brigade based at Hamilton.[9]
Lord Blythswood was succeeded as Lt-Col Commandant in 1897 by Colonel W. Clark, VD, who had been the unit's second Lt-Col since 1877.[9] Sixty-one volunteers from the battalion served alongside the Regulars in the Second Boer War, mostly in the 1st 2nd and 3rd Volunteer Service Companies of the HLI, earning the battalion its first Battle honour: South Africa 1900–02.[5][6][7][9][15]
In 1902 the battalion built a new drill hall at 69 Main Street, Bridgeton, Glasgow, while musketry training was carried out at a 900 yards (820 m) range at Gilbertfield near Cambuslang.[5][7] In the same year, the Volunteer Brigades were reorganised, and the HLI battalions split from the rest of the Glasgow units to form their own Highland Light Infantry Brigade, still based at Hamilton.[9]
Territorial Force[]
When the Volunteers were subsumed into the new Territorial Force (TF) under the Haldane Reforms of 1908,[16][17] the battalion became the 7th (Blythswood) Battalion, Highland Light Infantry.[6][7][9][18] The HLI Brigade now formed part of the Lowland Division of the TF.[19][20][21][22][23]
World War I[]
Mobilisation[]
The Lowland Division had been attending annual camp on the Ayrshire coast when the order to mobilise was received at 17.25 on Tuesday 4 August 1914. On return from camp the troops undertook guards and patrols at vulnerable points around Glasgow and the River Clyde. 7th HLI was under Lt-Col J.H. Galbraith, TD, commanding officer (CO) since 20 December 1911 . The division completed its mobilisation by 10 August and proceeded to its war stations, with the HLI Bde at Dunfermline. The troops were billeted in all manner of buildings. Through the winter of 1914–15 they dug and wired defensive positions, provided guards and patrols and undertook rigorous training.[9][19][24][25]
Recruitment[]
On 10 August, units of the division were invited to volunteer for Overseas Service, and the majority did so. On 31 August, the War Office authorised the formation of a reserve or 2nd Line unit for each unit where 60 per cent or more of the men had volunteered for Overseas Service. The titles of these 2nd Line units would be the same as the 1st Line original, but distinguished by a '1/' or '2/' prefix. In this way duplicate battalions, brigades and divisions were created, mirroring those TF formations being sent overseas. Where recruitment was good, they also formed 3rd Line units[26][27]
1/7th Highland Light Infantry[]
The Lowland Division was warned for overseas service on 5 April 1915, and the infantry battalions received Long Lee Enfield rifles modified to take modern ammunition chargers. On 7 May the division was informed that it would be employed in the Gallipoli Campaign, and equipment such as sun helmets and water carts was issued. On 11 May the division was numbered as 52nd (Lowland) Division and the brigades also received numbers, the HLI becoming 157th (Highland Light Infantry) Brigade. 1/7th HLI and the bulk of 157th (HLI) Bde embarked aboard the troopship Transylvania at Devonport Dockyard and sailed on 26 May, via Gibraltar and Malta, disembarking at Alexandria in Egypt on 5 June and going into camp at Aboukir.[20][21][22][28][29]
Gallipoli[]
Although some elements of the division had gone direct to the Gallipoli Peninsula, and others sailed on quickly from Alexandria, 157th (HLI) Bde on the Transylvania was turned back to Alexandria and the troops went back into camp. The battalion was not re-embarked until 28 June (aboard the Mauitor), arriving at Mudros on 1 July, Imbros on 2 July, and finally landing at Cape Helles on 3 July.[20][24][29][30]


The HLI attack at Achi Baba Nullah, 12 July 1915.
1/7th HLI moved into the firing line and support trenches on 5 July for its first short tour of duty under the guidance of the Royal Naval Division. It was back in the line on 11 July and took part in the attack on Trenches E10 and F12 on 12 July (the Action at Achi Baba Nullah). Under the command of Lt-Col Galbraith, the battalion advanced at 16.50 on the right of the brigade in four waves. Despite heavy shrapnel, machine gun and rifle fire, it took the Turkish front and support trenches without much difficulty, and the two leading waves pushed on to the third line, Trench E12. They discovered too late that this was nothing more than a scrape in the ground and offered no cover. They tried to hold on to this until the trench behind (E11) had been. consolidated, but casualties were heavy and at 18.00 the CO allowed the leading waves to withdraw to E11. Consolidation was difficult because of the number of dead in the trenches. The following morning the battalion came under heavy enfilade fire and retreated, but Lt-Col Galbraith rallied the men, charged, and re-took their positions by 07.00. By the time it was relieved on 15 July, 1/7th HLI had lost six officers and 40 other ranks (ORs) killed, 2 officers and 149 ORs wounded, and 53 ORs missing.[20][29][31][32]
For the next three months, 1/7th HLI alternated with 1/5th and 1/6th HLI in the front line at 'the Horsehoe' and 'Argyle Street', broken by spells in reserve in the 'Redoubt Line', 'Wigan Road' and 'No 1 Australian Lines'. On the night of 20 October the battalion made a small attack on Trench H11A, and established a 'bomb sap', then repulsed a Turkish counter-attack (total casualties 2 killed and 8 wounded). Moving up into the firing line on 21 November the battalion suffered shellfire and several Turkish attacks, which were easily repulsed. Manning recently captured tranches G11A and G12 on 21 November, 1/7th HLI endured heavy bombardment and bombing from aircraft. Being on the high ground on the west of the Nullah, the battalion was able to bring down enfilade fire on the Turks attacking the neighbouring 1/5th HLI, and the Turkish attack failed.[29][33]
Casualties from sickness during the hot summer had been heavy, and the attrition continued through the bitter winter weather. By now it had been decided to evacuate the force. The Suvla and Anzac positions were evacuated on the night of 19/20 December, and 1/7th HLI contributed three bombing teams (2 officers and 26 ORs) to 157th Bde's elaborate diversionary attack that night and kept two companies in brigade reserve. The attack went badly and the reserves were required to support the bombing parties. The following night 1/7th HLI had to garrison the line for the weakened brigade.[34]
Next it was the turn of the Helles position to be evacuated. The forces ashore were reduced from 31 December. On 1 January 1916 the battalion relieved the Anson Battalion of the RN Division at 'Hyde Park Corner'. The lines were then thinned out until on the night of 7/8 January battalion HQ and just 150 men, mainly machine gunners and signallers, held 'Eglington Tunnel' during the final evacuation. The last party to leave set up 'trip bombs' and automatically-fired rifles and flare pistols to maintain the illusion that the line was still strongly held. The battalion was clear of the beach by 02.45 on 9 January and sailed aboard HMS Prince George for Mudros. The battalion had landed with 30 officers and 941 ORs and received 19 officers and 104 ORs as reinforcements. During the campaign it lost 7 officers and 709 ORs killed, 5 officers and 279 ORs wounded, 26 officers and 450 ORs evacuated to hospital sick, and 30 missing.[29][35]
Egypt[]
After the evacuation of Helles the 52nd (L) Division moved back to Egypt. After concentration it went to El Qantara and on 2 March 1916 it took over part of No 3 Section of the Suez Canal defences.[20]
While stationed at El Qantara in 1916, the 1/7th HLI formed a trench mortar team that was sent to Mesopotamia where it was attached to 7th (Meerut) Division. This team took part in the division's advance on Baghdad (March 1917), serving in the Battle of Sannaiyat. It then went to Palestine, where it served with the Meerut Division in the fighting from March 1918 to the Armistice with Turkey. As the 52nd Division historian wrote, 'Throughout its travels this small unit retained its identity'.[36]
No 3 or Northern Section of the Canal defences had its outer flank anchored on the Mediterranean. Running inland were a series of redoubts manned by the infantry with machine guns and backed by artillery. On the night of 3/4 August a German and Turkish force attacked the position (the Battle of Romani). The redoubts came under heavy shelling and direct attack, but the attack was driven off by the British artillery. Attempts to outflank the Romani position were held by the ANZAC Mounted Division, and the defenders then moved to the counter-attack. By the night of 5/6 August 157th Bde was well advanced, though the pursuit bogged down in the appalling desert conditions of Sinai.[20][37][38]
Palestine[]
After months of preparation the Eastern Expeditionary Force (EEF) crossed the Sinai Desert at the end of 1916 and prepared to invade Palestine, beginning the Sinai and Palestine Campaign. 52nd (L) Division was held in reserve during the 1st Battle of Gaza (26–27 March 1917) and was not committed.[20][39][40] There followed several weeks of preparation for the 2nd Battle of Gaza, during which 1/7th HLI began a daily routine of sending a company to turn a Turkish post out of an orchard to the front, only to retire back to the British lines at dusk. These apparently meaningless operations were designed to accustom the Turks to British troops being moved into the area, in order to cover preparations for the main attack. The first phase was carried out on 17 April, with 52nd (L) Division tasked with taking Ali Mansur and the adjoining hills. 157th Brigade slipped quietly into its positions before 01.00, and at 04.45 (before dawn) it advanced up the El Burjaliye Ridge to attack the cliffs of Ali Mansur, with 1/7th HLI advancing in the centre led by Lt-Col Galbraith. As the light grew, the Turks opened fire, and the British artillery bombardment began. When the bombardment ended, HLI patrols scaled the cliffs and were soon at the top, firing down on retreating Turks. By 07.00 the brigade was in complete possession of the objective, with patrols pushing out across the plain behind. Consolidation was carried out under Turkish shellfire. The second phase of the attack on 19 April against Ali Muntar, for which 157th Bde was in reserve, was less successful. The Turkish positions known as 'the Labyrinth' had not been sufficiently suppressed by the bombardment and although 155th (South Scottish) Brigade took a lunette on Outpost Hill, it could not be held, and changed hands several times. It was finally abandoned at 18.20, just as 1/7th HLI arrived to reinforce the position. 1/7th HLI then helped 156th (Scottish Rifles) Brigade to establish a line across the ridge. They dug all night in the hard ground, but by daybreak on 20 April the trench was less than 1 metre deep and came under mortar fire. Several men of the 1/7th HLI were killed trying to get water through to the men pinned down in this trench; the battalion lost 34 men by sniping during the day. At midnight the advanced line was withdrawn to a stronger defence line in rear. During the four-day battle the 1/7th HLI lost 4 officers and 14 ORs killed, 1 officer and 7 ORs missing, and 3 officers and 115 ORs wounded. Most of the missing were in fact dead, and many of the wounded also died.[20][41][42][43]
Capture of Wadi el Hesi.
By the autumn of 1917 the EEF had been revitalised by the arrival of Sir Edmund Allenby as commander-in-chief, and the next operation (the 3rd Battle of Gaza, 31 October–7 November) was much better planned and successful. 52nd (L) Division down on the coast carried out a holding action while the Desert Mounted Corps swept round the Turkish flank. The Turks withdrew to defend the Wadi el Hesi, with 52nd (L) Division well up in pursuit. 157th Brigade led this pursuit, having been in reserve, and made for the mouth of Wadi el Hesi, accompanied by artillery and cavalry. 5th HLI captured the first part of 'Sausage Ridge' during the night of 7/8 November and 7th HLI,[lower-alpha 1] (now commanded by Lt-Col Edward Gibbons, originally of the Middlesex Regiment) pressed forward to extend 5th HLI's line down to the sea, and by dawn had secured both sides of Wadi Hesi. Daylight showed a sand ridge still occupied by the enemy from which they could bring down fire on the division crossing the mouth of the wadi, but a company of the 7th HLI advanced under heavy shell, machine gun and rifle fire across the sand ridge 'as if it was carrying out a parade movement'. The rest of the division followed up and took the rest of Sausage Ridge. The Turks retreated leaving behind large quantities of stores. 7th HLI's casualties in this successful operation were 6 ORs killed and 6 missing, 1 officer and 55 ORs wounded.[20][44][45][46]
The brigade continued leading the pursuit up the coast, marching through soft sand towards Esdud. The attack on Esdud was directed by 7th HLI on the left under Lt-Col Gibbons, with 5th Argyll and Sutherland Highlanders on the right, and darkness fell before the assaulting troops reached the hills that formed the objective, but they went through the Turkish defences with the bayonet. Casualties at this stage had been low, but consolidation had to be carried on under machine gun fire illuminated by flares, and fighting of several small counter-attacks. After midnight a serious counter-attack came in, with the Turks rushing the right hand part of 7th HLI's position. Private Jack with a Lewis gun maintained the end of the line, and Lt-Col Gibbons led an attack back up the hill, rifle in hand, to restore the position. 7th HLI had lost 5 ORs killed and 2 officers and 23 ORs wounded, but the Turkish position had been cracked open, the EEF's advance continuing next morning.[47]
52nd (L) Division assaulted Mughar Ridge on 13 November, leading to the capture of Junction Station the following day, while a composite force including 7th HLI marched into Mansurah.[20][48][49]
The EEF now began to advance on Jerusalem. 52nd (L) Division had to negotiate a poor road through the hills beyond Beit Liqya in heavy rain. On 20 November, at the start of the Battle of Nebi Samwil, 7th HLI under Lt-Col Gibbons moved up this track along a wadi to attack the hill village of Beit Duqqu. A guide led them astray, and they attacked Beit 'Anan (the objective of 5th HLI) by mistake. Attacked from two sides, that village fell quickly, 6th HLI climbed to take Beit Duqqu, and then the whole brigade cleared the villages behind by weight of rifle and machine gun fire. Over the following days 52nd (L) Division continued to make demonstrations while the EEF took Nabi Samwil.[20][50][51][52]
The Turks began a counter-offensive in late November, when 157th Bde was defending Beit Ur al-Tahta. In front of 7th HLI the opposing lines were only 20–50 m apart, so the battalion had been given a high proportion of the brigade's machine guns and trench mortars. The attacks on 30 November and 1 December were driven off, and casualties among 7th HLI were very light.[53][54]

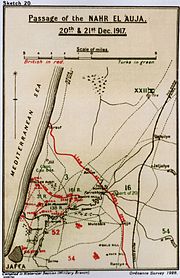
Passage of the Nahr el Auja
After breaking this counter-offensive, the EEF captured Jerusalem on 11 December.[55] 52nd (L) Division's next operation was the tricky passage of the Nahr el Auja to launch the Battle of Jaffa. The troops practised using canvas boats on a village pond, then at 22.30 on the evening of 20 December the first assaulting waves went forward under cover of an artillery barrage. 7th HLI, under Lt-Col Gibbons, had the task of landing, then attacking the flank of the Turkish trenches defending the ford. All four companies were across by 01.00 on 21 December, and began their attack from an unexpected direction, quickly clearing the flooded Turkish trenches and dugouts. The battalion then signalled the rest of the brigade to cross by the ford, but the ford could not at first be found in the flooded river. By daybreak the division held a significant bridgehead, and the Royal Engineers were constructing pontoon bridges for the artillery. The advance was renewed up the coast on the morning of 22 December, with fire support from HMS Grafton and gunboats, until 52nd (L) Division reached the castle of Arsuf, overlooking the Plain of Sharon, where it halted. The Official History describes the passage of the Auja as 'one of the most remarkable feats of the Palestine Campaign'. 7th HLI suffered only 5 casualties.[20][56][57][58]
Western Front[]
In the early part of 1918 the 52nd (L) Division remained in the lines near Arsuf. Then on 24 March it was warned for a transfer to the British Expeditionary Force (BEF) on the Western Front. The division's units sailed from Alexandria between 4 and 11 April, and landed at Marseilles by 17 April. 157th Brigade was the last to entrain, on 19 April, and the division was concentrated near Abbeville on 23 April. On 29 April it moved to Aire-sur-la-Lys and continued training. On 6 May it moved to the Vimy area and took over front line trenches, 7th HLI taking an active part in patrolling. On 23 July the division was pulled out of the line into GHQ Reserve, and on 31 July it moved up to the front line at Oppy near Arras to join in the victorious Hundred Days Offensive that was about to get under way.[20][59]


Men of 52nd (L) Division with captured machine guns at Quéant, 6 September 1918.
Most of 52nd (L) Division launched a surprise attack at Hénin-sur-Cojeul during the Battle of Albert on 23 August. 157th Brigade launched its own attack the following day, the objective being part of the Hindenburg Line running behind the crest of Hénin Hill. This entailed a 1.5 miles (2.4 km) advance with an enemy trench line on Croisilles Ridge on its right flank. The latter was to be taken 56th (1st London) Division. The 4 miles (6.4 km) approach march in the darkness crossed derelict wire and shellholes, but the brigade advanced promptly at 07.00 when the barrage started. It was a misty morning and it was 10 minutes before the German SOS barrage came down on its own lines, but it caught 7th HLI. 157th Brigade took the village of Hénin-sur-Cojeul with little difficulty and began advancing up Hénin Hill to the Hindenburg Line, but the creeping barrage and 56th Division had stopped short of the hill, and 157th Bde began to suffer casualties from its own guns. It got outposts into the wire of the Hindenburg Line by 16.00, but the only barrage that could be provided at short notice was thin, and the attack failed.[20][60] The attack was renewed at 09.20 on 27 August (the Battle of the Scarpe), with 7th HLI under Lt-Col Gibbons attacking on the right of the brigade. Opposition was fierce and casualties heavy, but the brigade got through the wire and trenches and crossed the Sensée river, only to find that 56th Division was held up again, and 157th Bde's flank was in the air. 157th Bde was involved in a desperate fight in a labyrinth of trenches, and it took 155th Bde to clear the trenches holding up 56th Division. 157th Brigade was unable to get further forward and was ordered to consolidate its position. 7th HLI's casualties from 22 to 31 August came to 5 officers and 58 ORs killed, 9 officers and 249 ORs wounded, and 23 ORs missing. 52nd (L) Division took part in the Battle of Drocourt-Quéant Line on 2–3 September and made good progress against the triangle of defences linking the Hindenburg Line to the Drocourt-Quéant Switch Line, but 157th Bde was barely engaged.[20][61]


Destroyed bridge over the Canal du Nord near Mœuvres.
There was then a pause while the BEF prepared for a set-piece crossing of the Canal du Nord. Meanwhile, 52nd (L) Division was holding Mœuvres, which the Germans were determined to retake. Bitter fighting went on from 17 to 19 September with 7th HLI initially in reserve, then counter-attacking on 19 September to retake the northern edge of the village. The CO, Lt-Col Gibbons, was mortally wounded during this action.[62][63] After the fight at Mœuvres, 52nd (L) Division was given a reduced role in the Battle of the Canal du Nord on 27 September. 157th Brigade advanced south from Mœuvres with tank and air support to clear both sides of the canal and Hindenburg Line. 7th HLI (commanded by Major C. Gibb) followed 6th HLI, dropping companies off in the dry brick-sided canal bed to mop up machine gun positions, and then supported 156th Bde onto its objective with rifle fire.[20][64][65] From 7 to 30 September, during the fighting at Mœuvres and the attack at the Canal du Nord, 7th HLI lost 5 officers and 13 ORs killed and died of wounds, 1 officer and 99 ORs wounded, and 8 ORs missing. By now the battalion's strength was down to about 400 men.[66]
On 7 October the division was pulled out of the line and transferred north. It went back into the line on 28 October, taking over positions on the Jard Canal, north of Valenciennes.[20][67][68] During the whole of October, 7th HLI's casualties amounted to only 1 OR killed and 8 wounded.[66]
Valenciennes fell to the BEF on 2 November and the German defences began to fall apart. On the night of 7/8 November, 7th HLI got patrols across the canal by means of canvas boast and broken bridges. The code word 'Hunt' was given, and the division crossed the following day to begin the pursuit of the broken German forces. On 10 November it attacked Herchies, north of the Mons Canal, which was held by a rearguard of machine guns and field guns. 7th HLI relieved a Canadian battalion on the Canal du Centre just outside Mons itself. When the Armistice with Germany came into effect at 11.00 the following morning, the division was clearing Herchies.[20][68][69]
After the Armistice 52nd (L) Division was engaged in training and clearing up the battlefields. Drafting and demobilisation proceeded and the units were quickly reduced to cadres. The last entrained for the UK on 31 May 1919. The division was reformed in Scotland in 1920.[20]
2/7th Highland Light Infantry[]
The 2nd Line Lowland Divisional and Brigade HQs were formed in January 1915, but it was some time before the various formations and units were assembled from their depots. Training was held up both by the lack of modern arms and equipment, and the need to supply reinforcement drafts to the 1st Line. By August, however, the division was substantially complete and stationed at Bridge of Allan with the HLI brigade at Dunfermline, when they were officially numbered 65th (2nd Lowland) Division and 196th (2/1st Highland Light Infantry) Brigade respectively.[70][71][72]
In November 1915 the infantry battalions in the 64th (2nd Highland) and 65th (2nd Lowland) Divisions were numbered sequentially, the 2/7th HLI becoming No 23 Battalion; by May 1916 they had reverted to their previous regimental designations. Also in November 1915 65th (2nd Lowland) Division went into winter quarters, but 196th Bde remained at Dunfermline. In March 1916 the division moved into England and joined Southern Army (Home Forces), 196th Bde being quartered around Danbury, Essex.[70][71]
In January 1917 65th (2nd Lowland) Division moved to Ireland to relieve 59th (2nd North Midland) Division, which had been the first TF formation to serve in that country. At first 196th Bde was stationed at the Curragh, Galway and Naas, but later the whole brigade moved into Dublin.[70][71] During 1917 the 2nd Line TF battalions in 65th (2nd Lowland) Division were progressively replaced by Graduated Battalions of the Training Reserve; by 30 July the 2/7th HLI ceased to exist and had been replaced by 221st Graduated Bn (previously 21st (Reserve) Bn Welsh Regiment).[24][70][71][73]
3/7th Highland Light Infantry[]
A 3rd Line or reserve battalion was formed at Glasgow in March 1915. By 8 April 1916, when it was redesignated 7th Reserve Bn, HLI, it was stationed at Ripon in Yorkshire. On 1 September 1916 it was at Catterick Camp when it was absorbed into the 5th Reserve Bn of the regiment.[24][25]
21st Highland Light Infantry[]
In 1915 the Home Service men of the HLI brigade were combined into 9th Scottish Provisional Battalion, which joined the Scottish Provisional Brigade (later 1st Provisional Brigade) on 22 May. In April 1916 the 1st Provisional Bde moved from Scotland to Kent to take over coastal defence duties, with 9th Bn stationed at Deal. The Military Service Act 1916 swept away the Home/Foreign service distinction, and all TF soldiers became liable for overseas service, if medically fit. The Provisional Brigades thus became anomalous, and at the end of 1916 the remaining battalions were formed into numbered battalions of their parent units in new Mixed Brigades and Home Service Divisions. 9th Provisional Bn became 21st HLI on 1 January 1917, while 1st Provisional Brigade became 221st Infantry Brigade (later 221st Mixed Brigade). Part of the role of these home defence units alongside the Training Reserve was physical conditioning to render men fit for drafting overseas. 21st HLI continued in this role until the end of the war.[24][74][75][76]
Interwar[]
In 1920 the TF reformed as the Territorial Army, with 7th HLI once again in 157th (HLI) Bde of 52nd (Lowland) Division.[77] The Beardmore Cadet Corps was also affiliated to the battalion at this time.[9]
Anti-Aircraft conversion[]
During the 1930s the increasing need for anti-aircraft (AA) defence for Britain's cities was addressed by converting a number of TA infantry battalions into AA units. The 7th HLI was one of the battalions selected, becoming the 83rd (7th (Blythswood) Battalion, Highland Light Infantry) Anti-Aircraft Regiment, Royal Artillery on 1 November 1938, consisting of Regimental HQ (RHQ) and three batteries (257, 258, 259) all based at Bridgeton. It adopted the simpler title of 83rd (Blythswood) AA Regiment in 1939.[6][78]
It formed part of 42nd Anti-Aircraft Brigade, newly-formed to take responsibility for the AA defence of Glasgow and the Clyde estuary.[79][80]
World War II[]
Mobilisation[]


3.7-inch HAA gun preserved at Imperial War Museum Duxford.
In February 1939 the existing AA defences came under the control of a new Anti-Aircraft Command. In June a partial mobilisation of TA units was begun in a process known as 'couverture', whereby each AA unit did a month's tour of duty in rotation to man selected AA and searchlight positions. On 24 August, ahead of the declaration of war, AA Command was fully mobilised at its war stations.[81]
In June 1940 those AA regiments like the 83rd equipped with 3-inch or the newer 3.7-inch guns were termed Heavy Anti-Aircraft (HAA) to distinguish them from the new Light Anti-Aircraft (LAA) units being formed.[6][78]
Blitz[]


Formation sign of 12 AA Division.
83rd (Blythswood) HAA Rgt continue to served with 42 AA Bde through the period of the Phoney War and the Battle of Britain.[82][83][84][85] Following the Luftwaffe 's defeat in the Battle of Britain, it began night attacks on Britain's cities ('The Blitz'). 3rd AA Division's responsibilities were split in November 1940 and a new 12th AA Division created, to which 42nd AA Bde was transferred, with its responsibility restricted to the defence of Glasgow and the Firth of Clyde.[86] [87] The industrial town of Clydebank near Glasgow was badly hit on the nights of 13/14 and 14/15 March 1941 in the 'Clydebank Blitz', but none of the raiders was brought down by AA fire.[88][89] The urgent need for more HAA guns on Clydeside was well known: the authorised scale had been 80 in 1939, raised to 120 in 1940, but in February 1941 there were still only 67. A new scale of 144 guns was authorised on 21 March, but only 88 were in position.[86][90] There were three other heavy raids on Clydeside during the Blitz, on the nights of 7/8 April, 5/6 and 6/7 May 1941.[89][91]
However, after the Blitz ended in May 1941, sufficient reinforcements were arriving to allow AA Command to withdraw 83rd (Blythswood) HAA Rgt to meet the urgent need for AA reinforcements in overseas theatres. The regiment left AA Command in July 1941 and joined the War Office Reserve with 257, 258, 259 HAA Btys.[92][93]
Middle East[]


Tenth Army insignia.
By October 1941 the regiment was on its way to join Middle East Forces. On arrival it was sent to Persia and Iraq Force (Paiforce) in Iraq, where General Henry Maitland Wilson was trying to build up the AA resources of Tenth Army to meet a possible German advance on the vital oilfields via the Caucasus. This was a slow process: by June 1942, 83rd (Blythswood) HAA Rgt was still the only HAA unit in Tenth Army. By the end of the year it formed part of 8 AA Bde in Tenth Army. The tasks undertaken were the defence of the Basra base area, RAF Habbaniya, Baghdad, Mosul and the oil installations at Kirkuk. Each of these gun defence areas received one HAA battery.[82][94][95]
Wilson's planned AA defences never reached their full extent. After the German defeat at the Battle of Stalingrad the Luftwaffe was never in a position to attack Iraq or Persia and from April 1943 the AA defences were run down. 8th AA Brigade and 83rd (Blythswood) HAA Rgt moved to Palestine and came under Ninth Army.[82][94][95]
4 AA Bde remained in Iraq, responsible for Habbaiya, Basra, and a few oilfields, but it was given two important training tasks in addition to its operational commitments. The first was to organise and train four Polish AA regiments from the thousands of former Prisoners of War (Anders' Army) released by the Soviet Union to form II Polish Corps under British command. Their technical training was assigned to 83rd (Blythswood) HAA Rgt. A second task for 83rd HAA Rgt was to provide 258 HAA Bty as a cadre to form the basis of 25th Indian HAA Rgt. By May 1943 the first battery of 25th Indian HAA Rgt was ready for duty and posted to Habbaniya. This regiment was complete by March 1944, and in May the Indian Army took full responsibility for AA tasks under Tenth Army. 4 AA Brigade and 83rd HAA Rgt returned to Middle East Forces, where the AA organisation was also being run down.[82][94][95][96] The regiment was placed in suspended animation in North Africa in September 1944.[78][82]
Postwar[]
AA Command formation sign.
When the TA was reconstituted in 1947, the regiment reformed at Bridgeton as 483rd (Blythswood) (Mixed) Heavy Anti-Aircraft Regiment, RA ('Mixed' indicating that members of the Women's Royal Army Corps were integrated into the unit). It formed part of 77 AA Bde at Glasgow.[6][78][97] [98][99]
AA Command was disbanded on 10 March 1955, and there was a reduction in the number of AA units in the TA. 483 (Blythswood) HAA Rgt amalgamated with 474 (City of Glasgow) HAA and 591 (Cameronian) LAA Rgts to form a new 445 (Cameronians) LAA Rgt with[6][78][98][100]
- P (Cameronians) Bty
- Q (Blythswood) Bty
- R (Glasgow) Bty
Further amalgamations in 1961 saw the Blythswood and Glasgow batteries merged as Q Bty, and in 1967 the regiment was disbanded. Although elements continued to serve in the TAVR, the Blythswood lineage was ended.[100]
Uniform and Insignia[]

Mackenzie Tartan.
The RVCs that were raised in 1859–60 wore variations on Volunteer grey or green uniforms and different headgear.[101] However, in July 1861 the 2nd Admin Bn adopted a Rifle green uniform with scarlet collars and piping, a Rifle green shako with black ball-tuft and black belts. The uniform of the 7th Admin Bn was similar but with black facings, adopting a black busby with a black plume in 1872. In 1874 the combined unit adopted a uniform of scarlet tunics with blue facings and trousers, with blue Glengarry bonnets, replaced by a helmet in 1878. From 1886 the battalion adopted the full uniform of the HLI with yellow facings and tartan Trews.[5][7][9] After 1908 it followed the HLI in changing to buff facings. The trews would have been in Mackenzie No 5 tartan, the regimental tartan of the HLI.[9][102][103]
From 1947 to 1955 the 483rd HAA Rgt wore a Mackenzie tartan flash on the left arm of battledress blouses.[78]
Honorary Colonel[]
The following served as Honorary Colonel of the battalion:[9]
- Alex. C. Ewing, VD, 3 June 1864 to 1902.
- William Stirling, VD, (supernumerary Hon Col, having held the appointment with the 7th Admin Bn from 22 May 1863)
- Col Lord Blythswood, VD, former CO, appointed 28 May 1902
- Col W. Clarke, VD, former CO, from 6 August 1908
- Squadron-Leader Douglas Douglas-Hamilton, Marquess of Douglas and Clydesdale (later Air Commodore the Duke of Hamilton, AFC), appointed 15 July 1931[104][105]
Memorials[]
There is a stone obelisk memorial to the 7th (Blythswood) Bn HLI in World War I on Glasgow Green, not far from the battalion's former HQ at Bridgeton.[106][107][108] The memorial to the men of all battalions of the HLI who died in World War I is in Glasgow Cathedral[109]
Footnotes[]
- ↑ The battalions had abandoned the '1/' prefix now that the 2nd and 3rd Line battalions had been disbanded.
Notes[]
- ↑ Beckett.
- ↑ Grierson, pp. 1–12.
- ↑ Spiers, pp. 163–8.
- ↑ 4.0 4.1 Beckett, Appendix VII.
- ↑ 5.0 5.1 5.2 5.3 5.4 5.5 5.6 5.7 5.8 Grierson, pp. 265–9.
- ↑ 6.00 6.01 6.02 6.03 6.04 6.05 6.06 6.07 6.08 6.09 6.10 "7th HLI at Regiments.org.". http://www.regiments.org/regiments/uk/volmil-scotland/vinf/hli-7.htm#.
- ↑ 7.0 7.1 7.2 7.3 7.4 7.5 7.6 7.7 7.8 7.9 Westlake, Rifle Volunteers, pp. 127–38.
- ↑ Westlake, Engineer Volunteers, p. 10.
- ↑ 9.00 9.01 9.02 9.03 9.04 9.05 9.06 9.07 9.08 9.09 9.10 9.11 9.12 9.13 Army List, various dates.
- ↑ Archibald Campbell at The University of Glasgow Story.
- ↑ Archibald Campbell at Grace's Guides.
- ↑ Beckett, pp. 135, 185–6.
- ↑ Dunlop, pp. 60–1; Appendix A.
- ↑ Spiers, pp. 228–9.
- ↑ Leslie.
- ↑ Dunlop, Chapter 14.
- ↑ Spiers, Chapter 10.
- ↑ London Gazette 20 March 1908.
- ↑ 19.0 19.1 Thompson, pp. 3–5.
- ↑ 20.00 20.01 20.02 20.03 20.04 20.05 20.06 20.07 20.08 20.09 20.10 20.11 20.12 20.13 20.14 20.15 20.16 20.17 20.18 Becke, Pt 2a, pp. 109–15.
- ↑ 21.0 21.1 52 (L) Division at Long, Long Trail.
- ↑ 22.0 22.1 "52 (L) Division at Regimental Warpath.". http://warpath.orbat.com/divs/52_div.htm#.
- ↑ Conrad, British Army, 1914.
- ↑ 24.0 24.1 24.2 24.3 24.4 HLI at Long, Long Trail.
- ↑ 25.0 25.1 "HLI at Regimental Warpath.". http://www.warpath.orbat.com/regts/hli.htm#.
- ↑ Becke, Pt 2b, p. 6.
- ↑ Thompson, pp. 5–6.
- ↑ Thompson, pp. 7–11.
- ↑ 29.0 29.1 29.2 29.3 29.4 Westlake, Gallipoli, pp. 205–7.
- ↑ Thompson, p. 14.
- ↑ Aspinall-Oglander, pp. 105–6.
- ↑ Thompson, pp. 78–81, 102–28.
- ↑ Thompson, pp. 160–1, 184–5.
- ↑ Thompson, pp. 190–202.
- ↑ Thompson, pp. 219–41.
- ↑ Thompson, Appendix II.
- ↑ Bullock, pp. 30–1.
- ↑ MacMunn & Falls, p. 156.
- ↑ Bullock, pp. 44–5.
- ↑ MacMunn & Falls, pp. 310–4.
- ↑ Bullock, pp. 46–7.
- ↑ MacMunn & Falls, pp. 329–48.
- ↑ Thompson, pp. 312–34.
- ↑ Bullock, pp. 71–8.
- ↑ Falls, pp. 131–6.
- ↑ Thompson, pp. 372–89.
- ↑ Thompson, pp. 392–9.
- ↑ Bullock, pp. 80–1.
- ↑ Thompson, pp. 424–6.
- ↑ Bullock, p. 90.
- ↑ Falls, pp. 194–6.
- ↑ Thompson, pp. 434–7.
- ↑ Bullock, pp. 91–2.
- ↑ Thompson, pp. 468–73.
- ↑ Bullock, pp. 93–5.
- ↑ Bullock, p. 96.
- ↑ Falls, pp. 268–74.
- ↑ Thompson, pp. 486–501.
- ↑ Thompson, pp. 511–5.
- ↑ Thompson, pp. 515–23.
- ↑ Thompson, pp. 528–31, 541–4.
- ↑ Thompson, pp. 548–52.
- ↑ 7th HLI at Remembering the Dead of World War I.
- ↑ Edmonds & Maxwell–Hyslop, pp. 32–4.
- ↑ Thompson, pp. 560–5.
- ↑ 66.0 66.1 Thompson, pp. 568–9.
- ↑ Edmonds & Maxwell–Hyslop, p. 396.
- ↑ 68.0 68.1 Thompson, pp. 570–1.
- ↑ Edmonds & Maxwell–Hyslop, pp. 526, 531, 536–7, 554.
- ↑ 70.0 70.1 70.2 70.3 Becke Pt 2b, pp. 61–5.
- ↑ 71.0 71.1 71.2 71.3 65 (2nd L) Division at Long, Long Trail.
- ↑ "65 (2nd L) Division at Regimental Warpath.". http://warpath.orbat.com/divs/65_div.htm#.
- ↑ Training Reserve at Long, Long Trail.
- ↑ Army Council Instructions, January 1916, Appendix 18.
- ↑ "David Porter's work on Provisional Brigades at Great War Forum.". http://1914-1918.invisionzone.com/forums/index.php?showtopic=175475#.
- ↑ HQ 221 Mixed Brigade War Diary 4 August 1914–30 July 1919, The National Archives, Kew, file WO 95/5458.
- ↑ Titles and designations, 1927.
- ↑ 78.0 78.1 78.2 78.3 78.4 78.5 Litchfield, p. 291.
- ↑ Routledge, Table LX, p. 378.
- ↑ AA Command 3 September 1939 at Patriot Files.
- ↑ Routledge, pp. 65–6, 371.
- ↑ 82.0 82.1 82.2 82.3 82.4 "83 HAA Rgt at RA 39–45.". https://ra39-45.co.uk/units/heavy-anti-aircraft-regiments/83-blytheswood-heavy-anti-aircraft-regiment-rata.
- ↑ 12 AA Division at RA 39–45.
- ↑ Farndale, Annex D.
- ↑ Routledge, Tble LXV, p. 397.
- ↑ 86.0 86.1 Pile's despatch.
- ↑ Collier, Chapter XVI
- ↑ Collier, Chapter XVII.
- ↑ 89.0 89.1 Collier Appendix XXX.
- ↑ Collier, Chapter XVIII.
- ↑ Collier Appendix XXXI.
- ↑ Order of Battle of Non-Field Force Units in the United Kingdom, Part 27: AA Command, 12 May 1941, with amendments, TNA file WO 212/79.
- ↑ Order of Battle of the Field Force in the United Kingdom, Part 3: Royal Artillery (Non-Divisional Units), 25 March 1941, with amendments, TNA files WO 212/5 and WO 33/2323.
- ↑ 94.0 94.1 94.2 Joslen, pp. 484, 487–9.
- ↑ 95.0 95.1 95.2 Routledge, pp. 199–200.
- ↑ Routledge, Table XXVI, p. 165.
- ↑ Farndale, Annex M.
- ↑ 98.0 98.1 474–519 Rgts RA at British Army 1945 onwards.
- ↑ 67–106 AA Bdes at British Army 1945 onwards.
- ↑ 100.0 100.1 "5th Bn Cameronians at Regiments.org.". http://www.regiments.org/regiments/uk/volmil-scotland/vinf/cam-5.htm#.
- ↑ A number of uniforms of the unit's constituent RVCs were illustrated by Maj-Gen Sir James Grierson in 1909; see Grierson Plate XXX and Blythswood Bn at Scottish Military Articles.
- ↑ Mackenzie HLI tartans at Regiments.org.
- ↑ Money Barnes, p. 295.
- ↑ London Gazette, 14 July 1931.
- ↑ Burke's.
- ↑ HLI 7th (Blythswood) Battalion – Glasgow Green at Scottish Military Research Group.
- ↑ Ref WM152926 at War Memorials Online.
- ↑ Ref 54464 at IWM War Memorials Register.
- ↑ Ref 69792 at IWM War Memorials Register.
References[]
- Army Council Instructions Issued During January 1916, London: HM Stationery Office, 1916.
- Brig C.F. Aspinall-Oglander, History of the Great War: Military Operations Gallipoli, Vol II, May 1915 to the Evacuation, London: Heinemann, 1932/Imperial War Museum & Battery Press, 1992, ISBN 0-89839-175-X.
- Maj R. Money Barnes, The Uniforms and History of the Scottish Regiments, London: Seeley Service, 1956/Sphere 1972.
- Maj A.F. Becke,History of the Great War: Order of Battle of Divisions, Part 2a: The Territorial Force Mounted Divisions and the 1st-Line Territorial Force Divisions (42–56), London: HM Stationery Office, 1935/Uckfield: Naval & Military Press, 2007, ISBN 1-847347-39-8.
- Maj A.F. Becke,History of the Great War: Order of Battle of Divisions, Part 2b: The 2nd-Line Territorial Force Divisions (57th–69th), with the Home-Service Divisions (71st–73rd) and 74th and 75th Divisions, London: HM Stationery Office, 1937/Uckfield: Naval & Military Press, 2007, ISBN 1-847347-39-8.
- Ian F.W. Beckett, Riflemen Form: A Study of the Rifle Volunteer Movement 1859–1908, Aldershot: Ogilby Trusts, 1982, ISBN 0 85936 271 X.
- David L. Bullock, Allenby's War: The Palestine-Arabian Campaigns 1916–1918, London: Blandford Press, 1988, ISBN 0-7137-1869-2.
- Burke's Peerage, Baronetage and Knightage, 100th Edn, London, 1953.
- Col John K. Dunlop, The Development of the British Army 1899–1914, London: Methuen, 1938.
- Brig-Gen Sir James E. Edmonds & Lt-Col R. Maxwell-Hyslop, History of the Great War: Military Operations, France and Belgium 1918, Vol V, 26th September–11th November, The Advance to Victory, London: HM Stationery Office, 1947/Imperial War Museum and Battery Press, 1993, ISBN 1-870423-06-2.
- Lt-Col H.F. Joslen, Orders of Battle, United Kingdom and Colonial Formations and Units in the Second World War, 1939–1945, London: HM Stationery Office, 1960/Uckfield: Naval & Military Press, 2003, ISBN 1-843424-74-6.
- N.B. Leslie, Battle Honours of the British and Indian Armies 1695–1914, London: Leo Cooper, 1970, ISBN 0-85052-004-5.
- Norman E.H. Litchfield, The Territorial Artillery 1908–1988 (Their Lineage, Uniforms and Badges), Nottingham: Sherwood Press, 1992, ISBN 0-9508205-2-0.
- Lt-Gen Sir George MacMunn & Capt Cyril Falls, History of the Great War: Military Operations, Egypt and Palestine, Vol I, From the Outbreak of War with Germany to June 1917, London: HM Stationery Office, 1928/Imperial War Museum and Battery Press, 1992, ISBN 1-870423-26-7.
- Capt Cyril Falls, History of the Great War: Military Operations, Egypt and Palestine, Vol II, From June 1917 to the End of the War, London: HM Stationery Office, 1930/Imperial War Museum and Naval & Military Press, 2013, ISBN 1-84574951-0.
- Brig N.W. Routledge, History of the Royal Regiment of Artillery: Anti-Aircraft Artillery 1914–55, London: Royal Artillery Institution/Brassey's, 1994, ISBN 1-85753-099-3
- Edward M. Spiers, The Army and Society 1815–1914, London: Longmans, 1980, ISBN 0-582-48565-7.
- Lt-Col R.R. Thompson, The Fifty-Second (Lowland) Division 1914–1918, Glasgow: Maclehose, Jackson 1923/Uckfield: Naval & Military, 2004, ISBN 978-1-84342993-7.
- Titles and Designations of Formations and Units of the Territorial Army, London: War Office, 7 November 1927.
- Ray Westlake, Tracing the Rifle Volunteers, Barnsley: Pen and Sword, 2010, ISBN 978-1-84884-211-3.
- Ray Westlake, British Regiments at Gallipoli, Barnsley: Leo Cooper, 1996, ISBN 0-85052-511-X.
- R.A. Westlake, Royal Engineers (Volunteers) 1859–1908, Wembley: R.A. Westlake, 1983, ISBN 0-9508530-0-3.
External sources[]
The original article can be found at Blythswood Rifles and the edit history here.