
The Battle of Saint-Malo was fought between Allied and German forces to control the French coastal town of Saint-Malo during World War II. The battle formed part of the Allied breakout across France and took place between 4 August and 2 September 1944. United States Army units, with the support of Free French and British forces, successfully assaulted the town and defeated its German defenders. The German garrison on a nearby island continued to resist until 2 September.
Saint-Malo was one of the French towns designated as a fortress under the German Atlantic Wall program, and its prewar defenses were expanded considerably before the Allied landings in Normandy during June 1944. As part of their invasion plans, the Allies intended to capture the town so that its port could be used to land supplies. While there was some debate over the necessity of this in August as the Allied forces broke out of Normandy and entered Brittany, it was decided to capture rather than contain Saint-Malo to secure its port and eliminate the German garrison.
After initial attempts to capture the locality failed, the US Army began a siege operation. Infantry units attacked and defeated large numbers of fortified German positions with the support of artillery and aircraft. A fortification on the edge of Saint-Malo was the final German position on the mainland to hold out, and surrendered on 17 August. After extensive air and naval bombardments, the garrison on the nearby island of Cézembre surrendered on 2 September. German demolitions made it impractical to use Saint-Malo as a port. The town was also heavily damaged during the battle and was rebuilt after the war.
Background[]
Saint-Malo is a historic port town on the northern coast of Brittany,[2] which, due to its strategic location, was extensively fortified over the centuries.[3] It had a population of 13,000 in 1936, of whom 6,000 lived within the city walls.[4] Saint-Malo's harbor facilities could accommodate medium-sized ships and unload one thousand tons of cargo per day.[2] Before World War II, the town was a popular holiday destination for wealthy Parisians and boasted a casino, hotels and spas.[5]
The town is located on the northwest of the Saint-Malo peninsula, on the eastern side of the mouth of the Rance river.[2] Saint-Malo was once an island, but had been joined to the mainland by a causeway and a road by the time of World War II.[6][7] The suburb of Paramé was to the east of Saint-Malo, and the fishing port of St. Servan-sur-Mer to the south.[6] The town of Dinard is across the Rance from Saint-Malo.[2] The small but heavily fortified island of Cézembre lies at the mouth of the Rance, and is 4,000 yards (3,700 m) off the coast from Saint-Malo.[8]
During the first months of the war, Saint-Malo was one of the ports used to import supplies for the British Expeditionary Force in France.[9] As the Germans neared victory in the Battle of France, Allied forces were also evacuated to Britain from the town during Operation Aerial in June 1940; 21,474 personnel were embarked from Saint-Malo without the loss of any lives or ships.[10] Brittany was a key center for German forces during the occupation of France and its major ports were used as submarine bases. As the Allies prepared to liberate France, the Germans judged that Brittany was a likely location for an Allied invasion. This led to extensive fortifications being built in the region as part of the Atlantic Wall program.[11] In 1943 the Oberkommando der Wehrmacht (Template:Translation) designated Saint-Malo and other French ports with prewar fortifications as fortresses. Each fortress was assigned a commander who was required to swear an oath to defend it to the death.[12] The German leader Adolf Hitler expected that these fortresses would hold out for at least 90 days if they were attacked.[5]
Saint-Malo formed part of the Occupied Zone of France, which was directly administered by the German military rather than the Vichy French regime.[13] During the occupation, the town's port was used as a base for coastal forces by the Kriegsmarine (German Navy). It was also a supply base for the large German garrison in the Channel Islands.[2] In August 1942 German military police rounded up local Jews as part of a mass deportation operation.[14] The Atlantic Wall program led to a substantial augmentation of the prewar fortifications at Saint-Malo, this work being undertaken by volunteer and forced laborers controlled by Organization Todt.[3][6]
The French Resistance had large numbers of members in Brittany and was capable of successfully attacking German forces.[15] The resistance in the region was dominated by the communist Francs-Tireurs et Partisans who, unlike many other resistance units, were in favor of making attacks before the Allies landed in France.[16] This led to a partisan war that intensified from 1943. The German forces that attempted to suppress the resistance included the Gestapo secret police, army military police formations and security battalions. Many of the latter were manned by captured Soviet personnel who agreed to fight for the Germans; these units gained a reputation for committing war crimes.[15] The German units were under orders to kill any partisans taken prisoner, at the same time the Free French did not accept their opponents' surrender.[17] The Allies began to airdrop supplies to the Free French in Brittany from early 1944, and special forces units were inserted from June that year to strengthen them.[18] There were more than 2,500 resistance members in the Saint-Malo region as of August 1944, most of whom lived in the towns of Saint-Malo, Dinard and Dinan.[19]
Prelude[]
Allied plans[]


Map showing the advance of US Army units into Brittany and the locations of German positions in August 1944
As part of the preparations for Operation Overlord, the Allied invasion of Normandy, Saint-Malo was identified by the Allied planners as one of several minor ports on the French Atlantic coast that could be used to land supplies for the Allied ground forces in France. It was intended that these ports would provide a useful supplement for the major ports such as Brest, Cherbourg and Quiberon Bay.[20] At this time, the planners envisioned that the initial invasion phase would be followed by a subsequent phase to secure a lodgment area. The lodgement area was to include all of the coastline between the Seine and the Loire rivers and nearby inland areas, including Normandy and Brittany. It was believed that this region could be secured within three months of the invasion. Facilities constructed within the lodgment area and supplies and troops landed there would be used to support the subsequent liberation of France and invasion of Germany.[21] Accordingly, the Overlord plan specified that securing Brittany would be the main objective of Lieutenant General Omar Bradley's Twelfth United States Army Group after it broke out from Normandy. This task was assigned to the Third Army, which formed part of the army group and was commanded by Lieutenant General George S. Patton.[22] The planners believed that it would be possible to open Saint-Malo to Allied shipping on the 27th day after the Normandy landings if Allied advances following the invasion went as scheduled, and that 900 tones of supplies could initially be unloaded there daily via DUKW amphibious trucks. It was hoped that port capacity could subsequently be increased to 3,000 tons of supplies per day at Saint-Malo, and another 6,000 tons per day at the ports in the region around the town such as Cancale. This would allow the Saint-Malo area to be the main port for the Third Army. However, Saint-Malo's port was also assessed as being easily blocked by German forces.[23]
Following the Normandy landings on 6 June 1944, the Allies and Germans fought a prolonged campaign in the region. The German forces managed to block the Allies from breaking out of the peninsula into other parts of France for almost two months but suffered heavy casualties in the process.[24] During early July the Allied leadership considered the feasibility of launching combined amphibious and airborne landings at Saint-Malo, Quiberon Bay and Brest to seize ports. It was judged that these operations would be very risky, leading to a decision to only attempt them if the stalemate in Normandy became prolonged.[25] British bomber aircraft attacked railway yards and fuel storage tanks at Saint-Malo on 17 July; this raid resulted in French civilian casualties.[5] In late July the American forces in the west of the Normandy region launched the Operation Cobra offensive, which led the German positions to collapse.[26] The town of Avranches, through which the main roads leading from the west coast of Normandy into Brittany ran, was liberated on 30 July and a German counter-attack was defeated the next day.[27] Large numbers of highly mobile American units passed through the town over the next days, and rapidly penetrated the interior of France.[26] Patton's initial plans for the liberation of Brittany involved first cutting off the Germans in the peninsula by driving a force from Avranches to Quiberon Bay. His amoured units would then rapidly capture the plateau in the peninsula's center, which would isolate the German garrison in a few port towns. These towns were to be attacked as the final stage of the operation.[28] Bradley initially ordered Patton to capture Saint-Malo as part securing Brittany.[29] Patton did not consider the town's capture to be important in its own right, and none of his forces were assigned it as an objective. Bradley did not object, and Patton gained his agreement to bypass the Saint-Malo area if it proved to be well defended.[30] At this time, the Allied intelligence services believed that there were 3,000 Germans at Saint-Malo and Patton thought that the entire peninsula was held by around 10,000 German troops. These estimates were much lower than the actual size of the garrisons.[5] The collapse of the German Army in France as the Allies broke out of Normandy in early August led the Allied leadership to change their plans regarding Brittany. By 2 August General Dwight D. Eisenhower, the Supreme Commander of the Allied Expeditionary Force, believed that the main effort should be encircling the German forces to the southeast of Normandy rather than securing the peninsula. Bradley's views also changed, and by 3 August he preferred that Patton assign only a "minimum of forces" to Brittany, and advance to the east.[22] The VIII Corps under Major General Troy Middleton was given responsibility for Brittany.[31] The 6th Armored Division led the advance into western Brittany with the goal of rapidly capturing Brest, while the 4th Armored Division pushed south to liberate Rennes and then Quiberon Bay.[32] On 2 August all of the German Army units in Brittany were ordered to withdraw into the fortified ports, including Saint-Malo, by their parent headquarters XXV Corps.[33][34] The town was attacked by Allied aircraft again on 1 August.[35] The United States Navy also patrolled the Gulf of Saint-Malo, and American destroyers and torpedo boats engaged German coastal craft in the area on several occasions during early August.[36] The resistance in Brittany was directed on 3 August to launch widespread attacks on German forces but avoid major battles.[37] There were approximately 35,000 armed resistance fighters in Brittany at the time, and they rapidly seized most of the region outside of the towns including strategically important roads and bridges. The resistance's control of these areas and transport infrastructure enabled the VIII Corps' rapid advance.[38] Resistance fighters also guided American forces as they moved through Brittany and undertook some garrison duties.[39]
German defenses[]
Prior to the Allied landings in Normandy, the German Army's 77th Infantry Division (77. Infantrie-Division) was stationed in the Saint-Malo area.[40] This division had been formed in early 1944 near Caen in Normandy, and had been transferred to Saint-Malo during May.[41] The 77th Infantry Division was dispatched to Normandy soon after D-Day, and suffered heavy casualties in the fighting there. The remnants of the division returned to Saint-Malo in late July, where it was reinforced with two anti-partisan units, Eastern Battalion 602 (Ost-Batallion 602) and Security Battalion 1220 (Sicherungs-Bataillion 1220).[40] It was later sent forward again as part of the ad hoc force that unsuccessfully attempted to stop the American breakout at Avranches.[40][42]

Obstacles installed on a beach at Dinard by German forces to prevent amphibious landings
At the time of the battle, the German force in the Saint-Malo area comprised approximately 12,000 personnel. The garrison included the remnants of the 77th Infantry Division, which had withdrawn into the Saint-Malo area. Other Army units included the 3rd Battalion of the 266th Infantry Division's 897th Grenadier Regiment, Eastern Battalion 602, Eastern Battalion 636 and Security Battalion 1220. Luftwaffe (German air force) units in the area comprised the 15th Flak Regiment and several other air defense units. Kriegsmarine forces included two coastal artillery units, Navy Artillery Regiment 260 (Marine-Artillerie-Abteilung 260) and Army Coast Battalion 1271 (Heeres-Küsten-Bataillon 1271).[3]
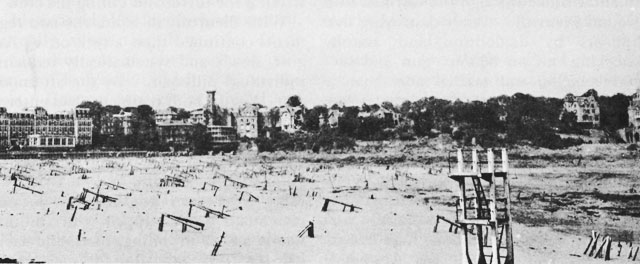
The Saint-Malo area was extensively fortified. The old town of Saint-Malo was enclosed by walls that had thick stone ramparts on the seaward side. Its landward entrance was protected by a fortified chateau that had once been the home of Anne of Brittany, the Duchess of Brittany between 1488 and 1514. The Fort de la Cité d'Aleth, which was designated the Citadel (Zitadelle) by the Germans, was located on a rocky promontory between Saint-Malo and St. Servan-sur-Mer. This fort had originally been designed by the great engineer Sébastien Le Prestre de Vauban in the eighteenth century. Several other fortresses were located on the approaches to Saint-Malo, including Fort la Varde at the Pointe de la Varde (fr) on the coast, the St. Ideuc strongpoint to the east of Paramé and fortifications on St. Joseph's Hill to the southeast of the town. Artillery in the fortifications on Cézembre provided support. Barbed wire and other obstructions had been placed on the beaches in the area to deter amphibious landings. The Germans had also planned to dig an antitank ditch across the Saint-Malo Peninsula and fill it with water, but this was incomplete. The fortifications in the Saint-Malo area were positioned in such a way that their garrisons were able to support one another. They were also stocked with ammunition, water and food. Further supplies could be brought in by sea from the Channel Islands. While the German High Commander in the West judged that the Saint-Malo fortifications were the most complete of any in their command at the time of the battle, they were not finished. A key deficiency was that they included few artillery guns.[43][44]
The Saint-Malo garrison was designated Coastal Defense Group Rance (Küstenverteidigungsgruppe Rance), and was divided into three sub-groups. Saint-Malo and nearby towns were defended by Coastal Defense Subgroup Saint-Malo (Küstenverteidigunguntergruppe Saint-Malo, or KVU Saint-Malo), which manned 79 fortified positions. The area around the town of Dol-de-Bretagne to the southeast of Saint-Malo was the responsibility of Coastal Defense Subgroup Dol and included seven fortified positions. Coastal Defense Subgroup Cancale was assigned the section of the peninsular to the northeast of Saint-Malo and 16 fortified positions.[45] The sector on the western side of the Rance, around Dinard, was the responsibility of the remnants of 77th Infantry Division, which was assigned some StuG III assault guns from StuG Brigade 341. Several strong points had been constructed to bolster the area's defenses.[46] These included four fortified positions for artillery.[47]
Cézembre was garrisoned by the 1st Battery of Navy Artillery Regiment 608, armed with several French 194-millimeter (7.6 in) caliber guns, antiaircraft guns and other weapons.[48] The personnel on the island included around 100 men contributed by the Italian Social Republic.[49] The garrison came under the command of the German forces at the Channel Islands.[5]
The fortress commander was Colonel Andreas von Aulock, a veteran of the Battle of Stalingrad and recipient of German's highest military honor, the Knight's Cross of the Iron Cross.[50][5] Historian Randolph Bradham has described him as an "arrogant Nazi",[51] but the US Army official historian Martin Blumenson and historians Willard Sterne and Nancy Nahra state that he treated French civilians correctly.[5][35] He was disappointed to command a fortress, and would have preferred to lead mobile forces.[6] Aulock and the other German commanders in the Saint-Malo region willingness to obey their orders to continue the fighting until further resistance was impossible led to the prolonged battle for the region.[51] During the battle Aulock stated that "I was placed in command of this fortress. I did not request it. I will execute the orders I have received and, doing my duty as a soldier, I will fight to the last stone".[35] His headquarters during the battle was in the Citadel.[47]
Battle[]
Task Force A[]


A map of the Battle of Saint-Malo
An ad hoc unit designated Task Force A was the first American unit to enter the Saint-Malo area. This force was established by Patton in late July to rapidly capture the bridges on the Paris–Brest railway line, which ran along the north coast of Brittany, before they were demolished by German forces. It comprised the 15th Cavalry Group, the 159th Engineer Battalion and the headquarters of the 1st Tank Destroyer Brigade and was commanded by Brigadier General Herbert L. Earnest. The task force passed through Avranches on 3 August, and engaged German forces 2 miles (3.2 km) from Dol-de-Bretagne that day. The commander of the Cavalry Group was killed in the initial clash, and Earnest decided to bypass Dol-de-Bretagne to the south after learning from civilians that it was heavily defended.[52] Middleton directed the Task Force to probe Saint-Malo's defenses as it pushed west, to investigate how strongly the town was held. This led to fighting near Miniac, 7 miles (11 km) west of Dol-de-Bretagne. As the Americans advanced towards Saint-Malo, they encountered stronger defenses to the south of Châteauneuf-d'Ille-et-Vilaine. Due to the strength of the German forces, Earnest asked Middleton to urgently dispatch infantry to support his command. The 83rd Infantry Division's 330th Infantry Regiment was entering the area at that time, and reached Dol-de-Bretagne on the afternoon of 3 August. The regiment's commander decided to delay attacking the town until the next day, to allow his men sufficient time to defeat the many German defensive positions.[29]
The 330th Infantry Regiment assaulted Dol-de-Bretagne on the morning of 4 August, and quickly captured the town. Task Force A also continued to advance north towards Châteauneuf-d'Ille-et-Vilaine during the day. This led to heavy fighting during which German coastal artillery and naval vessels in the Saint-Malo area fired on the American troops.[29]
Despite Patton's desire to avoid a siege, Middleton concluded that the German force at Saint-Malo was too strong to be safely bypassed, as it could attack the supply lines supporting the Allied advance into Brittany.[53] As a result, he directed that the 83rd Infantry Division capture the area. Patton partially overruled him, believing that the Germans would only offer a token defense of the town and the 330th Infantry Regiment would suffice to take it. The Army commander preferred that the rest of the 83rd Infantry Division follow the 6th Armored Division to Brest.[54]
Events during the afternoon of 4 August proved that Middleton was correct. While the Germans withdrew north in the morning, further heavy fighting during the afternoon indicated that they were strengthening their positions. Accordingly, Middleton again ordered the entire 83rd Infantry Division to be concentrated in the Saint-Malo area and then make a quick attack on the town in conjunction with Task Force A in the hope that this would crack the German defenses.[54] The remainder of the division arrived at Dol-de-Bretagne on the afternoon of 4 August, and its three regiments were deployed on the eastern side of the Rance.[55] The 83rd Infantry Division had landed at Normandy on 19 June, and taken part in the fighting there during July. It had overcome strong German resistance during Operation Cobra and followed the 6th Armored Division into Brittany. Major General Robert C. Macon had commanded the division since January 1944.[56]
Attacks made by the American forces on 5 August demonstrated that Saint-Malo would not fall quickly.[54] The 331st Infantry Regiment advanced along the coast and penetrated the first line of German defenses near Saint-Benoît-des-Ondes.[55] Châteauneuf-d'Ille-et-Vilaine was also captured, Task Force A taking 655 prisoners. A battalion of the 329th Infantry Regiment crossed the Rance in assault boats as the first stage of an operation intended to rapidly capture Dinard. Due to strong German resistance, this unit had to be withdrawn.[57] As it was clear that further fighting would be prolonged, Middleton directed Task Force A to disengage from the Saint-Malo area during the night of 5/6 August and resume its mission of securing railway bridges.[54] One of the 330th Infantry Regiment's three battalions was detached from 5 August to 25 September to reinforce Task Force A.[54][58]
Advance on Saint-Malo[]
In early August Bradley reached a conclusion that Saint-Malo should be captured, and ordered that this take place. He believed that it would provide a useful port to supply the large American force in Brittany.[2] The Americans still underestimated the size of German forces in Saint-Malo at this time. While French personnel had advised them that there were around 10,000 Germans in the area, American estimates ranged from 3,000 to 6,000. The VIII Corps believed the garrison comprised 5,000 personnel as of 12 August. There were actually more than 12,000 Germans in the Saint-Malo area.[59] Nevertheless, the stubborn resistance demonstrated by the Germans during the early fighting around Saint-Malo convinced Middleton and Macon that it would be difficult to capture the town.[60]


Street fighting on the Rue de la Gardelle in Parame during 8 August[61]
Aulock prepared for a lengthy battle, and rejected a proposal from local civilians to surrender his command to prevent damage to the towns in the region.[57] On 3 August he told community leaders that most civilians would be expelled from Saint-Malo for their own safety. When the leaders asked him to declare the town an open city to avoid fighting, Aulock stated that after he raised this with his superiors, Hitler ordered him to "fight to the last man". He further claimed that as his forces included armed boats that were operating near Saint-Malo, it was not possible to declare the town an open city as these vessels were legitimate targets for the Allies. During the evening of 5 August most of Saint-Malo's population departed the town, and entered areas controlled by the Americans.[35] As part of efforts to consolidate their positions, in the evening of 5 August German forces withdrew from Cancale as well as the town of Dinan on the western bank of the Rance.[57]
American troops attacked towards Saint-Malo during 6 August. Despite artillery and aircraft support, the pace of the advance was slow. By the afternoon the division was in contact with the main German defenses, including barbed wire, mine fields and machine gunners in pillboxes.[62] The advance brought the Americans within range of the guns on Cézembre, which opened fire. One of the first shells to be fired hit Saint-Malo Cathedral's spire and knocked it over.[35] Due to the slow progress, Middleton reinforced the 83rd Infantry Division that day with the 8th Infantry Division's 121st Infantry Regiment, a company of medium tanks and an artillery battalion.[Note 1] He also requested more air support.[62] The 121st Infantry Regiment was given responsibility for capturing Dinard.[64] The number of American troops assigned to the Saint-Malo area eventually reached 20,000.[65] This force included ten battalions of artillery.[66]
Saint-Malo was extensively damaged during 6 and 7 August. On the afternoon of 6 August multiple fires broke out across the town. French civilians believed that these were accidentally started by German troops who were burning codebooks and other documents, and that SS personnel both refused to allow firefighters to put them out and lit further fires. Efforts to fight the fires were also complicated by the town's water supply being cut by the Americans on that day, which was done to induce the garrison to surrender.[35] A Kriegsmarine patrol vessel was scuttled in the harbor during 6 August.[67] On the morning of 7 August the Germans completely destroyed Saint-Malo's harbor with explosives.[35] In response, American artillery began bombarding Saint-Malo.[5] The German demolitions and American bombardments resulted in fires that burned for the next week.[62]
Aulock ordered all French males aged between 17 and 70 who had remained in Saint-Malo after 5 August to be arrested as hostages following an inaccurate report that civilians had attacked his troops. The 382 hostages were held in harsh conditions at Fort National, and denied shelter, food and water. When American mortars bombarded the fort, 18 were killed.[5]
The 83rd Infantry Division continued to advance slowly towards Saint-Malo between 7 and 9 August. The 330th Infantry Regiment found that the German strongpoint at St. Joseph's Hill in the center of the division's sector was impossible to attack with infantry.[62] This position was a quarry that had been converted into a fortification through the addition of tunnels and bunkers.[47] After being bombarded with artillery for two days, the 400 survivors of the German garrison surrendered on 9 August. After this position fell, the division was able to move rapidly towards the town. On the left of the division's sector, the 329th Infantry Regiment captured St. Servan-sur-Mer and reached the Citadel. On the right of the sector, the 331st Infantry Regiment secured Paramé and cut off the garrisons of St. Ideuc and Fort la Varde. By the end of 9 August, the 83rd Infantry Division had captured around 3,500 prisoners but still faced German forces in multiple fortified positions.[62]
Capture of Dinard[]
Free French forces surrounded Dinan on 6 August and found that several hundred Germans had remained in the town. The Germans were unwilling to surrender to Free French troops, but indicated that they would do so for Americans.[57] On 7 August the 121st Infantry Regiment crossed the Rance to begin its advance on Dinard, and a party from this unit took the surrender of the Germans at Dinan. As the 121st Regiment advanced north from Dinan it found that all roads in the region were heavily defended. The German positions comprised roadblocks, well camouflaged strongpoints, minefields and pillboxes, all supported by artillery fire. Progress was slow, and it took until the afternoon of 8 August for the regiment's 3rd Battalion to capture the village of Pleurtuit, 4 miles (6.4 km) from Dinard.[64]
Soon after Pleurtuit was captured, German StuG IIIs supported by infantrymen launched an attack that cut the roads to the village and isolated the 3rd Battalion, 121st Infantry Regiment.[1][64] Attempts by the regiment's 1st Battalion to breakthrough were unsuccessful. In response to this action, Macon judged that the 121st Infantry Regiment's performance was unimpressive and there was a need to reinforce it. He decided to give priority to capturing Dinard after St. Joseph's Hill was secured to rescue the isolated battalion, eliminate the German artillery in the area and prevent Saint-Malo's garrison from escaping across the Rance.[64] Accordingly, Macon transferred the 331st Infantry Regiment to the Dinard sector and took personal control of operations there.[68]
The two American regiments began their attack on Dinard during 11 August. German resistance remained stubborn, and little progress was made that day. The next day the German commander in the Dinard sector, Colonel Bacherer, rejected a demand from Macon that he surrender and stated that he would fight "for every stone".[68] The 331st Infantry Regiment finally broke through German positions near Pleurtuit on the afternoon of 12 August, and rescued the 3rd Battalion of the 121st Infantry Regiment. During the period it was isolated, the battalion had fought off several German attacks and suffered 31 killed and 106 wounded.[69][Note 2]
The American troops continued their attacks on 13 August, which involved isolating and destroying individual pillboxes. Both regiments entered Dinard the next day. The Dinard position was liquidated on 15 August, the Americans securing the town and nearby villages. Almost 4,000 Germans, including Bacherer, were captured.[71]
Siege warfare in Saint-Malo[]


American artillerymen firing a 3-inch gun M5 at a German position on the Place de la Fotaine in Saint-Malo[72]
The remainder of the 83rd Division continued its advance on Saint-Malo during the attacks on the Dinard area. These operations were commanded by the division's assistant commander, Brigadier General Claude Birkett Ferenbaugh, while Macon was focused on Dinard.[71][73] While it was no longer considered feasible to use Saint-Malo's port, it was believed to be necessary to capture the fortifications in the area to prevent German artillery from attacking Allied shipping using nearby ports. This would also free up the 83rd Infantry Division for other tasks.[74] The Americans also hoped that securing the town would encourage the German garrisons of other isolated ports to surrender.[75] The American photojournalist Lee Miller, who arrived at Saint-Malo on 13 August, described the resultant fighting as "fortress warfare reminiscent of crusader times".[76][Note 3]
Before the walled town and the Citadel were attacked, it was decided to capture Fort la Varde and St. Ideuc. The garrisons of these fortifications were able to support one another. One of two battalions under the control of the 330th Infantry Regiment began the attack on the St. Ideuc position on 9 August. After three days of artillery bombardments and infantry attacks first on pillboxes and then the position itself, St. Ideuc's 160 surviving defenders surrendered on the afternoon of 12 August. The battalion immediately began attacking Fort la Varde, whose 100 remaining defenders also surrendered on the evening of 13 August.[78]
The other battalion under the 330th Infantry Regiment attacked towards Saint-Malo with the goal of capturing the causeway that linked the town to Paramé. This led to house-to-house fighting, the American infantry advancing with support from tanks, tank destroyers and engineers. The ruins of Saint-Malo's casino were captured on 11 August. The Americans were then faced with the challenge of crossing the exposed 1,000-yard (910 m)-long causeway to assault the well-defended chateau on the landward side of Saint-Malo.[78]
The chateau was bombarded by artillery and air attacks for two days, with little apparent effect on the defenders.[78] A truce was agreed for the afternoon of 13 August to allow around 1,000 French civilians as well as 500 hostages and internees who were being held by the Germans at Fort National to be evacuated.[79] The 330th Infantry Regiment assaulted Saint-Malo on the morning of 14 August. Under the cover of an intensive artillery bombardment and a smokescreen, a battalion charged across the causeway and entered the walled town. The few Germans in the town were quickly captured, but the chateau held out until the afternoon when its defenders surrendered; 150 were captured.[80] On 16 August American infantrymen assaulted Fort National and Grand Bey, which were the last remaining German positions on the mainland of the Saint-Malo area other than the Citadel. Fort National was found to be unoccupied, and the 150 defenders of Grand Bey surrendered after a brief fight.[81]
The Citadel[]

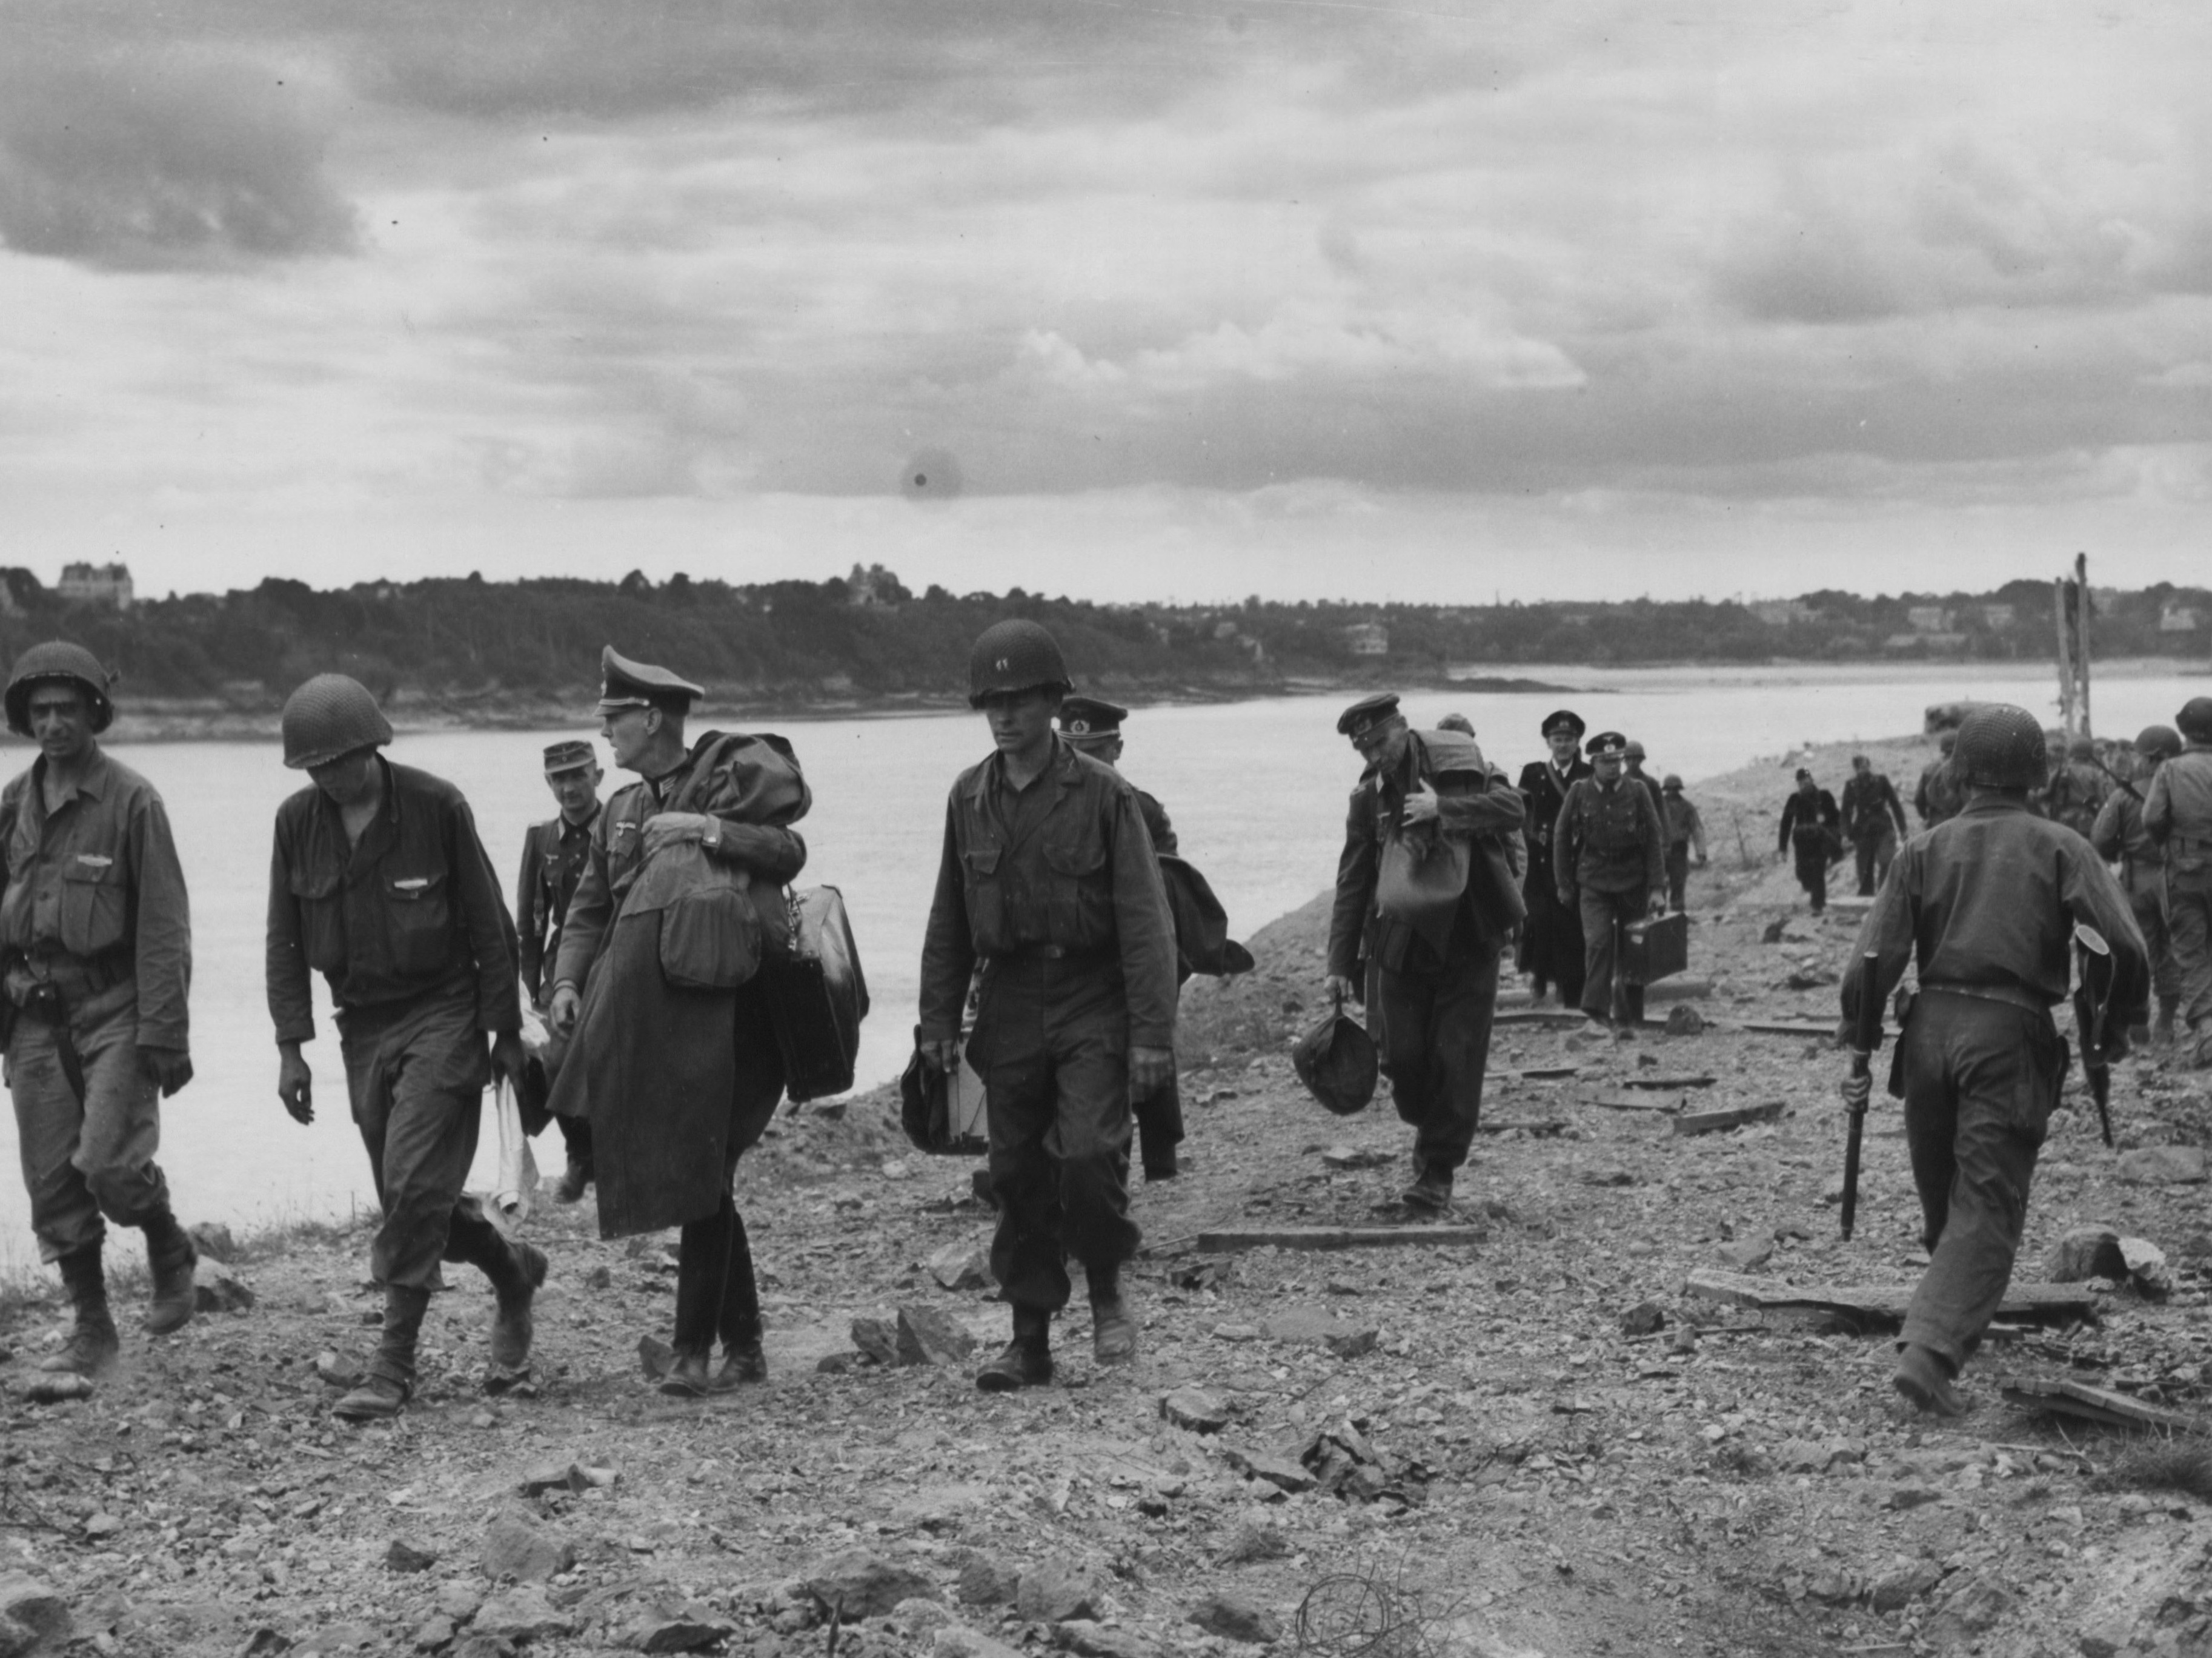
German prisoners of war being escorted at Saint-Malo on 18 August
The Citadel was a formidable position. It had been constructed by adding interconnected blockhouses to improve the defenses of the Fort de la Cité d'Aleth. The thick walls were almost impervious to air attacks and artillery, and it had large quantities of water, food and other supplies. The garrison was weakly armed with only 18 or 20 machine guns and a few mortars, but these weapons were skillfully positioned to maximise their effectiveness. Macon was aware that it would be difficult to neutralize the Citadel from an early stage in the battle.[82]
American artillery and Allied aircraft began to attack the Citadel during the assault on Saint-Malo. Shortages of ammunition disrupted the artillery bombardments and the air attacks proved ineffective. Attempts by an American psychological warfare unit to persuade the Germans to surrender were unsuccessful, and Aulock also rejected entreaties from a captured German chaplain and a female French civilian with whom he had a close relationship.[66] His refusal to surrender and the hardline orders he issued led to him being nicknamed the 'mad colonel' by the citadel's garrison.[83]
On 11 August, a rifle company from the 329th Infantry Regiment that was reinforced with engineers and three Free French soldiers assaulted the Citadel after it was attacked by medium bombers. Some of the troops reached an interior courtyard in the fortification, but withdrew after finding that the bombardment had not breached the main defenses.[84] Artillery attacks continued over the next few days, and two specially trained 96-man strong assault groups made another assault on 15 August after medium bombers struck the Citadel again. This attack was repelled by machine gun fire.[85]
After the unsuccessful 15 August assault, Macon ordered an intensification of the artillery bombardment. Two 8-inch guns were positioned less than 1,500 yards (1,400 m) from the citadel, so they could target individual portholes and vents. Mortar bombardments also increasingly used white phosphorus incendiary and smoke rounds. An air attack using napalm incendiary bombs was planned for the afternoon 17 August.[86] This was to be one of the first times napalm bombs were used in combat.[87][88] Shortly before the air strike was scheduled, a white flag appeared over the Citadel and a party of German soldiers emerged from it to inform the Americans that Aulock wished to surrender. The air strike was diverted to attack Cézembre,[Note 4] and Aulock and 400 other Germans were taken prisoner. Aulock gave the destruction caused by the 8-inch guns and a collapse in the garrison's morale as his reasons for surrendering.[86] French civilians shouted abuse at Aulock and his men as they departed.[5] This marked the end of German resistance in the Saint-Malo area, aside from the Cézembre garrison that continued to hold out. By this time the 83rd Infantry Division had captured more than 10,000 prisoners. Its casualties were relatively light.[89] Aulock was held for a period at the Trent Park prisoner of war camp and interrogation center for senior officers in the United Kingdom, where he was briefly reunited with his brother Brigadier General Hubertus von Aulock who had been captured near Brussels in Belgium.[90]
All of the 83rd Infantry Division other than two battalions from the 330th Infantry Regiment were withdrawn from Saint-Malo after Aulock's surrender. The main body of the division undertook largely defensive tasks south of Rennes to allow the troops a period of recuperation. The two battalions remaining at Saint-Malo formed a garrison, and sought to prevent the Germans at Cézembre from landing on the mainland.[91] Following the surrender of Saint-Malo the German warships that had been operating in the Gulf of Saint-Malo rarely put to sea.[36]
Cézembre[]
Allied bombers attacked the German positions on Cézembre during 6 and 11 August. The VIII Corps artillery began shelling the island from 9 August.[8] Following Aulock's capitulation and the napalm attack, Macon sent a party of personnel to Cézembre on 18 August to request its surrender. The garrison commander, Oberleutnant Richard Seuss, refused to do so on the grounds that he was under orders to continue resistance and still had ammunition.[48][92] The Americans observed that the German positions appeared to have been badly damaged by the bombardments.[93] Another air raid was conducted against the island on 23 August.[94] German minesweepers and other small vessels transported ammunition from the Channel Islands and evacuated wounded personnel on most nights from 17 August onwards.[95]

,_31_August_1944_-_cropped.jpg)
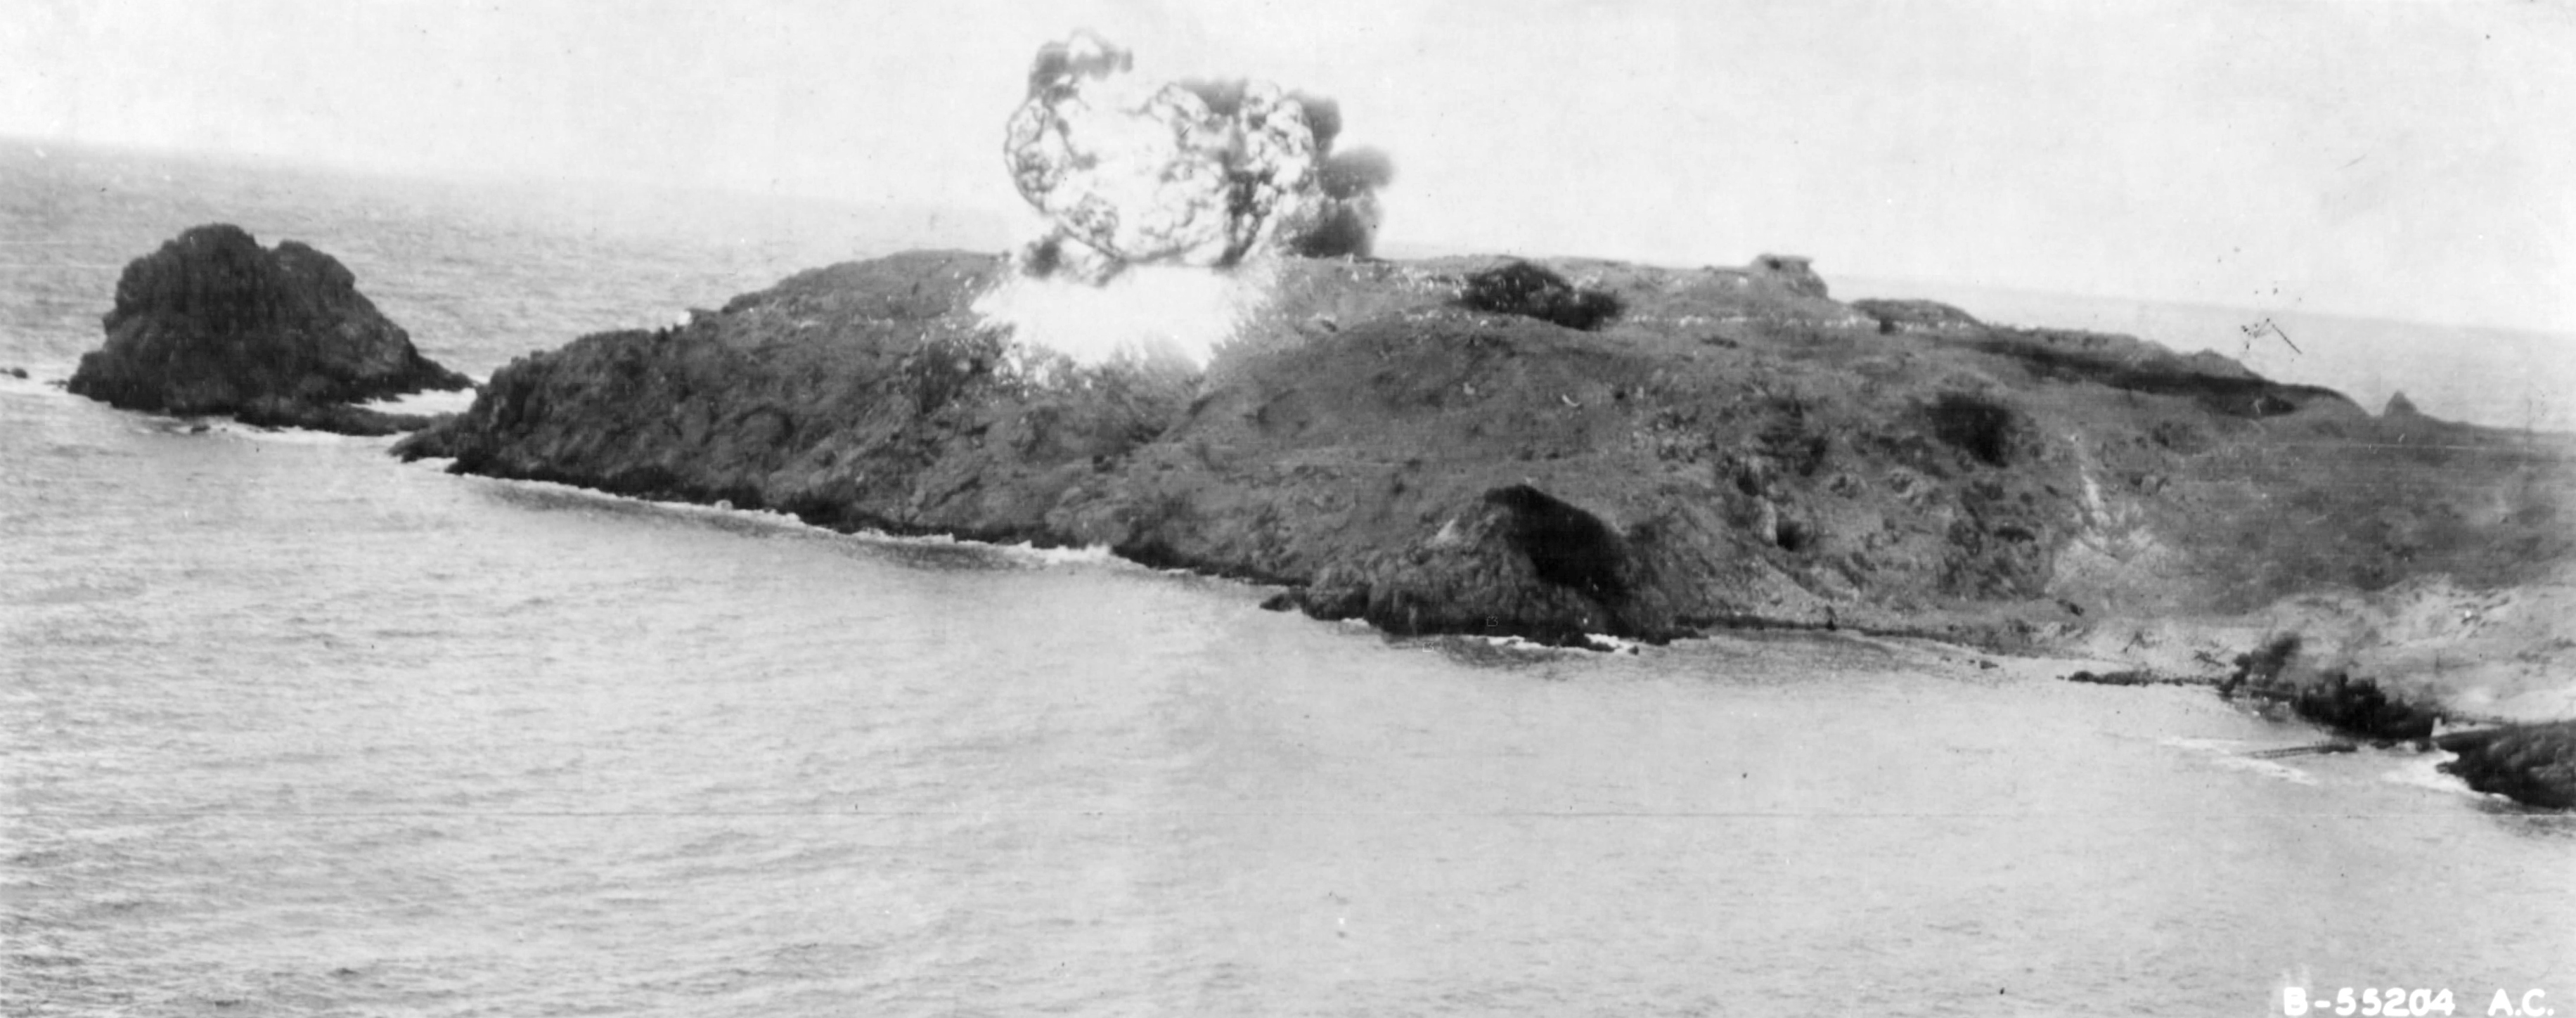
Napalm exploding on Cézembre during the 31 August air raids
No further attacks were made against Cézembre for another week, when it was decided to eliminate the German positions there.[93] This decision may have resulted from intelligence gained from three Italian deserters who fled to Saint-Malo in late August and, after being taken prisoner, described the heavy damage to the island's defenses and shortages of water and ammunition.[96] The 330th Infantry Regiment was directed to begin preparations for an amphibious assault.[93] To transport the troops, 15 US Navy LCVP landing craft were moved by truck from Omaha Beach in Normandy to Saint-Malo.[97] Aerial attacks resumed on 30 August. A large attack involving 300 heavy bombers, including British Avro Lancasters, as well as 24 Lockheed P-38 Lightnings armed with napalm was made the next day.[93][94] Artillery bombardments also targeted the island's water tanks.[93] To assist the members of the garrison who were wounded in these attacks, the hospital ship Bordeaux and a barge were dispatched from the Channel Islands. Both vessels were captured by Allied naval forces.[98] Seuss refused to surrender again during another truce on 31 August.[93]
A major air and naval attack took place on 1 September. American and British medium bombers attacked the island, followed by 33 napalm-armed Lightnings. A British battleship[Note 5] and American artillery then shelled Cézembre. Another message was transmitted to Seuss requesting that he surrender, but he refused.[93] After an attempt to use small craft to evacuate the garrison on the night of 1/2 September was foiled by bad weather, Seuss received permission to surrender from his superior officer in the Channel Islands. At 7:30 pm the next day, as the 330th Infantry Regiment was preparing to attack, a white flag appeared over the island and Seuss capitulated. The American landing craft evacuated the 323 surviving members of the garrison, who included twelve female Red Cross nurses.[100] Seuss gave the destruction of Cézembre's water distilling plant as his reason for surrendering.[93] Despite the extent of the attacks on the island, the garrison suffered only light casualties.[101]
Aftermath[]


A 2014 photograph of a German fortification at Saint-Malo that was extensively damaged during the battle
The Battle of Saint-Malo had mixed results. While the 83rd Infantry Division performed well, the German garrison also achieved its goals.[102] Historian Russell F. Weigley judged that the battle was "tenaciously and well conducted on both sides".[103] Aulock denied Saint-Malo's port to the Allies and, by detaining the 83rd Division and other VIII Corps units for two weeks, prevented the Americans from being able to take rapid and decisive action against the German positions at Brest and Lorient.[102] The battle also occupied Allied aircraft that were needed to support the advance into northern France.[94]
The VIII Corps assaulted and captured Brest in a battle which lasted from 7 August to 19 September. The Germans also demolished the city's port, and it proved impractical to restore it to service.[104][105] The rapid liberation of France and the capture of ports on the English Channel reduced the potential value of the remaining German-held cities in Brittany and the French Atlantic coast to the Allies. On 7 September, Eisenhower approved a proposal that these positions be contained rather than attacked.[105] French units and a US Army division besieged them for the remainder of the war.[106] As result, Cherbourg in Normandy and Brest and Saint-Malo in Brittany were the only fortified German-held ports in France to be taken by the US Army.[107] British and Canadian forces also captured Antwerp, Dieppe, Le Havre and Rouen during 1944, and besieged several other fortified ports in northern France until the end of the war.[108]
The US Army's Communications Zone began work on reopening the ports in the Saint-Malo area on 25 August 1944.[103] Cancale was soon judged unsuitable due to unfavorable tidal conditions, and was dropped from the plans. While the logisticians initially believed that there were good prospects for bringing Saint-Malo's port facilities back into service, the extent of the damage frustrated their efforts. After a report that was completed in September revealed that the Canal d'Ille-et-Rance, which links the Rance and Rennes, was in a poor condition it was decided that re-opening Saint-Malo was not worth the effort. On 21 November the town was handed over to French authorities.[109] Neither Saint-Malo or Cancale were ever used to land supplies for the US military.[110] As a result, historian David T. Zabecki has written that while the capture of Saint-Malo was a tactical success for the Americans, "on the operational level ... it contributed very little" to the Allied war effort.[111]
Saint-Malo suffered extensive damage during the battle; 683 of the 865 old town buildings were destroyed.[112] While consideration was given to leaving the town in ruins as a memorial, the architect Marc Brillaud de Laujardière was selected in October 1944 to prepare a reconstruction plan.[113] Work to clear the rubble began at around this time, and took two years to complete.[114] De Laujardière's plan was accepted by the local council in February 1946. The reconstruction program was completed in 1960, and a new spire was installed on the cathedral during 1971.[113] No ruins were preserved in Saint-Malo and most signs of damage on the surviving buildings were obscured.[114] The old town's population has never recovered to pre-war levels, many apartments being used as vacation homes. By the early 1960s Saint-Malo was a popular holiday destination again.[113]
A memorial to the Battle of Saint-Malo called "Memorial 39-45" was established at the Citadel in 1994. Many of the main sites involved in the battle remained extant as of 2018.[115] These include fortifications in and around Saint-Malo.[116] Cézembre remains largely as it was left at the end of the battle, and is one of the best-preserved World War II battlefields.[114][116] The final chapters of Anthony Doerr's 2014 novel All the Light We Cannot See are set during the bombardment of Saint-Malo.[117]
See also[]
References[]
Footnotes[]
- ↑ Full strength US Army artillery battalions had twelve howitzers.[63]
- ↑ US Army infantry battalions at this time comprised 860 personnel when they were at full strength.[70]
- ↑ Miller was the only photojournalist to witness the battle. Female war correspondents were usually banned from the front line, and she was not authorized to be at Saint-Malo. Miller was briefly arrested after Allied commanders learned of her presence there, and subsequently prohibited from covering combat.[77]
- ↑ Willard Sterne Randall and Nancy Nahra state that a single aircraft dropped napalm on the Citadel, and this prompted the German surrender. This is not noted in other sources.[5]
- ↑ Two different British battleships are stated to have undertaken this bombardment in the sources. Martin Blumenson and Steven Zaloga identify the vessel as HMS Warspite.[48][93] Samuel Eliot Morison and Jürgen Rohwer state that it was HMS Malaya.[67][97] The Imperial War Museums hold a BBC recording identified as an account of HMS Malaya bombarding Cézembre in its collection.[99]
Citations[]
- ↑ 1.0 1.1 Zaloga 2018, p. 44.
- ↑ 2.0 2.1 2.2 2.3 2.4 2.5 Blumenson 1961, p. 394.
- ↑ 3.0 3.1 3.2 Zaloga 2018, p. 40.
- ↑ Clout 2000, pp. 165–166.
- ↑ 5.00 5.01 5.02 5.03 5.04 5.05 5.06 5.07 5.08 5.09 5.10 Randall & Nahra 2019.
- ↑ 6.0 6.1 6.2 6.3 Blumenson 1961, p. 397.
- ↑ "Saint-Malo". Britannica Group. https://www.britannica.com/place/Saint-Malo.
- ↑ 8.0 8.1 Blumenson 1961, p. 411.
- ↑ Ellis 1954, p. 16.
- ↑ Ellis 1954, p. 302.
- ↑ Zaloga 2018, p. 13.
- ↑ Blumenson 1961, p. 340.
- ↑ Marrus & Paxton 1981, p. 258.
- ↑ Marrus & Paxton 1981, pp. 257–258.
- ↑ 15.0 15.1 Zaloga 2018, p. 24.
- ↑ Zaloga 2018, p. 22.
- ↑ Zaloga 2018, p. 26.
- ↑ Zaloga 2018, pp. 24–25.
- ↑ Delaforce 2006, p. 81.
- ↑ Ruppenthal 1953, pp. 288–289.
- ↑ Blumenson 1961, pp. 3–4.
- ↑ 22.0 22.1 Weigley 1981, p. 175.
- ↑ Ruppenthal 1953, pp. 288–290.
- ↑ Rein 2019, p. 69.
- ↑ Ruppenthal 1953, p. 486.
- ↑ 26.0 26.1 Rein 2019, p. 70.
- ↑ Blumenson 1961, pp. 313–321.
- ↑ Blumenson 1961, pp. 348.
- ↑ 29.0 29.1 29.2 Blumenson 1961, p. 390.
- ↑ Blumenson 1961, pp. 348–349, 390.
- ↑ Weigley 1981, p. 178.
- ↑ Blumenson 1961, pp. 357–359.
- ↑ Hellwinkel 2014, p. 142.
- ↑ Blumenson 1961, p. 634.
- ↑ 35.0 35.1 35.2 35.3 35.4 35.5 35.6 Blumenson 1961, p. 398.
- ↑ 36.0 36.1 O'Hara 2007, p. 235.
- ↑ Blumenson 1961, p. 355.
- ↑ Zaloga 2018, pp. 26–27.
- ↑ Wieviorka 2019, p. 317.
- ↑ 40.0 40.1 40.2 Zaloga 2018, p. 15.
- ↑ Hinsley 1984, p. 80.
- ↑ Blumenson 1961, pp. 325, 342.
- ↑ Blumenson 1961, pp. 396–397.
- ↑ Saunders 2007, pp. 165–166.
- ↑ Zaloga 2018, pp. 40–41.
- ↑ Zaloga 2018, pp. 43–44.
- ↑ 47.0 47.1 47.2 Saunders 2007, p. 166.
- ↑ 48.0 48.1 48.2 Zaloga 2018, p. 47.
- ↑ Viganò 1991, p. 181.
- ↑ Blumenson 1961, pp. 397–398.
- ↑ 51.0 51.1 Bradham 2012, p. 105.
- ↑ Blumenson 1961, p. 389.
- ↑ Blumenson 1961, pp. 390–391.
- ↑ 54.0 54.1 54.2 54.3 54.4 Blumenson 1961, p. 391.
- ↑ 55.0 55.1 Zaloga 2018, p. 41.
- ↑ Stanton 1984, p. 154.
- ↑ 57.0 57.1 57.2 57.3 Blumenson 1961, p. 396.
- ↑ Office of the Theater Historian 1945, p. 296.
- ↑ Blumenson 1961, pp. 394–395.
- ↑ Blumenson 1961, pp. 394, 396.
- ↑ Ramsey 1981, p. 9.
- ↑ 62.0 62.1 62.2 62.3 62.4 Blumenson 1961, p. 399.
- ↑ Sayen 2007, p. 20.
- ↑ 64.0 64.1 64.2 64.3 Blumenson 1961, p. 400.
- ↑ Atkinson 2013, p. 152.
- ↑ 66.0 66.1 Blumenson 1961, p. 407.
- ↑ 67.0 67.1 Rohwer 2005, p. 346.
- ↑ 68.0 68.1 Blumenson 1961, p. 401.
- ↑ Blumenson 1961, pp. 401–402.
- ↑ Sayen 2007, p. 14.
- ↑ 71.0 71.1 Blumenson 1961, p. 402.
- ↑ Ramsey 1981, p. 11.
- ↑ Office of the Theater Historian 1945, p. 290.
- ↑ Blumenson 1961, p. 405.
- ↑ Blumenson 1961, p. 633.
- ↑ Miller 1995, p. 227.
- ↑ "Lee Miller's Second World War". Imperial War Museums. https://www.iwm.org.uk/history/lee-millers-second-world-war.
- ↑ 78.0 78.1 78.2 Blumenson 1961, p. 403.
- ↑ Zaloga 2018, p. 45.
- ↑ Blumenson 1961, p. 404.
- ↑ Blumenson 1961, pp. 404–405.
- ↑ Blumenson 1961, p. 406.
- ↑ Ramsey 1981, p. 18.
- ↑ Blumenson 1961, p. 408.
- ↑ Blumenson 1961, pp. 408–409.
- ↑ 86.0 86.1 Blumenson 1961, p. 409.
- ↑ Rein 2019, p. 409.
- ↑ Delaforce 2006, p. 86.
- ↑ Blumenson 1961, p. 410.
- ↑ Mallett 2013, p. 40.
- ↑ Blumenson 1961, pp. 410–411.
- ↑ Blumenson 1961, p. 412.
- ↑ 93.0 93.1 93.2 93.3 93.4 93.5 93.6 93.7 93.8 Blumenson 1961, p. 413.
- ↑ 94.0 94.1 94.2 Craven & Cate 1951, p. 262.
- ↑ Ramsey 1981, pp. 32–34.
- ↑ Ramsey 1981, p. 34.
- ↑ 97.0 97.1 Morison 2002, p. 301.
- ↑ Ramsey 1981, p. 36.
- ↑ "HMS Malaya bombards Cezembre". Imperial War Museums. https://www.iwm.org.uk/collections/item/object/80001816.
- ↑ Ramsey 1981, p. 37.
- ↑ Craven & Cate 1951, p. 263.
- ↑ 102.0 102.1 Blumenson 1961, pp. 409–410.
- ↑ 103.0 103.1 Weigley 1981, p. 185.
- ↑ Morison 2002, p. 302.
- ↑ 105.0 105.1 Zaloga 2018, p. 84.
- ↑ Zaloga 2018, pp. 84–87.
- ↑ Hellwinkel 2014, p. 156.
- ↑ Delaforce 2006, p. 12.
- ↑ Ruppenthal 1959, p. 89.
- ↑ Ruppenthal 1959, p. 51.
- ↑ Zabecki 2015, p. 1661.
- ↑ Clout 2000, p. 168.
- ↑ 113.0 113.1 113.2 Clout 2000, p. 176.
- ↑ 114.0 114.1 114.2 Ramsey 1981, p. 44.
- ↑ Zaloga 2018, p. 92.
- ↑ 116.0 116.1 Saunders 2007, p. 171.
- ↑ "About All the Light We Cannot See". Houghton Mifflin Harcourt. 2020. https://www.cliffsnotes.com/literature/a/all-the-light-we-cannot-see/about-all-the-light-we-cannot-see.
Works consulted[]
| Wikimedia Commons has media related to Category:Liberation of Saint-Malo. |
- Atkinson, Rick (2013). The Guns at Last Light: The War in Western Europe, 1944–1945. New York City: Henry Holt and Company. ISBN 978-0-8050-6290-8.
- Bradham, Randolph (2012). "To the last man": The Battle for Normandy's Cotentin Peninsula and Brittany. Barnsley, United Kingdom: Frontline Books. ISBN 978-1-84832-665-1.
- Blumenson, Martin (1961). Breakout and Pursuit. United States Army in World War II. Washington, D.C.: Center of Military History. OCLC 5594822. https://www.ibiblio.org/hyperwar/USA/USA-E-Breakout/index.html.
- Clout, Hugh (2000). "Place Annihilation and Urban Reconstruction: The Experience of Four Towns in Brittany, 1940 to 1960". pp. 165–180. Digital object identifier:10.1111/j.0435-3684.2000.00081.x. JSTOR 491095.
- Craven, Wesley Frank; Cate, James Lea, eds (1951). Europe: Argument to V-E Day. January 1944 to May 1945. The Army Air Forces in World War II. Washington, D.C.: Office of Air Force History. ISBN 978-0-912799-03-2. https://archive.org/details/Vol3EuropeArgumentToVEDay.
- Delaforce, Patrick (2006). Smashing the Atlantic Wall: The Destruction of Hitler's Coastal Fortresses. Barnsley, United Kingdom: Pen & Sword Books. ISBN 978-1-84415-371-8.
- Ellis, L.F. (1954). The War in France and Flanders 1939–1940. History of the Second World War. London: Her Majesty's Stationery Office. OCLC 601368748. https://www.ibiblio.org/hyperwar/UN/UK/UK-NWE-Flanders/index.html.
- Hinsley, F.H. (1984). British Intelligence in the Second World War: Its Influence on Strategy and Operations. Volume Three, Part I. History of the Second World War. London: Her Majesty's Stationery Office. ISBN 978-0-11-630935-8.
- Hellwinkel, Lars (2014). Hitler's Gateway to the Atlantic: German Naval Bases in France 1940–1945. Barnsley, United Kingdom: Seaforth Publishing. ISBN 978-1-84832-199-1.
- Mallett, Derek R. (2013). Hitler's Generals in America: Nazi POWs and Allied Military Intelligence. Lexington, Kentucky: University Press of Kentucky. ISBN 978-0-8131-4253-1.
- Marrus, Michael Robert; Paxton, Robert O. (1981). Vichy France and the Jews. Palo Alto, California: Stanford University Press. ISBN 978-0-8047-2499-9.
- Miller, Lee (1995). "The Siege of St. Malo". Reporting World War II. Part II: American Journalism 1944–46. New York City: The Library of America. pp. 224–241. ISBN 978-1-883011-05-5.
- Morison, Samuel Eliot (2002). The Invasion of France and Germany 1944–1945. History of United States Naval Operations in World War II. Urbana, Illinois: University of Illinois Press. ISBN 978-0-252-07062-4.
- Office of the Theater Historian (1945). Order of Battle of the U.S. Army, World War II, European Theater of Operations, Divisions. Washington, D.C.: US Army Center of Military History. OCLC 2367024. https://history.army.mil/documents/ETO-OB/ETOOB-TOC.htm.
- O'Hara, Vincent P. (2007). The U.S. Navy Against the Axis: Surface Combat, 1941–1945. Annapolis, Maryland: Naval Institute Press. ISBN 978-1-68247-185-2.
- Ramsey, Winston G., ed (1981). "St. Malo 1944". pp. 1–45. ISSN 0306-154X.
- Randall, Willard Sterne; Nahra, Nancy (Summer 2019). "Assault on the Citadel". ISSN 1040-5992. https://www.historynet.com/assault-on-the-citadel.htm.
- Rein, Christopher M. (2019). Forging the Ninth Army-XXIX TAC Team: The Development, Training, and Application of American Air-Ground Doctrine in World War II. Fort Leavenworth, Kansas: Army University Press. ISBN 978-1-940804-60-6. https://www.armyupress.army.mil/Portals/7/combat-studies-institute/csi-books/leavenworth-papers-24-forging-the-ninth-army-xxix-tac-team.pdf.
- Rohwer, Jürgen (2005). Chronology of the War at Sea, 1939–1945: The Naval History of World War Two (3rd ed.). Annapolis, Maryland: Naval Institute Press. ISBN 978-1-59114-119-8.
- Ruppenthal, Roland G. (1953). Logistical Support of the Armies: Volume I, May 1941 – September 1944. Washington, D.C.: Office of the Chief of Military History, Department of the Army. OCLC 640653201. https://history.army.mil/html/books/007/7-2-1/CMH_Pub_7-2-1.pdf.
- Ruppenthal, Roland G. (1959). Logistical Support of the Armies: Volume II, September 1944 – May 1945. Washington, D.C.: Office of the Chief of Military History, Department of the Army. OCLC 640653201. https://history.army.mil/html/books/007/7-3-1/CMH_Pub_7-3-1.pdf.
- Saunders, Anthony (2007). Hitler's Atlantic Wall. Stroud, United Kingdom: Sutton. ISBN 978-0-7509-4554-7.
- Sayen, John (2007). US Army Infantry Divisions 1944–45. Oxford: Osprey Publishing. ISBN 978-1-84603-119-9.
- Stanton, Shelby L. (1984). Order of Battle U.S. Army, World War II. Novato, California: Presidio Press. ISBN 978-0-89141-195-6.
- Viganò, Marino (1991). Il Ministero degli affari esteri e le relazioni internazionali della Repubblica Sociale Italiana (1943–1945). Milano: Jaca Book. ISBN 978-88-16-95081-8. https://books.google.com/books?id=DM_wbA1NuuwC.
- Weigley, Russell F. (1981). Eisenhower's Lieutenants: The Campaign of France and Germany, 1944–1945. London: Sidgwick & Jackson. ISBN 978-0-283-98801-1.
- Wieviorka, Olivier (2019). The Resistance in Western Europe, 1940–1945. New York City: Columbia University Press. ISBN 978-0-231-54864-9.
- Zabecki, David T. (2015). World War II in Europe: An Encyclopedia. Abingdon-on-Thames, United Kingdom: Taylor & Francis. ISBN 978-1-135-81249-2.
- Zaloga, Steven (2018). Brittany 1944: Hitler's Final Defenses in France. Oxford: Osprey Publishing. ISBN 978-1-4728-2737-1.
The original article can be found at Battle of Saint-Malo and the edit history here.