The Australian Services cricket team.
The Australian Services XI was a cricket team comprising solely military service personnel during World War II. They became active in May 1945 after the defeat of Nazi Germany. The team played matches against English cricket sides of both military and civilian origins to celebrate the end of the war. These matches were aimed at increasing morale in the war-ravaged English cities and as a means of reviving cricket after the conclusion of fighting.
The end of the war marked the start of the 1945 cricket season.[1][2] Plum Warner organised a series of matches between England and Australian servicemen, known as the Victory Tests, to celebrate the end of hostilities.[3] However, Australian cricket administrators would not accredit the three-day matches as official Test matches,[3][4] arguing that there were not enough Test-level players in the armed services; Lindsay Hassett was the only Australian who had Test experience.[5][6]
The side was composed of an amalgam of a Royal Australian Air Force (RAAF) team, which had already been stationed in England during the war, and another group of mostly Australian Imperial Force (AIF) soldiers from Australia. The players were deliberately stationed with each other in England for the express purpose of forming a cricket team to tour the country, with Australian prime minister John Curtin pushing for the immediate resumption of international cricket after the war was over. The team was officially a military unit, led by Squadron Leader Stan Sismey, the team's wicket-keeper.
England were close to full strength, so the AIF and the RAAF teams merged to strengthen their quality. As a result, the Australian Services cricket team was formed under the leadership of Warrant Officer Lindsay Hassett to compete in the Victory Tests.[5]
The Australian team, despite being split by rank and service, all took their place in the side in good spirit and not much was made of the fact that Hassett, a warrant officer who was outranked by almost every other member of the team, was appointed captain.[7][8]
The Victory Tests were greeted by packed English grounds, and raised a lot of money for war charities. Against expectations, the Australians managed to draw the series 2–2 against an England team filled with Test cricketers. As a result, the Australian government, cricket administrators and military officials ordered the team to travel home via India to play more fundraising matches, before finishing their campaign against the Australian state teams. By the time the team arrived in Australia they were extremely tired and their performances deteriorated, leading analysts who had not seen them in England to regard them as a weak team.
Personnel[]

.jpg)
Hassett, during the Second World War
The following cricketers played in at least one match.[7]
- Warrant Officer Lindsay Hassett (captain) (VIC)
- Squadron Leader Stan Sismey (NSW)
- Flying Officer Keith Miller (VIC)
- Captain Richard Whitington (SA)
- Flying Officer Jack Pettiford (NSW)
- Flight Sergeant Jim Workman (SA)
- Sergeant Cec Pepper (NSW)
- Flight Lieutenant Keith Carmody (NSW)
- Flight Lieutenant Ross Stanford (SA)
- Flying Officer Bob Cristofani (NSW)
- Flying Officer Eddie Williams (SA)
- Sergeant Charles Price (NSW)
- Warrant Officer Graham Williams (SA)
- Flight Lieutenant Mick Roper (NSW)
- Captain Albert Cheetham (NSW)
- Flying Officer Reginald Ellis (SA)
- Flying Officer Colin Bremner
- Sergeant L.W. Maddison
The manager was Flight Lieutenant Keith Johnson from New South Wales.[9]
Only one player in the side, future Test captain Lindsay Hassett had Test match experience.[8] Keith Miller, Bob Cristofani, Cec Pepper, Keith Carmody, Ross Stanford, Albert Cheetham, Stan Sismey, Dick Whitington, and Graham Williams were the players who had previous first-class experience.[8] The spinner Reg Ellis and opening batsman Jack Pettiford had not prior experience at first-class level, but played for their states in Australia after making their debut for the Services. Charles Price and Jim Workman made their debut during the Australian Services campaign and never played first-class cricket afterwards.[8]
Keith Miller, one of the ten inaugural inductees of the Australian Cricket Hall of Fame at the time only a batsman with Victoria, played what many consider to be his breakout series in the Victory Tests, ensuring that when he returned to Australia he would have a place in the Australian national team now referred to as The Invincibles.
In the batting department, Miller was the top-scorer; he scored 1,447 runs in 20 matches at an average of 49.89. Hassett scored 1,434 runs at 49.44 in 18 matches and top-scored for the whole campaign with 187. Opening batsman Whitington was the only other member of the team to score more than 1,000 runs. He totalled 1,054 runs at 35.13.[7]
On the bowling front, Australia was heavily dependent on its spin attack. The left arm orthodox spinner Ellis took 72 wickets at 25.02, while the leg spinner Pepper took 71 wickets at 32.47. The third highest wicket-taker was Cristofani, also a leg spinner; he took 34 wickets at 30.73.[10] Miller was the leading paceman, taking 29 wickets at 28.96.[10]
For all rounders, Pepper also scored 987 runs at 36.55, while Cristofani added 558 runs at 27.90. Pettiford scored 768 runs at 38.40 and took 22 wickets at 41.86 with his leg spin.[10]
Graham Williams, the team's main strike bowler, had only been released from a German prisoner of war camp weeks before the series started,[11] and played at 31 kg (68 lb) below his pre-war playing weight. In between overs he drank glasses of glucose and water to keep his energy up,[11] but when he was unable to bowl Miller took his place and demonstrated what a valuable pace bowler he would become in the future himself.
Omissions[]
Some players with prior first-class experience could not be considered for selection because they could not be released from the units in which they were serving, particularly those serving in the Pacific. These included Arthur Morris, Ian Johnson and Ray Lindwall. Lindwall and Johnson went on to make their debuts for Australia in 1946 in the first post-war Test, while Morris made his debut in 1946–47 against England. All three became long-serving Australian Test players, and all three captained their country, Johnson for two years. Bill Brown had played regularly for Australia's Test team before the war, but was not available, nor was Colin McCool, who had made his first-class debut before the outbreak of war.[12]
Chronology[]
In England[]

The team for the first RAAF match. Miller is standing sixth from left. The RAAF team later merged with the AIF team to form the Services team.
The Australians and their schedule was administered by Keith Johnson, a member of the Australian Board of Control and the New South Wales Cricket Association. During World War II, Johnson served in the Royal Australian Air Force (RAAF) and the rose to the rank of Flight Lieutenant and was deployed to London,[9] where he did public relations work at the RAAF's overseas headquarters.[9][13] Officially a military unit, the team's commanding officer was Squadron Leader Stan Sismey of the RAAF, although the on-field captain was Warrant Officer Lindsay Hassett of the Second Australian Imperial Force.[14]
Wisden Cricketers' Almanack praised the organisational work done by Johnson in arranging the services' programme in England: "A stranger to this country, he found the programme in only skeleton form; and that the tour proved such a success from every point of view was due to his hard work and courtesy."[15] The almanack reprinted in full Johnson's "message" of thanks to English cricket before the team sailed to India.[9] The First Victory Test started at Lord's on 19 May and was expected to usher in a new post-war era, which it hoped would be more aggressive and attractive.[16] The last Anglo-Australian Test series before the war had featured a large number of draws due to defensive play.[17] England won the toss and batted first. They batted steadily although none of their specialist batsmen managed to pass 57 and reached 4/205,[18] before Miller came on as the fifth bowler and bowled his Great Massingham pilot colleague Bill Edrich for 45,[19] precipitating an English collapse from 4/200 to 267.[20][21] Paceman Albert Cheetham took 3/49, while new ball partner Williams, spinner Reginald Ellis and Charles Price took two wickets each.[18]
In reply to England's 267 from 100.1 overs, Australia reached 2/82 by stumps on the opening day, with Hassett and Sismey at the crease. The next day, Sismey fell for 37,[18][19] and Miller came to the crease at 3/136 and joined Hassett. Miller gradually progressed, undeterred by the fall of Hassett for 77 at 4/171. He put on 99 with Ross Stanford, who fell for 49 soon after Australia passed England's total, with the score at 5/270. Once Australia had taken the lead, Miller cut loose. After spending 40 minutes in the 90s, he finished with 105 in 210 minutes, with a straight six.[22][23][24] The Times opined that his innings was "as good a century as has been seen at Lord's in many a long day".[25] Wisden said that he "was always getting runs with the soundness characteristic of most Australians".[26] Harry Altham declared that "a brilliant new star had joined the cluster of the Southern Cross".[27] Miller put on 87 for the sixth wicket with Pepper, and although both feel in quick succession in a collapse of 3/9, Price and Williams put on a ninth-wicket stand of 88 to take the Australian total to 455, giving them a 188-run lead,[25] and the end of the innings marked the end of the second day's play.[18]
On the final morning, England batted steadily and their Test openers Len Hutton and Cyril Washbrook took the score to 52 before leg spinner Cec Pepper removed both. Jack Robertson top-scored with 84 and his Middlesex teammate Edrich scored 50 as England moved to 5/286 late in the day, an overall lead of 98. It appeared that England would be able to hold on for a draw, but they lost their last five wickets for eight runs to be all out for 294. Pepper took 4/80 and Ellis and Price two wickets each.[18]
This left Australia with a target of 107. Miller and Richard Whitington were both out with only 11 runs on the board, but Hassett and Pepper put on 52 runs quickly and Australia reached their second innings target with two balls to spare. Pepper was unbeaten on 54.[18][28][29][30][31][32]
The last pre-war series between England and Australia in 1938 had been an attritional and hard-nosed contest, but in the afterglow of war victory, the cricketers played flamboyantly with abandon in front of a packed stadium. The attractive style of cricket was widely praised by commentators and the match raised £1,935 for war relief charities.[23][33] The First Victory Test was followed by a month in which the Australian Services were not active as a team; the various players represented their respective RAAF teams during this time.
The Second Victory Test was played at Bramall Lane in Sheffield and started on 23 June, where the grandstands were damaged by German air raids. Hassett sent the Englishmen into bat,[34] and the hosts' innings was highlighted by their captain Wally Hammond, who scored exactly 100, supported by Washbrook, who scored 63. However, Hammond's dismissal was part of a collapse that saw the home side lose their last five wickets for 38 runs. Cheetham and Pepper took three wickets each, and Ellis and Williams both captured a brace.[35] Australia moved to be 0/23 at stumps on the first day, but lost wickets steadily on the second morning, and were all out for 147; Keith Carmody scored 42, the only contribution beyond 21 by a batsman, while George Pope took 5/58.[35][36][37][38] In the second innings, England went about extending their lead and Miller bowled a fast and hostile spell,[31] hitting Test world record holder Hutton in the arm before hitting Washbrook in the head, provoking an angry crowd reaction, comparing Miller to the Bodyline spearhead Harold Larwood.[39] He later removed Washbrook and ended with 2/28.[37][40][41] His efforts led to calls for him to start taking his bowling seriously, instead of simply jogging in releasing the ball, especially from former South African representative Bob Crisp.[39][42] Miller's spell helped reduce the hosts to 7/122, a lead of only 261, but a rearguard fightback pushed the total to 190, leaving the Australians with a target of 330. England were bowled out at the end of the second day, so the Australians had a full day's batting to reach their target.[35]
The Australians started well, with their openers, Whitington and Jim Workman posting a century opening stand. However, both fell in quick succession for 61 and 63 respectively to leave the score at 2/121. Miller and Hassett took the score to 2/171 before Miller fell for eight. From then on, wickets fell steadily and Australia fell 41 runs short of the target and series was squared.[43] For England, Dick Pollard took 5/76.[35]
The Services then drew three non-first-class matches against Oxford & District, HDG Leveson-Gower's XI and Yorkshire;[44] the first two of these were one-day single innings fixtures while in the third Australia had a lead of 48 and reached 1/27 in their second innings when time ran out.
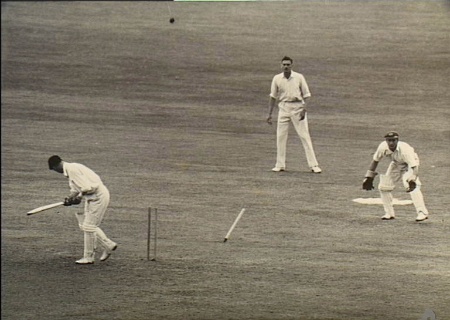
Len Hutton's off stump has just been knocked out by Miller.
In the Third Victory Test at Lord's,[45] Hammond won the toss and elected to bat. Despite his efforts in the previous Victory Test, Miller was only Hassett's fifth-choice bowler. When finally called upon, he measured out a run up.[46][47] Miller struck John Dewes before uprooting his off stump. However, Hutton, on his way to a century, was holding up his end. Eventually, Miller bowled Donald Carr for four and then removed Hutton's off stump. He ended with 3/44 from 18 overs.[46][47][48] These two wickets helped to precipitate a collapse of 7/92 as England fell from 3/162 to 254 all out on the first day.[49] Bob Cristofani helped clean up the tail, taking 4/43.[49]
Australia started their innings at the beginning of the second day. Their top-order failed and fell to 5/72, and it was up to Hassett (68), Carmody and Cristofani (32 each) to push the total to 194. Pollard took 6/75.[49]
Miller took the new ball in the second innings after his performances in the first innings. He bowled Dewes for a duck with an outswinger, before bowling Edrich for 58.[46][50] Nevertheless, England were in a strong position at stumps on the second day at 3/118, an overall lead of 178, with Hutton unbeaten on 49.[49] However, the home team collapsed on the final morning to be all out for 164, with Cristofani taking 5/49 and Miller taking 3/42.[49] This left Australia a target of 225 in five hours. Sismey (52) and Workman (30) laid the foundation for the run chase with a second wicket partnership of 82.[49] Miller came into bat at 3/104 and saw Australia to the target unbeaten on 71 with four wickets in hand.[39][47][50] C B Fry opined that Miller's innings was "superbly stroked and directed cover driving of the pace bowling formed the most telling and majestic feature".[46][47]
During the Sunday rest day of the Third Victory Test, which came after the first day's play, the Australians beat Gravesend Sunday Club in a single inningsgame.[44]
After the Third Test the Australians played in a non-first-class match against Yorkshire at Bramall Lane. The hosts scored 243 in reply to the Australians' 232; Hassett's men were 5/162 when time ran out.[51] They then drew with Sussex in and lost by 74 runs to the Metropolitan Police in single-innings one-day matches.[51] They were narrowly denied a victory in the next match, against the Royal Navy. The Royal Navy were 7/139 in their second innings, with a lead of only 12, when time ran out.[51]

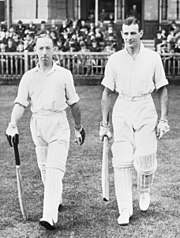
Hassett and Sismey walk out to bat against England
In the Fourth Victory Test, again at Lord's, Hassett won the toss and elected to bat. Whitington scored 46 and Sismey 59. Miller came in at 3/108 and after a slow start, scored another century, taking 170 minutes to reach the mark. At the end of the first day, Australia were 5/273 with Miller and Pepper at the crease.[52] Miller was removed for 118 the next day.[53] He struck ten fours, all off which were driven.[46][54][55] Pepper continued and made 57 to help Australia reach 388. Pope and Pollard took four wickets each.[52]
England's batsmen replied productively; Laurie Fishlock scored 69, Hammond 83, Edrich 73 and Washbrook 112.[52] They reached 3/249 by stumps on the second day and declared at 7/468.[52]
In the second innings, Miller came to the crease with Australia at 3/54 and still in arrears. He scored an unbeaten 35 to ensure that Australia would not collapse further and lose the match.[46][56] The public reception towards the Victory Tests resulted in an additional fifth match being added to the schedule.[57] A record attendance of 93,000 witnessed the Fourth Test at Lord's.[58][59] In the lead-up to the Fifth Victory Test, the Australians lost a single innings game against Northamptonshire and suffered a defeat by an innings and 89 runs North of England cricket team in a two-day match at Blackpool.[44]
In the final Fifth Victory Test at Old Trafford, Australia won the toss and batted first.[60] They collapsed to 4/66 under overcast conditions on a green pitch when Miller came to the crease. Against a swinging and seaming ball, Miller struck 14 from the first over that he faced and went on to finish 77 not out in a display that featured strong cutting and driving. However, he did not get much support from the lower order, with none of the last five batsmen passing single figures, including two run outs,[60] and Australia could manage only 173 in 59 overs.[4][54][55][61] Pollard took 4/78.[60]
Australia reduced England to 2/46, but a 97-run stand by Hutton and Washbrook took the score to 3/143 before both fell for half-centuries. Nevertheless, England were already 5/162 at stumps on the first day, having almost overtaken the Australians' score.[60]
The next morning, Cristofani took four wickets to dismiss England for 243 and ended with 5/55.[60] Australia then collapsed to 6/69, still a run in arrears, when Cristofani came to the crease. He struck an unbeaten 110, while his teammates added only 41 for the remaining four wickets, as Australia were all out for 210. WE Phillipson took 6/48.[60] England were left with a target of 141 on the final day, which they reached with six wickets in hand to square the series 2–2.[62] Hassett wrote at the end of the series that "This is cricket as it should be...These games have shown that international cricket can be played as between real friends—so let's have no more talk of "war" in cricket".[63] Miller topped the batting averages for the series, with 443 runs at 63.28. His aggregate exceeded that of Hammond and Hutton, who made 369 and 380 respectively.[64] Miller also took 10 wickets at 27.70.[63][64][65] Of Miller's batting, Hassett said that "as a strokeplayer he is second to none".[63] his exploits in military teams led some to compare him to Jack Gregory, who had broken into top-flight cricket with his exploits with an AIF team immediately after the First World War.[55]
The series was regarded as an outstanding success, with a total attendance of 367,000 and bright and attacking play.[66]
The English summer concluded with five more matches. The Australians defeated Nottinghamshire by 103 runs in a two-day game and Leveson-Gower's XI by an innings and 108 runs in their last first-class fixture.[44] This was followed by a low-scoring two-day match in which Australia lost to Surrey by three wickets; 37 wickets fell for just 327 runs.[44] Australia then won two more single-innings games against Sussex and at Middlesbrough versus the Combined Counties.
In India[]


Price, Hassett, an Indian official and Pepper during the Indian leg of the tour.
Due to the unexpectedly strong success of the Victory Tests, the government of Australia, led by foreign minister Doc Evatt, ordered the Australian Services to delay their demobilisation. With the team raising so much money for war charities, the government directed them to travel home via India and Ceylon for further fundraising matches for the Red Cross.[64][67]
The Australians faced an arduous schedule; eight of the nine matches were first-class; three were international matches, and four were against the zones of India.[68]
Miller, the vice-captain of the team, almost missed the trip to India after turning up late for the voyage.[69] The servicemen arrived in Bombay and took a two-day train journey to Lahore to play North Zone. North batted first and made 410; Australia replied with 351, and Pepper top-scored with 77.[70][71] He then took 5/45 in the second innings and reduced the hosts to 7/103, but time ran out and the match ended in a draw.[70][72]
The Australians headed to Delhi with another long train journey for a match against a Prince's XI. It was a high-scoring match in hot conditions; the Indian Test players Vijay Merchant, Lala Amarnath and Syed Mushtaq Ali all struck centuries in the hosts' only innings of 401, and Hassett struck 187 and 124 not out in Australia's 8/424 declared and 5/304.[72][73] Hassett then rested as Miller led the team against West Zone in Bombay. Miller top-scored with 106 in Australia's 362. The hosts replied with 9/500 declared, with Rusi Modi scoring 168, as the match ended in a high-scoring draw.[73][74] In the first match against India at Bombay's Brabourne Stadium, regarded as unofficial Tests, Hassett won the toss and elected to bat. Unlike the Victory Tests, these games were four days long. After Whitington fell for four, Carmody and Jack Pettiford added 177 for the second wicket, and scored 113 and 124 respectively. Australia proceeded to 2/301; Hassett scored 53, before four wickets fell in the space of 25 runs. Pepper added 95 and Workman 76, as Australia totalled 531 in almost two days of batting. Vijay Hazare took 5/109 and CS Nayudu 3/141.[75]
In reply, India reached 1/82 at the end of the second day. All of their batsmen made a start, none of the top seven scoring less than 24, but only Amarnath (64) and Hazare (75) passed 50. India were out for 339 just before stumps on the third day and were forced to follow on. Four Australian bowlers took two wickets.[75] The second innings followed a similar pattern and all of the top five Indian batsmen passed 20 without passing 70. India reached 8/239 and were only 47 runs ahead, leaving Australia in striking distance of victory, but Gul Mohammad and Amir Elahi added 51 for the ninth wicket and pushed the total to 304. This left Australia with 103 runs to win in half an hour. However, the Indian captain Merchant placed all of his fielders on the off side and instructed his bowlers to deliver the ball wide. The Australians ended at 1/31.[41][75][76][77] Australia were still searching for their first win of the Indian tour when they took on the Indian Universities in a non-first-class match in Pune.[68] However, Australia managed 300 and then took only one wicket as their hosts reached 385 before declaring. Australia were 3/85 when time ran out.[51][68]
Conflict hit the team after the ineffective display against the students. The team, mostly made up of RAAF personnel, had been ill with food poisoning and dysentery, and travelled across the Indian subcontinent via long train journeys. The airmen wanted to travel by air, and tried to ask Hassett and manager Keith Johnson for air travel.[78] When this was refused, they threatened to abandon the tour or replace Lindsay Hassett, an Australian Imperial Force member, with either Keith Carmody or Keith Miller, who were RAAF fighter pilots if their wish was not granted. With Bradman likely to miss the upcoming tour of New Zealand, the Services captain would be one of the leading candidates to lead Australia.[79] Miller refused to plot against Hassett and the dispute ended when Squadron Leader Stan Sismey arranged for a RAAF plane already in India to transport the team.[78][80] On the first flight to Calcutta, the squad survived an electrical storm that caused the plane to drop altitude.[79][81][82]


The Australian and East Zone teams in a group photo.
The team was scheduled to play East Zone in Calcutta, but the city was gripped in deadly riots as independence activists agitated against British rule. The match went ahead, but on the first day, thousands of protestors invaded the pitch, interrupting play for an hour. Elsewhere in the city, 23 people were killed.[83] Australia batted first and made only 107, before East Zone replied with 131. Led by Hassett's 125, Australia posted 304 to leave the hosts a target of 281. On the final day, Miller's friend Denis Compton, who was playing for East Zone while on deployment with the British Army in India, was nearing a century as his team closed in on victory.[83] The pro-independence rioters broke through the security presence and invaded the pitch again. The leader of the demonstrators ran up to Compton and said: "Mr Compton, you very good player, but you must stop".[80][84][85][86] In later years, Miller would quote this remark whenever Compton came to the crease in matches featuring both of them.[87] Compton told the rioters to ask Hassett, saying that the Australian skipper controlled proceedings. Hassett smiled at the leader of the irate demonstrators and asked "You wouldn't happen to have a cigarette, would you, old boy?"[80][84][86] The rioters calmed down and play resumed. Compton brought up his century with the winning runs.[80][87] In 2005, the ECB and Cricket Australia decided that the player adjudged the Player of the Series in the Ashes would be awarded the Compton-Miller Medal, recognising their friendship and rivalry.[88]
The second international match took place at Eden Gardens a week later. Merchant won the toss and elected to bat. Vinoo Mankad, Hazare and Modi all made half-centuries and the hosts ended with 386 on the second day. Pepper was the most successful of the Australians with 4/120. The Australian innings was set up by a second wicket partnership of 218 between Whitington (155) and Pettiford (101).[89] Miller came in 3/312 and then hit Mankad for four sixes from five balls,[87][90] before falling to the said bowler for 82.[91][92] This set up Australia's total of 472. India started their second innings late on the third day, and they declared late on the final day at 4/350, after Merchant (155 not out) and Abdul Hafeez Kardar (86 not out) had put on an unbroken stand of 189. This left Australia with an unfeasible target of 266 in around and hour. The Australians reached 2/49 and the match ended in a draw.[41][89][90][93]
Captaining the team, Miller took 3/19 and 1/8 in a match against South Zone in Madras, the Australians' only win on Indian soil, by six wickets.[41]
The final match in India was the third and deciding match in the international series, at Madras. Hassett won the toss and elected to bat, but his batsmen collapsed to 5/103, when Pepper joined Hassett at the crease. The pair added 181, but their dismissals for 87 and 143 signalled the end of the Australian innings for 339 early on the second day after a collapse of 5/55.[94] Shute Banerjee took 4/86 and Chandu Sarwate 4/94.[94]
In reply, India fell to 4/110, before Amarnath (113) and Modi (203) rebuilt the innings, supported by Gul Mohammad (55) and Nayudu (64). The hosts were eventually out for 525 late on the third day. Pepper was the most successful of the Australians, taking 4/118. Australia faced an uphill task to save the match, and the opening pair of Carmody and Whitington added 133. However, wickets fell regularly thereafter and the tourists were all out for 275.[94] Banerjee and Sarwate both took four wickets each for the second time.[94] India then accumulated the 92 runs needed for victory, with six wickets in hand.[94]
It was not a happy tour for Johnson and his men on the playing arena. They lost the three-match series against India 1–0 and recorded only one victory, against South Zone.[95][96]
Australia ended the subcontinental part of the tour with victory over Ceylon by an innings and 44 runs.[72] Not wanting to wait a month for the next boat and a fortnight's sea voyage, the Australians returned to Perth by hitching a ride on a B-24 Liberator. The pilot of the RAAF plane had already promised 14 friends a lift so that they would not be stuck in India for another six months, so the Australian team sat on the floor of the aircraft. They made it back to Australia despite suffering engine trouble and an overloaded plane.[91][97]
In Australia[]
Johnson's team arrived in Australia late in 1945, but the armed services and Australian Board of Control ordered them to play another series against the various Australian states.[98] The fixtures were meant to revive cricket following the war and were also used as a lead-up to the international tour to New Zealand in March 1946.[80][98][99]
The Services performed poorly; after playing consecutive draws against Western Australia and South Australia, they were crushed by an innings by both Victoria and New South Wales, before drawing against Queensland and Tasmania, the smallest state.[100][101]
The first match against Western Australia saw the hosts score 323, and the servicemen replied with 301; Miller top-scored with 80. The Western Australians reached 2/144 when time ran out.[93] The second match against South Australia followed a similar pattern. The hosts replied to the Services' 314 with 319, and after Hassett's men replied with 255, the Bradman-led South Australians reached 1/130 when time ran out.[72] Pepper took 4/100 and Ellis 5/88.[102]
In the next match against Victoria at St Kilda, Hassett's men were hammered. Ian Johnson took ten wickets for the match and the hosts bowled out the Servicemen for 118 and 182 to win by an inning and 156 runs.[72][103] Miller top-scored in both innings with 37 and 59.[103][104]
The military men had another difficult time against New South Wales, as their opponents made 7/551 declared, with Test batsman Sid Barnes scoring a century.[103][104][105] Apart from Miller, the Services batsmen struggled. Miller reached 74 as Services limped to 9/171. Services had no batsmen left with Pettiford injured and retired hurt, so O'Reilly allowed the twelfth man to Workman to be substituted in and allowed to bat, in order to give Miller a chance of making a century.[106] Miller attacked and scored 31 of the last 33 runs, ending with an unbeaten 105, with 11 fours in 172 minutes. He earned plaudits among cricket pundits on Australian soil.[99][107][108] Former leading Test batsman Alan Kippax opined that "Australia has unearthed a new champion",[109] claiming that he was finer than Jack Gregory and saying that "few batsmen I have watched have had his ability to blend beauty and power".[109] O'Reilly said that Miller's century was "one of the best hundreds ever got against me".[109] The Services were forced to follow on and were bowled out for 339 to fall to another innings defeat.[72] The Services struggled against the leg spin of Colin McCool, who took 11 wickets in a drawn match against Queensland. The hosts were 5/186 in pursuit of 190 for victory when time ran out and saved Hassett's team.[72][110] In the final match against Tasmania, the Services came as close as they would to a victory on Australian soil. After taking a 97-run first innings lead, they set Tasmania 292 for victory and the hosts held on for a draw with only wicket in hand. They were 9/166 when time ran out.[41][109][111][112][113]

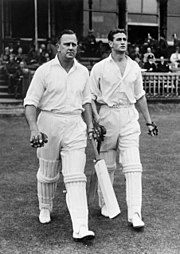
Miller walks out to bat with Cec Pepper.
Johnson was involved in another administrative dispute during the Australian leg of the campaign. Cec Pepper, whom teammates Keith Miller and Dick Whitington regarded as one of the best all rounders in the world and a certainty for Australian Test selection, appealed for leg before wicket against Australian captain Don Bradman in the match against South Australia. The appeal was turned down and Pepper complained to the umpire, prompting Bradman, who was also a member of the Australian Board, to lodge a complaint about Pepper. Pepper was subsequently never selected for Australia.[105] Cricket historian Gideon Haigh said that "Johnson was clearly upset by the affair, and also by the failure of the [national] selection panel [Bradman among them] ... to send Pepper, second only to Miller as a cricketer in the Services XI, to New Zealand".[114] Johnson tried to intercede on Pepper's behalf to no avail, although the other board members claimed that no directive had been given to the selectors to exclude Pepper.[114]
This capped a poor end to the long and taxing Australian Services campaign. As the military men played poorly in Australia, the national selectors concluded that their achievements against England must have been against weak opposition,[105] and only Hassett and Miller were selected for the Australian tour of New Zealand.[115]
See also[]
- Victory Tests
Notes[]
- ↑ Perry, p. 102.
- ↑ "British Empire XI v Royal Australian Air Force Royal Australian Air Force in British Isles 1945". CricketArchive. http://www.cricketarchive.com/Archive/Scorecards/17/17474.html. Retrieved 2008-12-09.
- ↑ 3.0 3.1 Perry, p. 103.
- ↑ 4.0 4.1 Pollard (1988), p. 366.
- ↑ 5.0 5.1 Perry, p. 104.
- ↑ Whitington, p. 65.
- ↑ 7.0 7.1 7.2 Jaggard, p. 77.
- ↑ 8.0 8.1 8.2 8.3 Jaggard, p. 66.
- ↑ 9.0 9.1 9.2 9.3 "Obituaries in 1972". Wisden, Cricinfo. http://content.cricinfo.com/wisdenalmanack/content/story/228453.html. Retrieved 2009-02-14.
- ↑ 10.0 10.1 10.2 Jaggard, p. 78.
- ↑ 11.0 11.1 Jaggard, p. 61.
- ↑ Cashman, pp. 67, 153, 174, 176, 215–216.
- ↑ Haigh and Frith, p. 97.
- ↑ Perry, pp. 98–104.
- ↑ "Australian Services in 1945". Wisden Cricketers' Almanack (1946 ed.). Wisden. p. 157.
- ↑ Pollard (1988), p. 360.
- ↑ Perry, p. 105.
- ↑ 18.0 18.1 18.2 18.3 18.4 18.5 "England v Australian Services Australian Services in England 1945". Cricket Archive. http://www.cricketarchive.com/Archive/Scorecards/17/17475.html. Retrieved 2009-08-05.
- ↑ 19.0 19.1 Perry, p. 106.
- ↑ Pollard (1988), p. 362.
- ↑ Whitington, p. 72.
- ↑ Perry, p. 107.
- ↑ 23.0 23.1 Pollard (1988), pp. 362–363.
- ↑ Whitington, pp. 72–73.
- ↑ 25.0 25.1 Perry, p. 108.
- ↑ Harte, p. 386.
- ↑ Whitington, p. 73.
- ↑ Perry, p. 110.
- ↑ "England v Australian Services Australian Services in England 1945". CricketArchive. Archived from the original on 2 December 2008. http://web.archive.org/web/20081202211759/http://www.cricketarchive.com/Archive/Scorecards/17/17475.html. Retrieved 2008-12-09.
- ↑ Pollard (1988), p. 363.
- ↑ 31.0 31.1 Harte, p. 387.
- ↑ Whitington, p. 74.
- ↑ Perry, pp. 106–110.
- ↑ Perry, p. 111.
- ↑ 35.0 35.1 35.2 35.3 "England v Australian Services Australian Services in England 1945". Cricket Archive. http://www.cricketarchive.com/Archive/Scorecards/17/17482.html. Retrieved 2009-08-05.
- ↑ Perry, p. 112.
- ↑ 37.0 37.1 Pollard (1988), p. 364.
- ↑ Whitington, p. 76.
- ↑ 39.0 39.1 39.2 Mallett, p. 73.
- ↑ Perry, p. 113.
- ↑ 41.0 41.1 41.2 41.3 41.4 "Player Oracle KR Miller 1939 to 1947". CricketArchive. http://www.cricketarchive.com/cgi-bin/player_oracle_reveals_results2.cgi?playernumber=741&opponentmatch=exact&playername=Miller&resulttype=All&matchtype=All&teammatch=exact&startwicket=&homeawaytype=All&opponent=&endwicket=&wicketkeeper=&searchtype=InningsList&endscore=&playermatch=contains&branding=cricketarchive&captain=&endseason=1947&startscore=&team=&startseason=1939. Retrieved 2008-12-09.
- ↑ Whitington, p. 77.
- ↑ Perry, p. 114.
- ↑ 44.0 44.1 44.2 44.3 44.4 "Australian Services in England 1945". Cricket Archive. http://www.cricketarchive.com/Archive/Seasons/ENG/1945_ENG_Australian_Services_in_England_1945.html. Retrieved 2009-08-05.
- ↑ Perry, p. 121.
- ↑ 46.0 46.1 46.2 46.3 46.4 46.5 Pollard (1988), p. 365.
- ↑ 47.0 47.1 47.2 47.3 Whitington, p. 78.
- ↑ Perry, pp. 122–123.
- ↑ 49.0 49.1 49.2 49.3 49.4 49.5 "England v Australian Services Australian Services in England 1945". Cricket Archive. http://www.cricketarchive.com/Archive/Scorecards/17/17488.html. Retrieved 2009-08-05.
- ↑ 50.0 50.1 Perry, p. 124.
- ↑ 51.0 51.1 51.2 51.3 "Player Oracle RS Whitington 1944 to 1947". CricketArchive. http://www.cricketarchive.com/cgi-bin/player_oracle_reveals_results2.cgi?playernumber=16855&opponentmatch=exact&playername=Miller&resulttype=All&matchtype=All&teammatch=exact&startwicket=&homeawaytype=All&opponent=&endwicket=&wicketkeeper=&searchtype=InningsList&endscore=&playermatch=contains&branding=cricketarchive&captain=&endseason=1947&startscore=&team=&startseason=1944. Retrieved 2008-12-09.
- ↑ 52.0 52.1 52.2 52.3 >"England v Australian Services Australian Services in England 1945". Cricket Archive. http://www.cricketarchive.com/Archive/Scorecards/17/17494.html. Retrieved 2009-08-05.
- ↑ Perry, p. 126.
- ↑ 54.0 54.1 Harte, p. 388.
- ↑ 55.0 55.1 55.2 Whitington, p. 79.
- ↑ Perry, p. 127.
- ↑ Perry, p. 128.
- ↑ Perry, pp. 122–128.
- ↑ Pollard (1988), pp. 364–366.
- ↑ 60.0 60.1 60.2 60.3 60.4 60.5 "England v Australian Services Australian Services in England 1945". Cricket Archive. http://www.cricketarchive.com/Archive/Scorecards/17/17498.html. Retrieved 2009-08-05.
- ↑ Perry, pp. 130–131.
- ↑ Perry, pp. 131–132.
- ↑ 63.0 63.1 63.2 Perry, p. 132.
- ↑ 64.0 64.1 64.2 Pollard (1988), p. 367.
- ↑ Mallett, p. 74.
- ↑ Perry, pp. 130–132.
- ↑ Perry, pp. 137–138.
- ↑ 68.0 68.1 68.2 "Australian Services in India 1945/46". Cricket Archive. http://www.cricketarchive.com/Archive/Seasons/IND/1945-46_IND_Australian_Services_in_India_1945-46.html. Retrieved 2009-08-05.
- ↑ Perry, p. 139.
- ↑ 70.0 70.1 Perry, p. 141.
- ↑ Whitington, pp. 86–89.
- ↑ 72.0 72.1 72.2 72.3 72.4 72.5 72.6 "Player Oracle AL Hassett 1944 to 1947". CricketArchive. http://www.cricketarchive.com/cgi-bin/player_oracle_reveals_results2.cgi?playernumber=706&opponentmatch=exact&playername=Miller&resulttype=All&matchtype=All&teammatch=exact&startwicket=&homeawaytype=All&opponent=&endwicket=&wicketkeeper=&searchtype=InningsList&endscore=&playermatch=contains&branding=cricketarchive&captain=&endseason=1947&startscore=&team=&startseason=1944. Retrieved 2008-12-09.
- ↑ 73.0 73.1 Perry, p. 142.
- ↑ Pollard (1988), p. 368.
- ↑ 75.0 75.1 75.2 "Indian XI v Australian Services Australian Services in India 1945/46". Cricket Archive. http://www.cricketarchive.com/Archive/Scorecards/17/17509.html. Retrieved 2009-08-05.
- ↑ Perry, p. 143.
- ↑ Whitington, pp. 92–93.
- ↑ 78.0 78.1 Whitington, p. 94.
- ↑ 79.0 79.1 Perry, pp. 145–146.
- ↑ 80.0 80.1 80.2 80.3 80.4 Pollard, p. 369.
- ↑ Perry, p. 146.
- ↑ Pollard (1988), p. 369.
- ↑ 83.0 83.1 Perry, p. 147.
- ↑ 84.0 84.1 Perry, p. 148.
- ↑ Miller, Keith (1956). Cricket Crossfire. London: Oldbourne Press. pp. 77..
- ↑ 86.0 86.1 Whitington, p. 95.
- ↑ 87.0 87.1 87.2 Perry, p. 149.
- ↑ "Ashes' best player to receive Compton-Miller medal". Australian Broadcasting Corporation. http://www.abc.net.au/news/stories/2005/07/21/1419624.htm. Retrieved 2009-01-31.
- ↑ 89.0 89.1 "Indian XI v Australian Services Australian Services in India 1945/46". Cricket Archive. http://www.cricketarchive.com/Archive/Scorecards/17/17512.html. Retrieved 2009-08-05.
- ↑ 90.0 90.1 Whitington, p. 97.
- ↑ 91.0 91.1 Perry, p. 150.
- ↑ Harte, p. 390.
- ↑ 93.0 93.1 Pollard (1988), p. 370.
- ↑ 94.0 94.1 94.2 94.3 94.4 "Indian XI v Australian Services Australian Services in India 1945/46". Cricket Archive. http://www.cricketarchive.com/Archive/Scorecards/17/17514.html. Retrieved 2009-08-05.
- ↑ Perry, pp. 151–152.
- ↑ Pollard (1988), pp. 368–370.
- ↑ Whitington, pp. 97–99.
- ↑ 98.0 98.1 Perry, p. 157.
- ↑ 99.0 99.1 Harte, p. 391.
- ↑ Perry, pp. 157–164.
- ↑ Pollard (1988), pp. 371–374.
- ↑ Perry (2005), p. 160.
- ↑ 103.0 103.1 103.2 Perry, p. 161.
- ↑ 104.0 104.1 Whitington, p. 104.
- ↑ 105.0 105.1 105.2 Pollard (1988), p. 372.
- ↑ Pollard (1988), p. 373.
- ↑ Perry, p. 162.
- ↑ Whitington, p. 105.
- ↑ 109.0 109.1 109.2 109.3 Perry, p. 163.
- ↑ Jaggard, p. 73.
- ↑ Perry, p. 164.
- ↑ Pollard (1988), p. 374.
- ↑ Whitington, p. 106.
- ↑ 114.0 114.1 Haigh and Frith, pp. 98–99.
- ↑ Perry, pp. 164–165.
References[]
- Cashman, Richard; Franks, Warwick; Maxwell, Jim; Sainsbury, Erica; Stoddart, Brian; Weaver, Amanda; Webster, Ray (1997). The A–Z of Australian cricketers. Melbourne, Victoria: Oxford University Press. ISBN 0-9756746-1-7.
- Haigh, Gideon; Frith, David (2007). Inside story: unlocking Australian cricket's archives. Southbank, Victoria: News Custom Publishing. ISBN 1-921116-00-5.
- Harte, Chris; Whimpress, Bernard (2003). The Penguin History of Australian Cricket. Camberwell, Victoria: Penguin Books Australia. ISBN 0-670-04133-5.
- Jaggard, Ed (May 1996). "Forgotten Heroes: The 1945 Australian Services Cricket Team". Sydney, New South Wales: Australian Society for Sports History. pp. 61–79.
- Perry, Roland (2005). Miller's Luck: the life and loves of Keith Miller, Australia's greatest all-rounder. Milsons Point, New South Wales: Random House. ISBN 978-1-74166-222-1.
- Pollard, Jack (1988). The Bradman Years: Australian Cricket 1918–48. North Ryde, New South Wales: Harper Collins. ISBN 0-207-15596-8.
- Pollard, Jack (1990). From Bradman to Border: Australian Cricket 1948–89. North Ryde, New South Wales: Harper Collins. ISBN 0-207-16124-0.
- Whitington, Richard (1981). Keith Miller: the golden nugget. Adelaide, South Australia: Rigby Publishers. ISBN 0-7270-1424-2.
External sources[]
- http://www.ascacricket.net.au/Hassett_1945.htm
- http://www.ausport.gov.au/fulltext/1997/sportsf/sf970425.htm
- http://www.abc.net.au/stateline/sa/content/2006/s1627653.htm
The original article can be found at Australian Services cricket team and the edit history here.