

The Butte de Warlencourt is an ancient burial mound off the Albert–Bapaume road, north-east of Le Sars in the Somme département of northern France. It is located on the territory of the commune of Warlencourt-Eaucourt and slightly north of a minor road to Gueudecourt and Eaucourt l'Abbaye. The Germans constructed deep dugouts throughout the Butte and surrounded it by several belts of barbed wire, making it a formidable defensive position in advance of Gallwitz Riegel (the Gird Trenches). After the Battle of Flers–Courcelette (15–22 September) the view from the Butte dominated the new British front line and was used by the Germans for artillery observation.
During the Battle of Le Transloy (1–20 October), part of the Battle of the Somme, the Butte de Warlencourt was the subject of several attacks by the British Fourth Army, which were costly failures; attacks in November also failed. The 2nd Australian Division occupied the Butte on 24 February 1917, during the German retirements made on the Somme front, preparatory to Operation Alberich, the retreat to the Hindenburg Line. The Butte de Warlencourt was recaptured by the German 2nd Army on 24 March 1918, during the retreat of the 2nd Division in Operation Michael, the German spring offensive. The butte was recaptured for the last time on 26 August, by the 21st Division, during the Second Battle of Bapaume. In 1990, the site was purchased for preservation, by the Western Front Association.
Background[]
1914[]
On 25 September, during the Race to the Sea a French attack north of the Somme against the II Bavarian Corps (General Karl Ritter von Martini), forced a hurried withdrawal. As more Bavarian units arrived in the north, the 3rd Bavarian Division advanced along the north bank of the Somme, through Bouchavesnes, Leforest and Hardecourt until held up at Maricourt. The 4th Bavarian Division further to the north, defeated the French territorials and then attacked westwards in the vicinity of Gueudecourt, towards Albert, through Sailly, Combles, Guillemont and Montauban.[1] The II Bavarian Corps and XIV Reserve Corps (Generalleutnant Hermann von Stein) pushed back a French Territorial division from the area around Bapaume and advanced towards Bray-sur-Somme and Albert, as part of an offensive down the Somme valley to reach the sea.[2] The German offensive was confronted north of the Somme by the northern corps of the French Second Army east of Albert.[3] The XIV Reserve Corps attacked on 28 September, along the Roman road from Bapaume to Albert and Amiens, intending to reach the Ancre and then continue westwards along the Somme valley. The 28th (Baden) Reserve Division advanced close to Fricourt, against scattered resistance from French infantry and cavalry.[4]
1916[]
On 21 July, 3 Squadron RFC discovered new German defences from Le Transloy to Warlencourt and more trenches between Eaucourt l'Abbaye and Flers, west of the butte. On 22 August a dogfight between 11 Squadron and about twenty German fighters took place above the butte and three Roland D.I aircraft were shot down.[5] On 4 October, the 47th Division occupied Flers Support unopposed and after nightfall on 5 October, advanced to occupy a ruined mill north-west of Eaucourt.[6] The capture of Eaucourt enabled the British to move field artillery over the High Wood ridge, into range in a valley beyond the Starfish, where they could support attacks on the butte.[7] Bavarian Reserve Infantry Regiment 16 remained in the line near Eaucourt and suffered many casualties; by 5 October, the commander of I Battalion reported that the battlefield conditions were extraordinary; morale was low because of cold rations and constant artillery-fire, some of which came from German artillery. The large number of casualties and the inability to bury dead, which were strewn around the trenches, sapped morale further. The cold, rainy weather poor food and lack of hygiene caused a big increase in non-battle casualties, with up to 1 1⁄3 of the troops contracting ; no fresh troops were available to rest the garrison, despite constant appeals from their commanders.[8]
Prelude[]
German defensive preparations[]


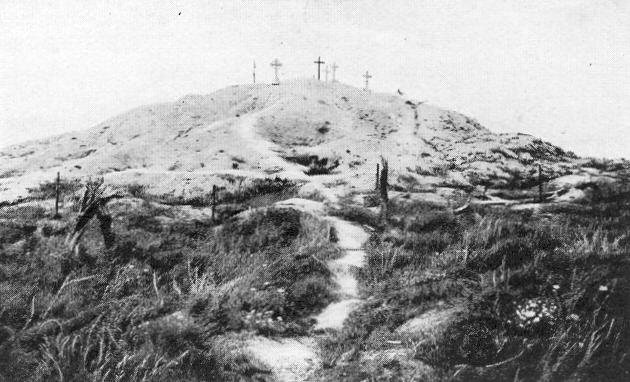
The Butte was a mound about 50–60 feet (15–18 m) high, on a slope near the Gird trenches (Gallwitz Riegel). In the Franco-Prussian War the mound had been tunnelled and during the Battle of the Somme the Germans fortified the Butte with machine-gun posts and encircled by many bets of barbed wire. From the mound, Pozières to the south-west, La Barque and Bapaume to the north-east were easily visible. Many German artillery positions had been established on the ground east of the butte.[9] German artillery positions commanded the area around Martinpuich, where the British had to move much of their artillery, which increased the accuracy of German counter-batter fire.[10]
British offensive preparations[]
The 47th Division captured the nearby farmstead of Eaucourt L'Abbaye from (1–3 October).[11] On 4 October, the 140th Brigade took over the line from the 141st Brigade in preparation for another general attack. Next day the 1/6th London Regiment (London) occupied an old mill 500 yards (460 m) west of Eaucourt l'Abbaye. The attack by III Corps was to begin at 1:45 p.m. on 7 October, against the Gird trenches, which ran north-west to south-east from Gueudecourt to Warlencourt and past the butte. The 47th Division was to attack in the centre, with the 41st Division on the right and the 23rd Division on the left flank. The Germans had dug a new trench (Diagonal Trench) across the 47th Division front, over the high ground north of Eaucourt I'Abbaye, westwards into the valley. Diagonal Trench the first objective was to be taken by the 1/8th London and the final objective at Gird Trench and the butte was to be captured by the 1/15th and 1/7th London, with the 1/6th London in support.[7] On 9 October, the 26th (South African) Brigade relieved the 140th and 142nd brigades.[12]
Battle[]
7 October[]


The first objective was set at Snag Trench, which ran across the east slope of a depression running north to Warlencourt. The 6th Bavarian Reserve Division held the area with the III Battalion, Bavarian Reserve Infantry Regiment 16. In the centre the objective was 500 yards (460 m) distant, half-way to the butte. On the right the 1/8th London was stopped by massed machine-gun fire, as were the 1/15th London and the 1/7th London, which had been intended to leap-frog through to the final objective. In 1922, the 47th Division historian A. H. Maude described how,
From across the valley the enemy had magnificent observation of the ground leading to our objective, and made full use of it... not a man turned back, and some got right up under the butte, but they were not seen again.[13]
the attackers came under small-arms fire from Diagonal Trench but the 1/15th London and 1/8th London got forward on the right and dug in, along a sunken road leading north-east from Eaucourt l'Abbaye to La Barque.[7] A few outposts were established near the Le Barque road and on the right flank, touch was gained with the 41st Division.[14]
To the left, companies of the 1/8th London, followed by the 1/7th London advanced down the slope, forward of the mill and was fired on from Diagonal Trench and by artillery and machine-gun fire sited in depth to aim cross-fire along the western slopes up to the butte and high ground to the south. From the far side of the valley the ground leading to the British objectives was easily observed. Some of the attackers reached the butte and disappeared. Several local counter-attacks were made by Bavarian Reserve Infantry Regiment 16.[15]Parties dug in where they could and several posts were pushed out from the mill to maintain contact with the 23rd Division, which had advanced along the main road and captured Le Sars.[13] The 23rd Division sent patrols which gained a view of the butte and the vicinity; at 3:40 p.m. the patrols reported that no Germans could be seen.[16] The 140th Brigade lost many casualties and were relieved on the left flank by the 142nd Brigade but the 1/6th London in the advanced posts had to wait until the 142nd Brigade attack next day.[13]
On 8 October, a post was spotted half-way up the road towards the butte, by the crew of a reconnaissance aircraft. The 142nd Brigade attacked Diagonal Trench again, with the 1/21 London and the 1/22 London, who crawled forward to rush the German garrison as soon as a one-minute hurricane bombardment lifted at 9:00 p.m. The 1/21 London advanced until about 200 yards (180 m) short of Diagonal Trench with no losses, then massed machine-gun fire began and inflicted many casualties and few troops reached the trench. On the left flank, three companies of the 1/22 London reached Diagonal Trench against slight opposition but enfilade fire from the right flank made the trench untenable once dawn broke. The survivors managed to dig advanced posts up to 100 yards (91 m) short of the objective and at the Eaucourt l'Abbaye–Warlencourt road. Touch was gained with the 23rd Division on the left.[17][13] The 47th and 23rd divisions were relieved by the 9th and 15th divisions from 8–11 October, preparatory to another attack.[17]
12 October[]
| Date | Rain (mm) |
Max–Min Temp (°F) |
Outlook |
|---|---|---|---|
| 7 | 0.1 | 66–52 | windy rain |
| 8 | 0.1 | 64–54 | rain |
| 9 | 0 | 64–50 | fine |
| 10 | 0 | 68–46 | fine sunny |
| 11 | 0.1 | 66–50 | dull |
| 12 | 0 | 61–55 | dull |
| 13 | 0 | 61–50 | dull |
| 14 | 0 | 61–50 | overcast |
| 15 | 3 | 57–41 | rain fine later |
| 16 | 0.1 | 54–36 | sunny cold |
| 17 | 3 | 55–43 | fine |
| 18 | 4 | 57–48 | rain fine later |
| 19 | 4 | 57–37 | heavy rain |
| 20 | 0 | 48–28 | cold |
| 21 | 0 | 45–28 | cold |
| 22 | 0 | – – | very cold |
| 23 | 3 | 55–43 | dull |
| 24 | 3 | 54–45 | dull, rain |
| 25 | 2 | 52–45 | rain |
| 26 | 1 | 55–39 | showery |
| 27 | 1 | 55–43 | showers cold |
| 28 | 8 | 55–41 | wet, cold |
| 29 | 7 | 53–45 | wet |
| 30 | 7 | 61–48 | wet, cold |
| 31 | 0 | 63–46 | — |
| 1 | 3 | 59–46 | — |
| 2 | 3 | 59–48 | — |
| 3 | 1 | 59–48 | — |
| 4 | 2 | 64–52 | wet cloudy |
| 5 | 0 | 59–48 | clear |
The 9th Division (Major-General W. T. Furse) took over from the 47th Division on the eve of the attack; Furse asked for a 48-hour postponement but was overruled. RFC aircraft tried to reconnoitre the area to establish the position of any new German trenches but the light was too poor. By 12 October, the Bavarian companies had been reduced to about 35 men each, with rifles and 18 machine-guns to defend an area of 1,000 by 1,500 metres (1,100 yd × 1,600 yd).[8] The divisional objectives were Snag Trench and the butte, including the Tail, a trench running back from Snag Trench to the Butte and the Pimple, a mound at the west end of Snag Trench. On the left flank, the 15th Division had been sapping forward was to support the attack by firing on the final objective, No. 4 Special Company RE preparing to lay a smoke screen on Little Wood and the butte. On the right flank, the 7th Seaforth Highlanders (Seaforth) of the 26th Brigade, were met by machine-gun fire as soon as it advanced and was also hit by the British heavy artillery, which fired short and missed Snag Trench. The 10th Argyll and Sutherland Highlanders (Argylls) moved forward as reinforcements but only about 200 yards (180 m) were gained, when the troops consolidated during the night. On the left flank, the 2nd Regiment of the South African Brigade, supported by the 4th Regiment was held up by long-range machine-gun fire and lost direction from the smoke screen which drifted from the butte. The remnants dug in half-way to Snag Trench behind some advanced parties, who were ordered to retire during the morning of 13 October.[19] Bavarian Reserve Infantry Regiment 16 was relieved by Infantry Regiment 104 on 13 October.[10] The defenders managed to recapture a British foothold in the 7th company zone and were then relieved by Reserve Infantry Regiment 181.[15] Bavarian Reserve Infantry Regiment 16 had lost 1,177 casualties in ten days and had only 350 infantrymen fit to fight.[8]
18 October[]
On 17 October, two companies of Infantry Regiment 104 counter-attacked and were confronted by a "gigantic iron dragon" (a tank) which fired on German positions with machine-guns and light guns. Most of the 9th Company was annihilated before the tank retired.[20] The capture of the butte by the 9th Division was postponed and Snag Trench was made the objective of an attack at 3:40 a.m. on 18 October. On the right flank an attack was to be made by the 30th Division.[21] The 26th Brigade was to attack with a battalion in line, the four companies moving on on platoon fronts with a supporting company and a machine-gun company; Stokes mortars were to add to the bombardment of the German front line. On the left flank, the South African Brigade was to attack with the 1st Regiment, with three companies in line, also on platoon fronts, one company in support and one in reserve. The weather broke again and the attack took place in a deluge. On the right battalion advanced close to the creeping barrage and rushed Snag Trench as the standing barrage lifted, the garrison running back to the Gird trenches. A counter-attack began after fifteen minutes and bombed back into the trench on the right and were repulsed soon after. On the left, the South African left flank was repulsed and contact was lost with the right flank units until 9:30 a.m., when a Lewis gun crew made contact with the 26th Brigade battalion, which had also met troops of the 30th Division. In the afternoon, a party of German troops were seen massing for a counter-attack and were dispersed by artillery and small-arms fire. At 5:30 p.m. a counter-attack on the left was also repulsed. During the night a pioneer company arrived and dug a communication trench back to the old front line.[22]
The Lewis gun team was the only South African party to reach the objective; the centre and right-hand companies disappeared, apart from the Lewis gunners and a few wounded. It was thought that the South Africans overran Snag Trench, which was unrecognisable and were cut down by the machine-guns at the butte; a few stragglers returned later in the day with 19 prisoners. The left flank company was stopped by uncut wire and then caught by machine-gun fire, which inflicted many casualties, the remaining troops retiring to the British front line. Furse ordered another attack for 5:45 p.m. and for the main German strong point the Nose to be bombarded, before the South Africans captured it and formed a trench block 500 yards (460 m) up Tail Trench. The rainstorm had turned the ground into a sea of mud so deep that moving 1,000 yards (910 m) took four hours. A company was to attack from the Pimple and one was to get into Snag Trench east of the Nose and attack westwards. The attack from the Pimple entered a hollow, which was full of German machine-gun nests which stopped the advance. The South African party got into Snag Trench and advanced to within 25 yards (23 m) of the Nose and were then repulsed by the fire of three machine-guns, reoccupying Snag Trench a few hours later.[23]
5 November[]
The 50th Division relieved the 9th Division from 24–25 October, in rain which had begun on 23 October and stopped around 3:00 p.m. the next day. The division took over the line east and south-east of Le Sars, in the angle of the Martinpuich–Warlencourt, Eaucourt l'Abbaye and Martinpuich–Le Barque roads. The front line in Snag Trench was irregular and isolated posts on the left flank, were joined to make a continuous line. The German front line was still in Gird Trench and Gird Support Trench behind the butte. A British attack on 26 October, was postponed for two days and then postponed until 30 October, as preparations continued and trenches were repaired. Swampy conditions in no man's land were so bad, that no attack could take place until the ground dried. On 28 October, the ground had recovered slightly and the attack was scheduled for 1 November but then another downpour began in the night, followed by warmer weather, rain and gales from 30–31 October and the attack was again delayed, eventually being set for 9:10 a.m. on 5 November. The 149th Brigade and the 150th Brigade holding the line had become so exhausted that the 151st Brigade was moved up from reserve for the attack.[24]
The 151st Brigade was to attack Gird Trench and Gird Support Trench, with the 1/8th, 1/6th and 1/9th battalions Durham Light Infantry (DLI); the 1/4th and 1/6th battalions Northumberland Fusiliers were attached from the 149th Brigade in support. The DLI battalions were to assemble in Snag and Snag Support trenches, Maxwell Trench and Tail Trench. As the 1/6th and 1/8th DLI took the Gird trenches, the 1/9th DLI was to capture the butte and the adjacent quarry and the Northumberland battalions were to support the attack from the flanks and the 1/5th Border Regiment was to stay in reserve in Prue and Starfish trenches; parts of the divisional machine-gun and trench mortar companies were to accompany the attack and a creeping barrage was to begin 200 yards (180 m) in front of the jumping-off line. Rain and high winds began again on night of 4/5 November and the attacking infantry floundered in mud, which was thigh-deep in places, as they advanced to the jumping-off points and several men drowned. The rain abated towards dawn, with the prospect of a fine cold day but the effect of the storm and a German counter-bombardment could be seen.[25]

At zero hour the creeping bombardment began and infantry crawled out of their trenches, the first men pulling the following troops over the parapet. The British began to follow the creeping barrage, a moderate German counter-barrage fell short of Snag Trench and massed machine-gun fire began from the flanks, causing many casualties as the British troops struggled through the mud at walking-pace. The remaining men of the 1/8th DLI got close to Butte Trench, where they were also hit by British artillery and Stokes mortar fire and then retired to Snag Trench, leaving wounded and stragglers in shell-holes. On the right flank, a supporting Australian attack failed when the Australian artillery barrage fell behind the front line and a machine-gun barrage was so inaccurate that bullets hit the DLI trenches. In the centre the 1/6th DLI was held up on the right and on the left managed to overrun Gird Trench and form a strong point. The attack of the 1/9th DLI on the left flank, took the quarry, overran the butte and established a machine-gun position, advanced to Gird Trench and dug in on the Albert–Bapaume road. By noon, the 1/6th DLI were held up in Maxwell Trench and the 1/9th DLI had consolidated at the quarry, Gird Trench, Gird Support Trench and Butte Alley.[26]
At 3:00 p.m., German counter-attacks began on the Gird Trenches and fighting in the butte continued for a strong point on the north side. By 3:00 p.m. the British had been forced back from Gird Trench and by 7:15 p.m. the Germans had advanced to Butte Alley and reinforcements were requested to recapture Gird Trench. At 12:20 a.m. (6 November) the 1/9th and 1/6th DLI were driven back to Maxwell Trench by converging attacks from the flanks and a frontal attack, which also overran the butte, where the German garrison emerged and joined in the counter-attack. German troops managed to get behind the quarry and by 1:00 p.m. on 6 November the British were back to their start line in Snag, Maxwell and Tail trenches. Another attack was ordered but cancelled later. The attacking Battalions lost 967 men and other casualties made a total of c. 1,000 losses[27] RFC aircraft flew in support of the Fourth Army attacks, despite high winds and a contact-patrol crew flew for 3 3⁄4 hours to observe the attack on the butte, reporting the capture and then the loss of the Butte to German counter-attacks.[28]
On 5 November, the 1st Guard Reserve Division had been relieving the 24th Division and Infantry Regiment 179 recorded that the British "swarmed" over the butte and reached the Warlencourt trenches. During the battle, German artillery also managed to fire on both sides and parts of I Battalion, Infantry Regiment 179, I Battalion, Infantry Regiment 139 and I Battalion, Guard Reserve Regiment 1 conducted the converging attack at 10:50 p.m. On the British right flank, Guard Grenadier Regiment 5 and Guard Reserve Regiment 93 of the 4th Guard Division engaged the British.[29] Early on 6 November, 73 soldiers stranded in no man's land surrendered to Infantry Regiment 179.[30]
Aftermath[]
Analysis[]


The British attack on 7 November, caused the Bavarian troops frightful losses but on 12 October, the Germans showed that afternoon attacks had become predictable and that understrength British units, few with more than 400 men and filled with many poorly trained replacements were not able to defeat the German defence. Air reconnaissance, contact patrol and artillery-observation by the RFC had been negated by poor visibility and the Germans were found to have moved back many machine-guns to concealed positions to engage the British with long-range fire. Major-General R. L. Cavan the XIV Corps commander, suggested that creeping barrages should begin just beyond each objective and that German gunners should be blinded by smoke shells but in 1916, the British Expeditionary Force (BEF) had none.[31]
Bradford wrote,
The Butte itself would have been of little use to us for the purposes of observation. But the Butte de Warlencourt had become an obsession. Everybody wanted it. It loomed large in the minds of the soldiers in the forward area and they attributed many of their misfortunes to it. ... So it had to be taken. It seems that the attack was one of those tempting, and unfortunately at one period frequent, local operations which are so costly and which are rarely worthwhile. But perhaps that is only the narrow view of the Regimental Officer.[32]
Before the attack on 5 November, German observers saw much traffic on light railways and carts behind the British front; carrying-parties moving material forward from Courcelette and Le Sars could also be seen. It was considered certain that an attack was imminent, when the British began to dribble reinforcements forward.[33] By 20 October, the advance of the Fourth Army towards Bapaume near the butte had been halted. In the middle of October, the German defenders had been under great strain, a large number of infantry units had been lost and soldiers surrendered much more readily. By the end of the month the defence had revived; German casualties in September had been 135,000 men, in October were 85,000 men and far less ground had been lost.[34]
Casualties[]
From 12–24 October the 9th Division had 3,255 casualties.[35] In the attack of 5 November, the 50th Division lost 967 men and other casualties made a total of c. 1,000 losses[27]
Subsequent operations[]
14 November[]
The rain stopped on 8 November and on 12 November, the Fourth Army headquarters ordered a local attack by I Anzac Corps and III Corps on either side of the Eaucourt l'Abbaye–Le Barque road. The 50th Division was to attack Gird Support Trench and Hook Sap, which connected the Gird trenches with Butte Trench and formed a salient from which all of the ground opposite the 50th Division could be swept by cross-fire.[36] The 1/5th Northumberland Fusiliers (Northumberland) were to attack up to Hook Sap on the right and the 1/7th Northumberland on the left flank were to capture Hook Sap, Gird Trench and Bind Trench. The rains returned, flooded trenches and left patches of mud thigh-deep. The attackers assembled in Abbaye, Snag and Snag Support trenches. At dawn the butte became visible to the left, the British barrage began at 6:45 a.m. and German SOS rockets made "pencils of golden rain" in the sky.[37]
The 1/5th Northumberland reached Gird Support and gained touch with Australian troops but the conditions were so bad that they retired to Gird Trench, to consolidate a line for 500 yards (460 m) astride the Eaucourt l'Abbaye–Le Barque road. The 1/7th Northumberland reached Hook Sap but German machine-gun fire from the butte was so severe that communication was cut off and the attackers disappeared in the mist. Suspected counter-attacks were engaged by artillery and machine-gun fire. At 11:00 p.m., a counter-attack by the three battalions of Guard Grenadier Regiment 5 and the divisional storm company was made on both flanks and at midnight, parties of the 1/4th and 1/5th Northumberland were repulsed on the right flank. Next day the British tried to bomb along Gird Trench but the mud was so bad that the attempt was abandoned due to exhaustion. A German bombardment began at 3:00 p.m. on 16 November and an attack followed two hours later which swiftly recaptured Gird trench.[38]
1917[]
Raid, 29/30 January 1917[]

In January, the 44th Brigade of the 15th Division organised a raid on the butte by two companies of the 8/10th Gordon Highlanders. The front lines ran along opposite sides of the shallow Warlencourt valley, which sloped down from Le Sars, the butte being just behind the German outpost line. German wire in the area had been cut by previous bombardments and the attack was made without a preliminary bombardment. Demonstrations were made by the 1st Australian Division on the right and the 2nd Division on the left flank. As the attack began a bombardment was fired at the German front line for one minute and then crept forward at 50 yards (46 m) per minute until beyond the butte and the quarry nearby. After 25 minutes, the barrage was to return to the German front line as the raiders retired. The raiders had rehearsed behind the lines and moved forward from the Scottish support line at 11:00 p.m. on 29 January but needed two hours to cross 700 yards (640 m) of ground. The party moved into no man's land along black tapes to a forming-up point, dressed in white smocks and white painted helmets, to blend in with the snow, forming two waves of two platoons each.[39]
The bombardment began at 1:30 a.m. (30 January) and the raid commenced. Little opposition was met, apart from the fire of three machine-guns from the flanks, which were quickly silenced. Screening parties advanced beyond the butte, as the main force attacked the butte and the quarry, taking several prisoners and destroying dug-outs. At the butte, twelve Germans surrendered but when others refused, mortar bombs and hand grenades were thrown into tunnel entrances. A fire was started, which spread inside the butte; after twenty minutes, the covering parties began to retire and five minutes later the raiding party had returned to the British lines. The Scottish lost 17 casualties; one of the twelve prisoners disclosed that the garrison of the butte had been 150 men, suggesting that c. 138 German troops had been trapped, when the tunnel entrances were blocked. At 3:15 a.m. a large explosion was seen in the butte, flames rose above the mound and the sound of exploding small-arms ammunition and hand grenades was heard.[40]
24 February 1917[]
The 2nd Australian Division occupied the Butte de Warlencourt on 24 February 1917, during the German retirements on the Somme front, preparatory to Operation Alberich a retreat to the Hindenburg Line.[41]
1918[]
The Butte de Warlencourt was recaptured by the German 2nd Army on 24 March 1918, during the retreat of the 2nd Division in Operation Michael, the German spring offensive.[42][43] The Butte was recaptured for the last time on 26 August, by the 21st Division, during the Second Battle of Bapaume.[44]
Commemoration[]
Paintings[]
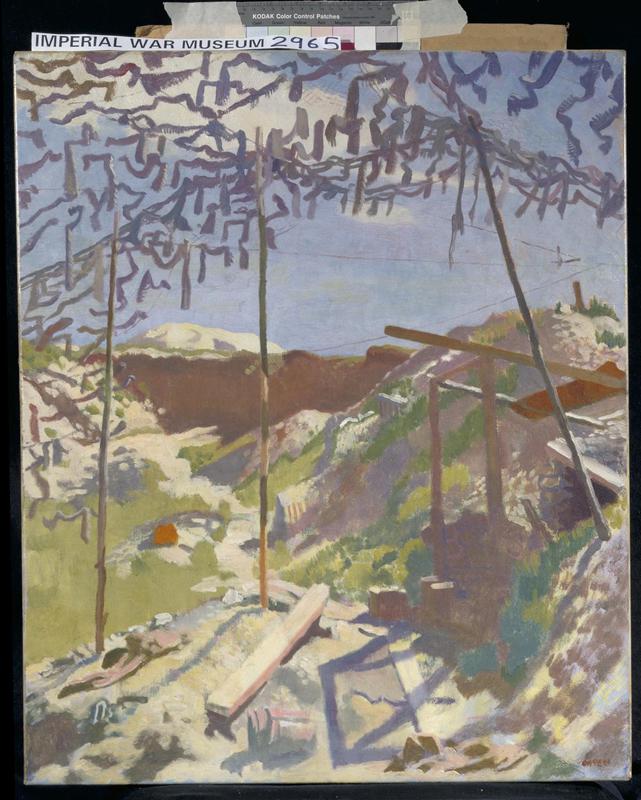
British artist William Orpen visited the Somme battlefield in September 1917. He later described the Butte,
.... pale gold against the eastern sky, with the mangled remains of trees and houses, which was once Le Sars, on its left. But what must it have looked like when the Somme was covered with snow, and the white-garmented Tommies used to raid it at night? It must surely have been a ghostly sight then, in the winter of 1916.[45]
Orpen later executed a landscape of the Butte and a portrait showing a British soldier sitting upon it in a manner evoking Rodin's The Thinker. Orpen later gave the paintings to the Imperial War Museum.[46] British war artist Christopher R. W. Nevinson also depicted the Butte in a pencil and chalk sketch, later acquired by the British Council.[47]
Purchase of the Butte[]
The land on which the Butte de Warlencourt stands was bought by the Western Front Association in 1990; memorials detailing the fighting that took place in the area were dedicated in a ceremony on the Butte on 30 June 1990.[48]
Footnotes[]
- ↑ Sheldon 2005, pp. 19, 22, 26, 28.
- ↑ Edmonds 1926, pp. 401–402.
- ↑ Edmonds 1926, pp. 402–403.
- ↑ Sheldon 2005, pp. 26, 28.
- ↑ Jones 1928, pp. 238, 258.
- ↑ Miles 1938, p. 433.
- ↑ 7.0 7.1 7.2 Maude 1922, p. 71.
- ↑ 8.0 8.1 8.2 Philpott 2009, p. 392.
- ↑ Gliddon 1987, p. 80.
- ↑ 10.0 10.1 Duffy 2006, p. 248.
- ↑ Miles 1938, pp. 436–437.
- ↑ Maude 1922, p. 73.
- ↑ 13.0 13.1 13.2 13.3 Maude 1922, p. 72.
- ↑ Miles 1938, p. 438.
- ↑ 15.0 15.1 Sheldon 2005, pp. 343–324.
- ↑ Sandilands 1925, p. 115.
- ↑ 17.0 17.1 Miles 1938, pp. 438–439.
- ↑ Gliddon 1987, pp. 421–423.
- ↑ Miles 1938, pp. 440–442.
- ↑ Duffy 2006, pp. 248–249.
- ↑ Flenley 1919, p. 9.
- ↑ Ewing 1921, pp. 158–159.
- ↑ Ewing 1921, pp. 159–161.
- ↑ Wyrall 1939, pp. 172–175.
- ↑ Wyrall 1939, pp. 175–176.
- ↑ Wyrall 1939, pp. 176–178.
- ↑ 27.0 27.1 Wyrall 1939, pp. 178–181.
- ↑ Jones 1928, p. 315.
- ↑ Miles 1938, p. 473.
- ↑ Duffy 2006, p. 253.
- ↑ Miles 1938, pp. 437, 442–443.
- ↑ DLIM 2012.
- ↑ Duffy 2006, p. 270.
- ↑ Duffy 2006, pp. 252–253.
- ↑ Ewing 1921, p. 409.
- ↑ Miles 1938, p. 524.
- ↑ Wyrall 1939, pp. 183–185.
- ↑ Miles 1938, pp. 525–526.
- ↑ Stewart & Buchan 1926, pp. 102–104.
- ↑ Stewart & Buchan 1926, pp. 104–106.
- ↑ Bean 1933, pp. 70–72.
- ↑ Edmonds, Davies & Maxwell-Hyslop 1935, p. 429.
- ↑ Wyrall 1921, p. 571.
- ↑ Edmonds 1947, pp. 300–301.
- ↑ Orpen 1921, p. 49.
- ↑ Orpen 1921, p. lxx.
- ↑ Nevinson 2011.
- ↑ Legg 2013.
References[]
- Books
- Bean, C. E. W. (1933). The Australian Imperial Force in France, 1917. Official History of Australia in the War of 1914–1918. IV (1982 ed.). Canberra: Australian War Memorial. ISBN 0-702-21710-7. http://www.awm.gov.au/histories/first_world_war/AWMOHWW1/AIF/Vol4/. Retrieved 27 September 2014.
- Duffy, C. (2006). Through German eyes: The British and the Somme 1916 (Phoenix 2007 ed.). London: Weidenfeld & Nicholson. ISBN 978-0-7538-2202-9.
- Edmonds, J. E. (1926). Military Operations France and Belgium 1914: Mons, the Retreat to the Seine, the Marne and the Aisne August–October 1914. History of the Great War Based on Official Documents by Direction of the Historical Section of the Committee of Imperial Defence. I (2nd ed.). London: Macmillan. OCLC 58962523.
- Edmonds, J. E.; Davies, H. R.; Maxwell-Hyslop, R. G. B. (1935). Military Operations France and Belgium 1918: The German March Offensive and its Preliminaries. History of the Great War Based on Official Documents by Direction of the Historical Section of the Committee of Imperial Defence. I (IWM and Battery Press 1995 ed.). London: Macmillan. ISBN 0-89839-219-5.
- Edmonds, J. E. (1947). Military Operations France and Belgium 1918: 8th August – 26th September The Franco-British Offensive. History of the Great War Based on Official Documents by Direction of the Historical Section of the Committee of Imperial Defence. IV (IWM and Battery Press 1993 ed.). London: HMSO. ISBN 0-89839-191-1.
- Ewing, J. (1921). The History of the Ninth (Scottish) Division 1914–1919 (N & M Press 2001 ed.). London: John Murray. ISBN 1-84342-190-9.
- Flenley, R. (1919). A Brief History of the 30th Division: From its Reconstitution in July, 1918 to the Armistice, 11th Nov., 1918 (N & M Press 2009 ed.). London: War Narratives Publishing Company. ISBN 1-84574-076-9. OCLC 44875867.
- Gliddon, G. (1987). When the Barrage Lifts: A Topographical History and Commentary on the Battle of the Somme 1916. Norwich: Gliddon Books. ISBN 0-947893-02-4.
- Jones, H. A. (1928). The War in the Air, Being the Story of the Part Played in the Great War by the Royal Air Force. II (N & M Press 2002 ed.). London: Clarendon Press. ISBN 1-84342-413-4. https://ia801609.us.archive.org/29/items/warinairbeingsto02rale/warinairbeingsto02rale.pdf. Retrieved 23 September 2014.
- Maude, A. H. (ed.) (1922). The 47th (London) Division, 1914–1919 by Some who Served with it in the Great War. London: Amalgamated Press. OCLC 494890858. http://www.archive.org/details/47thlondondivisi00maudrich. Retrieved 26 September 2014.
- Miles, W. (1938). Military Operations France and Belgium, 1916, 2nd July 1916 to the End of the Battles of the Somme. History of the Great War Based on Official Documents by Direction of the Historical Section of the Committee of Imperial Defence. II (IWM & Battery Press 1992 ed.). London: Macmillan. ISBN 0-901627-76-3.
- Orpen, W. (1921). An Onlooker in France, 1917–1919. London: Williams and Norgate. OCLC 17486734. https://ia600408.us.archive.org/34/items/anonlookerinfra00orpegoog/anonlookerinfra00orpegoog.pdf. Retrieved 25 March 2014.
- Philpott, W. (2009). Bloody Victory: The Sacrifice on the Somme and the making of the Twentieth Century (1st ed.). London: Little, Brown. ISBN 978-1-4087-0108-9.
- Sandilands, H. R. (1925). The 23rd Division 1914–1919 (N & M Press 2003 ed.). Edinburgh: Wm. Blackwood. ISBN 1-84342-641-2.
- Sheldon, J. (2005). The German Army on the Somme 1914–1916 (Pen & Sword Military 2006 ed.). London: Leo Cooper. ISBN 1-84415-269-3.
- Stewart, J.; Buchan, J. (1926). The Fifteenth (Scottish) Division 1914–1919 (N & M Press 2003 ed.). Edinburgh: Wm. Blackwood and Sons. ISBN 1-84342-639-0.
- The Union of South Africa and the Great War 1914–1918: Official History (IWM and N & M Press 2010 ed.). Pretoria: Government Print and Stationery Office. 1924. ISBN 1-845748-85-9. OCLC 16795056.
- Wyrall, E. (1921). The History of the Second Division, 1914–1918. II (N & M Press 2002 ed.). London: Thomas Nelson and Sons. ISBN 1-84342-207-7. http://ia700603.us.archive.org/0/items/historyofsecondd02wyra/historyofsecondd02wyra.pdf. Retrieved 27 September 2014.
- Wyrall, Everard (1939). The History of the 50th Division, 1914–1919 (N & M Press 2002 ed.). London: P. Lund, Humphries & Co.. ISBN 1-84342-206-9. OCLC 613336235. http://access.bl.uk/item/viewer/ark:/81055/vdc_100008213685.0x000002. Retrieved 28 September 2014.
- Websites
- DLI Museum (2006). "Of Doubtful Value". The Somme. Durham County Council. http://www.dlidurham.org.uk/SiteCollectionDocuments/07%20-%20Of%20Doubtful%20Value.pdf. Retrieved 13 November 2012.
- Legg, J.. "Battle Remains on the Somme Battlefields, France". www.greatwar.co.uk. http://www.greatwar.co.uk/places/somme-battle-remains.htm. Retrieved 18 May 2013.
- Nevinson, C. (2011). "Butte de Warlencourt". British Council. http://collection.britishcouncil.org/collection/artist/5/18760/object/44596. Retrieved 13 November 2012.
Further reading[]
- Books
- Bean, C. E. W. (1929). The Australian Imperial Force in France: 1916. Official History of Australia in the War of 1914–1918. III (12th, 1941 ed.). Sydney: Angus and Robertson. OCLC 271462387. http://www.awm.gov.au/histories/first_world_war/AWMOHWW1/AIF/Vol3/. Retrieved 25 September 2014.
- Browne, D. G. (1920). The Tank in Action. Edinburgh: W. Blackwood. OCLC 699081445. http://ia700306.us.archive.org/25/items/tankinaction00browrich/tankinaction00browrich.pdf. Retrieved 24 September 2014.
- Edmonds, J. E. (1932). Military Operations France and Belgium, 1916: Sir Douglas Haig's Command to the 1st July: Battle of the Somme. History of the Great War Based on Official Documents by Direction of the Historical Section of the Committee of Imperial Defence. I (IWM & Battery Press 1993 ed.). London: Macmillan. ISBN 0-89839-185-7.
- Fuller, J. F. C. (1920). Tanks in the Great War, 1914–1918. New York: E. P. Dutton. OCLC 559096645. http://ia700401.us.archive.org/10/items/cu31924027835168/cu31924027835168.pdf. Retrieved 24 September 2014.
- Haigh, R. (1918). Life in a Tank. New York: Houghton Mifflin. OCLC 1906675. http://ia700506.us.archive.org/7/items/lifeintank00haiguoft/lifeintank00haiguoft.pdf. Retrieved 24 September 2014.
- Prior, R.; Wilson, T. (2005). The Somme. New Haven: Yale University Press. ISBN 0-300-10694-7.
- Rogers, D. (ed.) (2010). Landrecies to Cambrai: Case Studies of German Offensive and Defensive Operations on the Western Front 1914–17. Solihull: Helion. ISBN 978-1-906033-76-7.
- Simpson, A. (2001). The Operational Role of British Corps Command on the Western Front 1914–18 (Spellmount 2005 ed.). London: London University. ISBN 1-86227-292-1. http://ethos.bl.uk/OrderDetails.do?did=1&uin=uk.bl.ethos.367588. Retrieved 26 September 2014.
- Watson, W. H. L. (1920). A Company of Tanks. Edinburgh: W. Blackwood. OCLC 262463695. http://ia600303.us.archive.org/19/items/companyoftanks00watsrich/companyoftanks00watsrich.pdf. Retrieved 24 September 2014.
- Williams-Ellis, A.; Williams-Ellis, C. (1919). The Tank Corps. New York: G. H. Doran. OCLC 317257337. http://ia600502.us.archive.org/4/items/tankcorps00willgoog/tankcorps00willgoog.pdf. Retrieved 24 September 2014.
- Wyrall, E. (1921). The History of the Second Division, 1914–1918. I. London: Thomas Nelson and Sons. OCLC 827208685. https://ia600609.us.archive.org/23/items/historyofsecondd01wyra/historyofsecondd01wyra.pdf. Retrieved 27 September 2014.
- Websites
- Australian War Memorial (2012). "Search results for Butte de Warlencourt". AWM Collection Search. http://www.awm.gov.au/search/collections/?q=butte+de+warlencourt&conflict=all&submit=Search. Retrieved 13 November 2012.
- Baker, E. (29 December 2008). "The Butte De Warlencourt". Western Front Association. http://www.westernfrontassociation.com/great-war-on-land/61-battlefields/143-butte-de-warlencourt.html. Retrieved 13 November 2012.
- Imperial War Museum (2012). "Search results for Butte de Warlencourt". IWM Collection Search. http://www.iwm.org.uk/collections/search?query=butte%20de%20warlencourt&items_per_page=50. Retrieved 13 November 2012.
- Orpen, W. (2012). "The Butte de Warlencourt (1917)". Your Paintings. BBC. http://www.bbc.co.uk/arts/yourpaintings/paintings/the-butte-de-warlencourt-6134. Retrieved 13 November 2012.
- Orpen, W. (2012). "The Thinker on the Butte de Warlencourt (1917)". IWM Collection Search. Imperial War Museum. http://www.iwm.org.uk/collections/item/object/20813. Retrieved 13 November 2012.
External links[]
| Wikimedia Commons has media related to Attacks on the Butte de Warlencourt. |
- Bradford, R. Attack on the Butte, 5 November 1916
- Occupation of the Butte, 25–26 February 1917
- Western Front Association: Butte de Warlencourt
The original article can be found at Attacks on the Butte de Warlencourt and the edit history here.