| 8th (Service) Battalion, East Yorkshire Regiment | |
|---|---|
|
Cap badge of the East Yorkshire Regiment | |
| Active | 22 September 1914–17 February 1918 |
| Country |
|
| Branch |
|
| Type | Infantry |
| Size | Battalion |
| Part of |
21st Division 3rd Division |
| Garrison/HQ | Victoria Barracks, Beverley |
| Engagements | |
| Insignia | |
| Shoulder title of the East Yorkshire Regiment |
 |
The 8th (Service) Battalion of the East Yorkshire Regiment (8th EYR),[lower-alpha 1] was a unit of 'Kitchener's Army' raised shortly after the outbreak of World War I. Following a short period of training it went to the Western Front with other Kitchener battalions and endured a disastrous initiation at the Battle of Loos. It was then transferred to the experienced 3rd Division and fought with it on the Somme, at Arras and Ypres. After heavy casualties the battalion was disbanded early in 1918.
Recruitment and training[]


_Britons_(Kitchener)_wants_you_(Briten_Kitchener_braucht_Euch)._1914_(Nachdruck),_74_x_50_cm._(Slg.Nr._552).jpg)
Alfred Leete's recruitment poster for Kitchener's Army.
On 6 August 1914, less than 48 hours after Britain's declaration of war, Parliament sanctioned an increase of 500,000 men for the Regular British Army, and the newly-appointed Secretary of State for War, Earl Kitchener of Khartoum issued his famous call to arms: 'Your King and Country Need You', urging the first 100,000 volunteers to come forward. This group of six divisions with supporting arms became known as Kitchener's First New Army, or 'K1', and was quickly followed by 'K2' and 'K3' as a flood of volunteers poured into the recruiting offices and were formed into 'Service' battalions at the regimental depots. The East Yorkshire Regiment formed its third such battalion, the 8th (Service) Battalion, on 22 September at Berkhamsted, Hertfordshire, from a draft of recruits sent from the depot at Victoria Barracks, Beverley.[2][3][4][5][6][lower-alpha 2]

21st Division's insignia.
The new battalion was assigned to 62nd Brigade in 21st Division, the senior K3 division, formed from units raised in North East England, which was assembling around Tring in Hertfordshire. The men started out in billets, but the division soon moved under canvas at Halton Park. Throughout October drafts arrived from Beverley until on 4 November the battalion reached a strength of 25 officers and 1092 other ranks under the command of Lieutenant-Colonel L.C. Fryer. Mud and rain brought a return to billets for the winter, with 8th East Yorkshires housed in Wendover, Aston Clinton and Weston Turville.[4][5][8][9][10]
Service in France[]
Huts had been built at Halton by the time the division returned there in May 1915, and training continued. Towards the end of June the first service rifles arrived and the men began their musketry courses. This was completed by 9 August, when the infantry began moving to Witley Camp in Surrey. Although its training was still woefully inadequate (the K1 and K2 units had taken all the best instructors and staff officers), the division soon received orders to join the British Expeditionary Force on the Western Front, and advance parties left at the beginning of September. 8th East Yorkshires crossed to Boulogne on 8–9 September under the command of Lt-Col B.I. Way (North Staffordshire Regiment). By 13 September 21st Division was concentrated west of St Omer with 8th EYR billeted in Moulle. Final training took place, in route marching, bomb-throwing, sniping, and machine-gun practice, culminating in an attack on practice trenches. Less than two weeks after arrival it was thrown into a major attack at the Battle of Loos, without the men ever having visited the frontline trenches.[8][10][11]
Loos[]


The battlefield of Loos.
The move south to Loos was achieved by a series of night marches beginning on 20/21 September, arriving at Nœux-les-Mines at 23.00 on 24 September, when the men bivouacked in open fields in heavy rain. The British attack was launched at 06.30 the following morning, and at 11.15 62nd Bde was ordered up to a concentration area north of Mazingarbe. Before the men had time to eat, orders arrived for the brigade to go up to support 15th (Scottish) Division, which was believed to have captured Hill 70. The brigadier selected 8th EYR and 10th Green Howards for this task. Without time for reconnaissance all he could do was point out Hill 70 on the map and tell the battalion commanders: 'We do not know what has happened on Hill 70. You must go and find out: if the Germans hold it, attack them; if our people are there, support them; if no-one is there, dig in'. As the inexperienced battalions set out (still accompanied by their transport) they were instructed by a military policeman that according to trench routine they must open out, with intervals between sections. Spacing out the columns took time, and it was 16.30 before they crossed the old front line and headed for Loos. Shortly afterwards they came in full view of German artillery, which practically destroyed the battalion transport. Instead of going through the village of Loos and north of the Loos Crassier spoil heap, the 8th Yorkshires, followed by 10th Green Howards, passed on the south side, bumping into 1/20th Londons of 47th (1/2nd London) Division, which was holding part of the German positions. The CO of 1/20th Londons tried to stop the advance, but the two Yorkshire battalions carried on in extended lines towards Chalk Pit Copse, well south of Hill 70. A few minutes later they came under intense machine gun fire from the German-held part of the copse, 8th EYR and the leading companies of 10th Green Howards sustaining heavy casualties. In the confusion and gathering darkness some troops trying to retrace their steps and go through Loos were mistaken for attackers and fired upon by the rear companies of 10th Green Howards. It was 19.30 before Lt-Col Way and the CO of the Green Howards were able to restore order. 8th East Yorkshires, together with the remnants of the 1/19th Londons, dug in, continuing the line of 1/20th Londons over the Crassier into the outskirts of Loos village. Two companies dug communication trenches back towards the old front line, and cleared German stragglers out of Loos.[12][13][14]
The attack on Hill 70 was renewed next morning after an hour-long bombardment. The main attack was made by 15th (S) Division, with 62nd Bde in support. As the bombardment ended Lt-Col Way led C and D Companies (about 120 men) with a few of the Londons and a few Northumberland Fusiliers towards Hill 70. The mist suddenly cleared and they were clearly visible to the German outposts on the hill. Although some men reached the enemy trenches the lines 'withered away' (in the words of the Official History) and flanking fire forced them to retreat. The Crassier then came under shellfire, and snipers and machine guns caused steady casualties. While A and B Companies maintained their position on the Crassier until relieved the following afternoon, Lt-Col Way (who had been wounded) ordered the remainder back to the cover of the village and the support trenches where they joined 1/23rd Londons and were shelled all night. At 16.30 on 27 September the battalion went into bivouacs at Sailly-Labourse when a roll-call revealed that the battalion had lost 7 officers killed or missing and 12 wounded, 154 other ranks killed or missing and 133 wounded. Next day the battalion entrained for Liettres where it began refitting.[15][16][17]

3rd Division's WWI insignia.
In October 21st Division went to the Armentières sector, where it received training in trench warfare. The BEF now instituted a policy of exchanging units between divisions to even up training levels between formations. Each of 21st Division's brigades exchanged one of its battalions with a Regular Army brigade, and on 16 November 8th EYR transferred to 8th Bde in 3rd Division. 3rd Division was composed of Regular units that had been fighting since the early days of the war. Many of the officers and men in the ranks of 3rd Division by now were replacements with no more experience than the East Yorkshires, but the staffs and support units were very experienced, and the battalion could expect its future operations to be better planned and executed. The brigade sent the battalion's companies one by one into the front line for two days each to gain experience of trench routine. It finally took responsibility for holding its own sector (near Voormezeele in the Ypres Salient) on 29 December.[8][18][19][20]
Ypres Salient[]

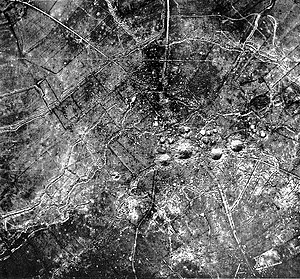
The St Eloi craters, visible in an aerial photograph taken on 1 April 1916.
In early 1916 the 8th EYR, temporarily commanded by Acting Lt-Col F.B. Brewis, took its turn in the trenches near St Eloi. On 2 March part of 3rd Division made a successful attack on The Bluff and 8th Bde relieved the attackers on the night of 3/4 March. 8th East Yorkshires took over flooded trenches in terrible condition, in a snowstorm, and had to deal with two German counter-attacks. By 6 March the effective strength of the battalion had been reduced by 55 per cent as a result of Trench foot and exposure.[1][18][19][19][21]
On the morning of 27 March the Royal Engineers exploded six mines under the German positions at The Mound near St Eloi and 3rd Division's 9th Bde attacked the craters. 8th Brigade was also in the line, with 8th EYR (under Lt-Col Way once more) alongside the attacking battalions. Despite the overall success, the Germans remained in possession of two of the craters and the battalion was involved in several days of shellfire and bombing attacks among the shattered trenches. After the 8th EYR were relieved by 31st Canadian Battalion on 3/4 April, the battalion's Lewis gun teams remained in the line for another week to help the Canadians, losing a number of casualties and having spent 18 consecutive days in the waterlogged positions.[18][19][22][23]
Somme[]
8th East Yorkshires spent the following weeks alternating between resting, training, and spells in the line near Dickebusch, while preparations went on further south for that summer's 'Big Push' (the Battle of the Somme). The battalion entrained for the Somme on the day the offensive began, 1 July. It went into brigade reserve when 3rd Division took over the Caterpillar Wood sector near Montauban, providing carrying parties and night patrols. After the disasters of the first day, 3rd Division in conjunction with three others was to make a daring night assembly and dawn attack on 13/14 July (the Battle of Bazentin Ridge). The Brigade Intelligence Officer had placed a screen of picquets and scouts out in No man's land within 200 yards (180 m) of the enemy line and the assaulting troops slowly moved up in the hours of darkness to a sunken lane just short of this line. They then moved forwards 15 yards every 15 minutes until they were on their jumping-off tapes about 120 yards (110 m) from the enemy by 03.15; 8th EYR was on the right of 8th Bde's line, with half of 1st Royal Fusiliers in support. At 03.20 a sudden intense bombardment was placed on the German barbed wire and trenches and five minutes later the whole attacking line of four divisions advanced behind a Creeping barrage. Along most of the line the German resistance was feeble; unfortunately the wire in front of 8th Bde was hardly touched, there were just a few breaks in the first belt and none in the second. Two platoons of the 8th EYR managed to get through on the right, the remainder had to shelter in shell holes in front of the wire or retire to the sunken road. Lieutenant-Colonel Way was wounded in the wire and Maj Brewis came up to take temporary command once more. Later a bombing party from 2nd Royal Scots came down from the left and cleared the Germans out of the trench in front of the battalion, but of the two platoons that had penetrated, no more was heard. In what was largely a successful British attack, the battalion had suffered severely, with 8 officers killed and 11 wounded, 81 other ranks killed, 218 wounded, and 141 missing, over half the initial strength of the battalion. Even when the battalion took over the opposing trenches they were heavily shelled with high explosive (HE) and gas until they were relieved on 20/21 July.[18][19][24][25]
The success of 14 July left the British with an awkward salient south of Delville Wood, which was the scene of six more weeks' bitter fighting (the Battle of Delville Wood). On 23 July 8th Bde held this salient round Waterlot Farm while the rest of the division attacked Delville Wood. The brigade's contribution to the attack was to send out two strong bombing parties from 7th King's Shropshire Light Infantry (KSLI), supported by a company of 8th EYR, trying to clear along the railway towards Guillemont station and widen the salient. They made little progress and fell back to Waterlot Farm, their attack having been disrupted by another division falling back from an attack on Guillemont. 8th East Yorkshires' companies were now down to a strength of 40–50 each, but a draft of 320 reinforcements (from the Green Howards and the York and Lancaster Regiment[lower-alpha 3]) arrived that day. When relieved on 25 July the battalion consisted of 20 officers and 570 other ranks.[18][19][27][28]
3rd Division went back into the line for a new attack on Guillemont on 17 August. Next day 8th EYR was loaned to 9th Bde for an attack during which the battalion bombers and B Company gained a footing in the German trenches but had to retire when the battalions on either side failed to get in. When it left the line on 20 August the battalion had suffered a further 6 officers wounded, 34 other ranks killed, 31 wounded and 46 missing. At the end of the month 8th EYR was holding trenches in the Hulluch sector and between 21 September and 5 October 3rd Division underwent training before moving back to the Somme.[29][30]
The last phase of the Somme offensive was the Battle of the Ancre on 13 November, a final attempt to secure better ground and observation points for the winter. 3rd Division's task was to repeat the attack on the village of Serre that had failed on the first day of the offensive, though this time it would be supported by twice as many guns. 8th Brigade attacked on the right with 8th EYR in the second line. The attacking battalions struggled through mud that was at times waist-deep, and got left behind by their protective creeping barrage. In the second line 8th EYR had the furthest to go, across 1,000 yards (910 m) of broken trench bridges and shell-torn ground before they reached the front. As they filed forwards, the German counter-barrage caught D Company coming up the rear. The battalion then followed the leading wave. Both waves struggled through gaps in the wire and across the German front line. Parties of all four battalions of 8th Bde reached the German support line, but could not maintain themselves there; others got mixed up in the confusion at the German front line. The whole mass of men was tumbled back to where they started. Zero hour had been at 05.45; by 06.30 it was clear at Brigade HQ that the battle was over. In the words of the Official History: 'the troops of the 3rd Division ... lost the battle in the mud'. 8th East Yorkshires had lost 2 officers killed and 3 wounded, 23 other ranks killed, 177 wounded and 30 missing.[18][19][31][32][33]
Arras[]


British infantry using trench bridges to cross assembly trenches as they move up in support of the initial assault at Arras on 9 April.
3rd Division moved to the Arras sector in February 1917 and the 8th EYR (now commanded by Lt-Col J.N. de la Perrelle) spent several tours in the St Sauveur trenches before a short period of training for the forthcoming Arras Offensive. The battalion went into the Auckland Caves under Arras on 7 April before moving up into their assembly trenches at 02.00 on 9 April, ready for Zero hour for the First Battle of the Scarpe. In 3rd Division, 76th Bde was to capture the German first line, 9th Bde the second and 8th Bde the third or Brown Line. The attack began at 05.30 with a 'hurricane bombardment' by guns, mortars and machine guns, and 8th Bde moved out of their assembly trenches at 10.40 in order to pass through 9th Bde at Zero plus 6 hours (11.30). 8th East Yorkshires formed the brigade's second wave. At first all went well, and dozens of prisoners were taken, but after a while 8th EYR got caught up with the wave in front, and then the whole line was held up by machine gun crossfire short of the Brown Line. A second attempt was made at 19.00 and casualties mounted. The Germans made no counter-attack, so the brigade was ordered to launch a fresh attack on the Brown Line at 08.15 next morning, later put off until 12.00. The barrage came down at 11.45, all four battalions advanced in line, and this time the enemy fled, the whole Brown Line being captured by 12.30. The battalions held this line for two more days in snowy weather until the division was relieved in the early hours of 14 April.[18][19][34][35]
During the Second Battle of the Scarpe (23–25 April) 8th Bde was moved up in support of 15th (S) Division and did not join the attack.[18][19][36] Again, on 28 April, although the 8th EYR 'stood to' to support 12th (Eastern) Division at the Battle of Arleux, it was not engaged, though it suffered a number of casualties from shellfire both before and after the attack.[18][19][37] The Third Battle of the Scarpe on 3 May was another matter: 3rd Division had been in the line for 10 days, although the divisional commander had managed to keep 8th and 9th Bdes relatively fresh before they took over the front line trenches on 1 May. Despite attacking before dawn there was no surprise and just before Zero (03.45) the enemy guns deluged the division's front with HE and gas shells, so the men had to wear their respirators while forming up. When it attacked, 8th Brigade fell into confusion in the darkness, partly because the enemy had pushed parties of riflemen out into shell holes in No man's land where they were missed by the barrage. 8th East Yorkshires in the second wave quickly ran into 1st Royal Scots Fusiliers (RSF) in front, who were completely held up. By the end of the day the brigade held a series of outposts in No man's land. Despite its heavy casualties – 6 officers killed (including the Padre),[lower-alpha 4] one wounded, 35 other ranks killed, 161 wounded and 39 missing – 8th EYR had to take over the line during the night from the even more shattered 1st RSF. Although the battalion was ordered to reorganise to continue the operations, both sides spent 4 May collecting wounded under Red Cross flags. The battalion spent the night of 4/5 May working on outposts and trenches.[18][19][39][40]
Although 8th EYR was later awarded the Battle honour for the Capture of Roeux that ended the Arras offensive on 13–4 May, it did not actually take part in the fighting.[18][19][41]
Polygon Wood[]


British troops (believed to be the 8th East Yorkshires) moving up during the Ypres Offensive.
During the summer of 1917 the 8th EYR was engaged in trench warfare, first on the Arras front, later on the Somme, while the Third Ypres Offensive raged further north. On 4 September 3rd Division moved to the Ypres Salient for intensive training to join in the fighting. They were in Corps Reserve during the Battle of the Menin Road Ridge (20–25 September) and then participated in the Battle of Polygon Wood. On the evening of 25 September Lt-Col de la Perrelle led 8th EYR up to their assembly positions in warm sunny weather. Zero hour was 05.50 on 26 September and 8th Bde was on the left of 8th Bde's attack on Zonnebeke. There was a morning mist and the troops had to steer by compass bearings over the devastated ground; they then found that despite the dry weather the Zonnebeke stream (not expected to be much of an obstacle) was swollen into a 30 yards (27 m) wide marsh. To get round the inundation the battalion had to move to the flank, opening up a gap to the 2nd Royal Scots on their right. Nevertheless, and despite resistance from a number of pillboxes, the battalion was on its objective (the Red Line) by 07.00, having captured a number of prisoners, while four Corporals had each captured a machine gun single-handed. The 1st RSF and 7th KSLI now leapfrogged past the 8th EYR and 2nd Royal Scots to advance towards the second objective (the Blue Line) by 10.00 (they did not quite achieve the final objective, Hill 40). The inevitable counter-attacks then began: the first was easily repulsed, the second, at 18.00, drove the leading troops back a little, but the ground was recovered. Now followed three terrible days holding the captured positions under incessant shellfire. On 27 September the Germans placed a barrage behind the frontline troops to isolate them and massed for an attack, but the SOS call to the divisional artillery broke it up. On the evening of 29 September the battalion was relieved. Its total casualties during the battle were unrecorded, but included the Padre[lower-alpha 5] killed.[18][19][43][44]

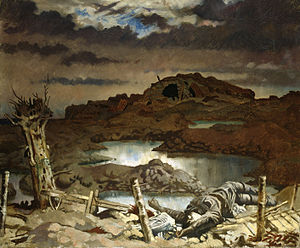
Zonnebeke, painted by Sir William Orpen in 1918.
After the relief, 8th EYR left the Ypres Salient and travelled south, reaching Beugnâtre by 13 October, where it underwent two weeks' training. It then returned to the line in the Noreuil sector. 3rd Division did not take part in the BEF's final effort of 1917, the Battle of Cambrai, but it did carry out a subsidiary attack at Bullecourt on the opening day of the offensive (20 November). The battalion was in Brigade Support, and although 8th Brigade itself was kept 'standing to' throughout the day it was not engaged. The rest of the winter was spent trench-holding.[45]
Disbandment[]
By early 1918 the BEF was experiencing a severe manpower crisis. The solution was to disband one battalion in each brigade and distribute the men to other units. As a 'New Army' battalion in a predominantly Regular Army division, 8th EYR was inevitably selected for disbandment. On 17 February it was amalgamated with 12th West Yorkshire Regiment of 9th Bde to form 10th Entrenching Battalion. Entrenching battalions were used for digging defences until their men were needed as reinforcements. The 10th Battalion was broken up before the end of the year, probably drafted to reinforce units shattered in the German Spring Offensive.[3][4][6][18][19][46][47] During its service, 8th EYR had lost 706 other ranks dead [lower-alpha 6][48]
A new 8th Battalion, East Yorkshire Regiment, was formed in 1940, initially as 50th (Holding) Bn; it later converted into 115th Light Anti-Aircraft Regiment, Royal Artillery, and served with 46th Division in the Tunisian and Italian Campaigns.[3]
Footnotes[]
- ↑ The battalion itself used the abbreviation 8th EYR.[1]
- ↑ The second Pals battalion raised in Hull, known as the 'Hull Tradesmen', was originally going to be the 8th (Hull) Bn, but this was changed to 11th (Service) Bn (2nd Hull).[7]
- ↑ The K4 battalions had been converted into reserve units for the K1–3 battalions, so the 6th, 7th and 8th (Service) Battalions would have received their reinforcements from the 9th (Reserve) Bn, East Yorkshires, formed at York on 7 November 1914. However, as the war progressed (and particularly after the passage of the Military Service Act 1916) men could be posted to any unit. The 9th (Reserve) Bn became 7th Bn Training Reserve on 1 September 1916 and its links with the regiment ceased.[3][4][6][26]
- ↑ Captain (Chaplain 4th Class) Rev Charles Wand Mitchell is buried in the Faubourg d'Amiens Commonwealth War Graves Commission Cemetery, Arras.[38]
- ↑ Captain (Chaplain 4th Class) Rev B.C. Ruck Keene is buried at Ypres Reservoir Commonwealth War Graves Commission Cemetery.[42]
- ↑ The regiment's officer casualties were not listed by battalion.
Notes[]
- ↑ 1.0 1.1 Wyrall, pp. 130–1.
- ↑ Becke, Pt 3a, pp. 2 & 8; Appendix I.
- ↑ 3.0 3.1 3.2 3.3 Frederick, p. 182.
- ↑ 4.0 4.1 4.2 4.3 James, p. 59.
- ↑ 5.0 5.1 Wyrall, p. 24.
- ↑ 6.0 6.1 6.2 East Yorkshires at Long, Long Trail.
- ↑ Wyrall, p. 23.
- ↑ 8.0 8.1 8.2 Becke, Pt 3a, pp. 103–9.
- ↑ 21st Division at Long, Long Trail.
- ↑ 10.0 10.1 Edmonds, 1915, Vol II, pp. 293–4.
- ↑ Wyrall, pp. 81–2.
- ↑ Cherry, pp. 175–6.
- ↑ Edmonds, 1915, Vol II, pp. 296–8.
- ↑ Wyrall, pp. 82–5.
- ↑ Cherry, pp. 194–9.
- ↑ Edmonds, 1915, Vol II, pp. 310–4, 342.
- ↑ Wyrall, pp. 85–6.
- ↑ 18.00 18.01 18.02 18.03 18.04 18.05 18.06 18.07 18.08 18.09 18.10 18.11 18.12 Becke, Pt 1, pp. 49–55.
- ↑ 19.00 19.01 19.02 19.03 19.04 19.05 19.06 19.07 19.08 19.09 19.10 19.11 19.12 19.13 3rd Division at Log, Long trail.
- ↑ Wyrall, pp. 124–5.
- ↑ Edmonds, 1916, Vol I, pp. 170–2.
- ↑ Edmonds, 1916, Vol I, pp. 180–6.
- ↑ Wyrall, pp. 131–3.
- ↑ Miles, 1916, Vol II, pp. 71–2, 78–80.
- ↑ Wyrall, pp. 149–52.
- ↑ Wyrall, p. 402.
- ↑ Miles, 1916, Vol II, pp. 139–40; Sketch 17.
- ↑ Wyrall, pp. 154–6.
- ↑ Wyrall, p. 176.
- ↑ Miles, 1916, Vol II, pp. 191–2.
- ↑ Horsfall & Cave, pp. 77–88.
- ↑ Miles, 1916, Vol II, pp. 478–9, 497–8.
- ↑ Wyrall, pp. 176–7, 179–81, 184.
- ↑ Falls, 1917, Vol I, pp. 216–7, 248.
- ↑ Wyrall, pp. 205–8.
- ↑ Wyrall, pp. 209, 211.
- ↑ Wyrall, pp. 213–4.
- ↑ Mitchell at CWGC.
- ↑ Falls, 1917, Vol I, p. 439.
- ↑ Wyrall, pp. 215–8.
- ↑ Wyrall, pp. 223, 226.
- ↑ at CWGC.
- ↑ Edmonds, 1917, Vol II, pp. 288-92.
- ↑ Wyrall, pp. 235–9.
- ↑ Wyrall, p. 252.
- ↑ Wyrall, pp. 258–9.
- ↑ 'Entrenching Battalions', The National Archives (TNA), Kew, file WO 95/5494/1.
- ↑ Wyrall, Appendix I.
References[]
- Maj A.F. Becke,History of the Great War: Order of Battle of Divisions, Part 1: The Regular British Divisions, London: HM Stationery Office, 1934/Uckfield: Naval & Military Press, 2007, ISBN 1-847347-38-X.
- Maj A.F. Becke,History of the Great War: Order of Battle of Divisions, Part 3a: New Army Divisions (9–26), London: HM Stationery Office, 1938/Uckfield: Naval & Military Press, 2007, ISBN 1-847347-41-X.
- Niall Cherry, Most Unfavourable Ground: The Battle of Loos 1915, Solihull: Helion, 2005, ISBN 1-874622-03-5.
- Brig-Gen Sir James E. Edmonds, History of the Great War: Military Operations, France and Belgium, 1915, Vol II, London: Macmillan, 1928/Imperial War Museum & Battery Press, 1995, ISBN 0-89839-219-5/Uckfield: Naval & Military Press, 2009, ISBN 978-1-84574-719-0.
- Brig-Gen Sir James E. Edmonds, History of the Great War: Military Operations, France and Belgium, 1916, Vol I, London: Macmillan,1932/Woking: Shearer, 1986, ISBN 0-946998-02-7.
- Brig-Gen Sir James E. Edmonds, History of the Great War: Military Operations, France and Belgium 1917, Vol II, Messines and Third Ypres (Passchendaele), London: HM Stationery Office, 1948/Uckfield: Imperial War Museum and Naval and Military Press, 2009, ISBN 978-1-845747-23-7.
- Capt Cyril Falls, History of the Great War: Military Operations, France and Belgium 1917, Vol I, The German Retreat to the Hindenburg Line and the Battle of Arras, London: Macmillan, 1940/London: Imperial War Museum & Battery Press/Uckfield: Naval and Military Press, 2009, ISBN 978-1-84574722-0.
- J.B.M. Frederick, Lineage Book of British Land Forces 1660–1978, Vol I, Wakefield: Microform Academic, 1984, ISBN 1-85117-007-3.
- Jack Horsfall & Nigel Cave, Battleground Europe: Somme: Serre, London: Leo Cooper, 1996, ISBN 0-85052-508-X.
- Brig E.A. James, British Regiments 1914–18, Samson Books 1978/Uckfield: Naval & Military Press, 2001, ISBN 978-1-84342-197-9.
- Capt Wilfred Miles, History of the Great War: Military Operations, France and Belgium 1916, Vol II, 2nd July 1916 to the End of the Battles of the Somme, London: Macmillan, 1938/Imperial War Museum & Battery Press, 1992, ISBN 0-89839-169-5.
- Everard Wyrall, The East Yorkshire Regiment in the Great War 1914–1918, London: Harrison, 1928/Uckfield,Naval & Military, 2002, ISBN 978-1-84342-211-2.
External sources[]
The original article can be found at 8th (Service) Battalion, East Yorkshire Regiment and the edit history here.