| 2nd (Seaham) Durham Artillery Volunteers 3rd Northumbrian Brigade, RFA 55th (Northumbrian) Medium Brigade, RA 63rd (Northumbrian) HAA Regiment, RA 463 (Durham) HAA Regiment, RA | |
|---|---|
| Active | 1860–1955 |
| Country |
|
| Branch |
|
| Role |
Coast Artillery Field Artillery Medium Artillery Air Defence Artillery |
| Garrison/HQ |
Seaham Sunderland (post-1920) |
| Nickname(s) | The Seaham Artillery |
| Engagements |
Western Front (World War I) Battle of Britain The Blitz Burma Campaign |
| Commanders | |
| Notable commanders | Charles Vane-Tempest-Stewart, 6th Marquess of Londonderry |
The 2nd (Seaham) Durham Artillery Volunteer Corps was a part-time unit of Britain's Royal Artillery raised in County Durham by the Vane-Tempest family during an invasion crisis in 1860. It became a permanent part of the Volunteer Force and later the Territorial Force, and fought as field artillery on the Western Front in World War I. Before World War II it became an anti-aircraft unit that served in the Battle of Britain, the Blitz and in the Far East where it converted to medium artillery in the Burma Campaign. Postwar, it continued to serve in the air defence role in the Territorial Army until 1955.
Origin[]
The enthusiasm for the Volunteer movement following an invasion scare in 1859 saw the creation of many Rifle, Artillery and Engineer Volunteer units composed of part-time soldiers eager to supplement the Regular British Army in time of need.[1][2] One such unit was the Seaham Artillery Volunteers formed at Seaham in County Durham on 14 March 1860, which became the 2nd (Seaham) Durham Artillery Volunteer Corps' (AVC).[3][4] From 1863 the 1st, 3rd (South Shields) and 4th (Hartlepool) Durham AVCs were attached to it; the 1st and 3rd were attached to other units in 1873 and the 4th became independent in 1886.[3][5]
The town of Seaham had been largely built by Charles Vane, 3rd Marquess of Londonderry, who owned Seaham Colliery and constructed Seaham Harbour. In 1860 his widow, Frances Vane, Marchioness of Londonderry, equipped a company raised for the 2nd Durham AVC from the colliery. Two further companies were raised by the Mann brothers, local timber merchants, and a fourth from the bottlemakers of John Candlish's Londonderry Bottle Works.[6][7]
The unit continued to rely on the colliery and the Vane-Tempest family. The 3rd Marquess's second son, Earl Vane (later 5th Marquess), a former Lieutenant in the 1st Life Guards, was appointed Lieutenant-Colonel Commandant on 26 March 1864. There was controversy in 1867 when his younger brother, Lord Ernest McD. Vane-Tempest, was allowed to serve in the unit, despite having been cashiered from the Regular Army. On 24 June1869, when the number of companies and officers was increased, Lord Ernest was appointed as second Lt-Col and Earl Vane's sons, Charles, Viscount Seaham and the Hon. Henry Vane Tempest – aged 17 and 15 respectively – as Major and 1st Lieutenant.[5][6][7][8] (Another of Earl Vane's brothers, Lord Adolphus Vane-Tempest, commanded the 3rd (Sunderland) Durham Rifle Volunteer Corps.)[9][10] Viscount Seaham (later 6th Marquess), became Lt-Col Commandant in turn, and was still in command of the unit when it transferred to the Territorial Force, before becoming Honorary Colonel.[5]
From 1865 the corps was officially allowed to include '(Seaham)' in its title, and in 1868 four new batteries were added from around the West Rainton area. These were originally to have formed a separate 5th (Rainton) Durham AVC, but the personnel raised were placed in the 2nd, and the new officers were gazetted to the 2nd on 24 June 1869.[3][8]
By 1870, the unit had reached a strength of 12 batteries, including batteries at Silksworth and Old Durham. Two batteries later merged as position artillery (smooth-bore field guns pulled by agricultural horses to work alongside the Volunteer infantry brigades)[11][12] and the Old Durham Bty moved to Gilesgate.[3] In 1900 a new company was raised at Gilesgate which moved to Brandon in 1901. A cadet company was formed at Seaham in September 1898 but was disbanded in 1903.[3]
The Seaham Colliery Disaster of 1880 killed 36 NCOs and men of the 2nd Durham AVC.[13]
Between 1860 and 1908, some 2 per cent of the 2nd Durham AVC's men transferred to the Regular Royal Artillery.[14]
From 1 April 1882, the Durham AVCs became part of the Northern Division of the Royal Artillery, changing to the Western Division in 1889, when the subtitle was added to the unit's official designation.[5][15] In 1899 the Artillery Volunteers were transferred to the Royal Garrison Artillery (RGA), the Seaham unit becoming the 2nd Durham RGA (V)
Territorial Force[]

Territorial shoulder title worn by the Northumbrian (County of Durham) Brigades RFA.[16]
When the Volunteers were subsumed into the new Territorial Force (TF) under the Haldane Reforms of 1908,[17][18] the 2nd Durham RGA (V) was to have formed the 2nd and 3rd Durham Btys and the Ammunition Column of the III (or 3rd) Northumbrian (County of Durham) Brigade, in the Royal Field Artillery. The 1st Durham Bty was to have come from the 1st Durham RGA (V), and the 4th Durham RGA (V) was to have become part of a new Durham and Yorkshire RGA, but these arrangements were changed in 1910. The two batteries from the 2nd Durham RGA (V) at Seaham and Durham were renumbered 1st and 2nd, and the 3rd battery and part of the ammunition column came from the 4th Durham RGA (V) (the rest of which became a new Durham RGA)[3][16][19][20]
The new unit had the following organisation:[5][21][22]
III Northumbrian (County of Durham) Brigade, RFA
- HQ, Drill Hall, Seaham Harbour
- 1st Durham Battery, Drill Hall, Seaham Harbour
- 2nd Durham Battery, City of Durham
- 3rd Durham Battery, Armoury, Ward Street, West Hartlepool
- 3rd Northumbrian (County of Durham) Ammunition Column, Drill Hall, Seaham Harbour
The three batteries were each equipped with four 15-pounder guns. The brigade was part of the Northumbrian Division of the TF.[22][23][24][25][26] The Commanding Officer (CO) was Major (RA) and Temporary Lt-Col (TF) J.F.I.H. Doyle, appointed 6 June 1914.[5][27]
World War I[]
Mobilisation[]

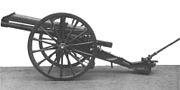
15-pounder gun, known to the gunners in France as the 'pip-squeak'.
In late July 1914 the units of the Northumbrian Division were at their annual training camp in North Wales. On 3 August they were ordered to return to their respective headquarters, where at 17.00 next day they received orders to mobilise. This was particularly difficult for the divisional artillery, which had to gather requisitioned horses and mules and fit them with harness, and collect ammunition from Ordnance stores. The units went to their war stations along the coast, where there were numerous alerts. In October the division became part of Central Force in Home Defence and manned the Tyne Defences.[22][23][28]
On the outbreak of war, TF units were invited to volunteer for Overseas Service and the large majority of the Northumbrian Division accepted. On 15 August the War Office (WO) issued instructions to separate those men who had signed up for Home Service only, and form these into reserve units. On 31 August, the formation of a reserve or 2nd Line unit was authorised for each 1st Line unit where 60 per cent or more of the men had volunteered for Overseas Service. The titles of these 2nd Line units would be the same as the original, but distinguished by a '2/' prefix. In this way duplicate battalions, brigades and divisions were created, mirroring those TF formations being sent overseas.[16][29][30][31][32]
1/III Northumbrian Brigade[]
Ypres[]
The Northumbrian Division trained hard while manning the Tyne Defences, and orders to proceed to France to join the British Expeditionary Force (BEF) arrived on 16 April 1915. The division completed its concentration in the area of Steenvoorde on 23 April and went straight into action the next day in the Second Battle of Ypres. Casualties among the infantry were heavy during the fighting to stabilise the British line (Battle of St Julien 24–28 April), but the divisional artillery did not take part.[22][23][33][34] Part of the divisional artillery first went into action at the Battle of Frezenberg Ridge (8–13 May), but again 1/III Northumbrian Brigade was not involved.[22][23][35]
The Northumbrian Division officially became the 50th (Northumbrian) Division on 14 May. For the next 10 days the situation was quiet apart from desultory artillery fire (the BEF was short of artillery ammunition) but on 24 May the Germans launched another serious attack accompanied with gas (the Battle of Bellewaarde Ridge). The 50th Division had been split up to reinforce other formations and the infantry were heavily engaged for two days, but with ammunition being scarce there was little the gunners could do to support them.[22][23][36]

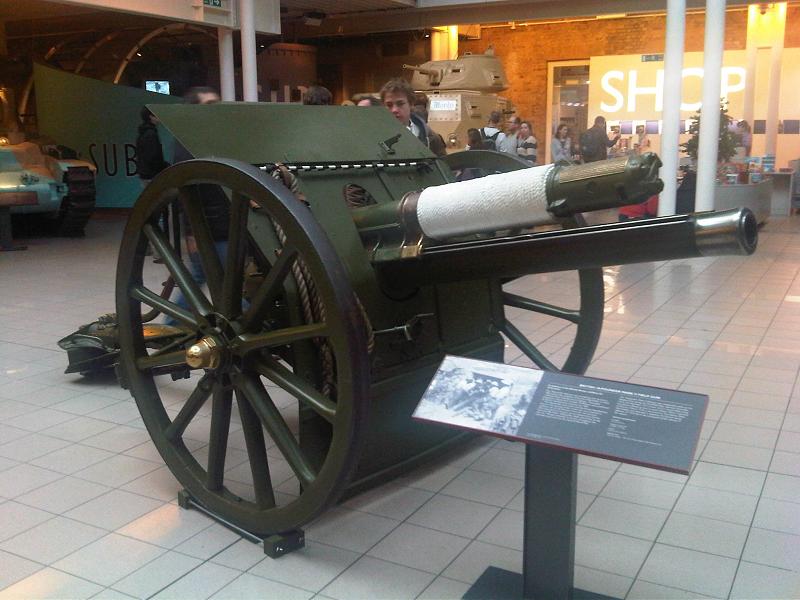
18-pounder preserved at the Imperial War Museum.
Over the following months the division was concentrated and took over its own section of the line south of Ypres, with its own artillery in support. However, when the division was relieved from its first spell in the line on 31 May, the 1/III Northumbrian Brigade was ordered to relieve a brigade of the 3rd Division on 6–7 June, and thus remained in action longer.[37] The 50th Division supported an attack by the 3rd Division on Bellewaarde Ridge on 16 June. The bombardment of the enemy trenches began at 02.50, but 50th Division's 15-pounders (known to the gunners as 'pip-squeaks') only fired for 10 minutes due to shortage of ammunition.[38]
By the end of July the division had moved to the Armentières sector, where the 1/III Northumbrian Brigade was at first in reserve. The division stayed in this quiet sector until mid-November, when it moved to Merris.[39] On 25 November 1915 the brigade was re-equipped with four modern 18-pounder guns to each battery, replacing the obsolete, short-ranged 15-pounders.[22][40]
In December 1915 the division returned to the Ypres Salient, in the Hill 60 sector, with the divisional artillery distributed around Zillebeke Lake, in appalling conditions. 1/III Northumbrian Brigade occupied positions between Trois-Rois and Woodcote House, near Blauwepoort Farm and near French Farm. There was almost constant low-level fighting until the division was relieved at the beginning of April 1916 and moved to the Wytschaete sector. Here the Observation posts (OPs) on Mont Kemmel gave the gunners some advantage.[41]
During May 1916 the BEF's artillery was reorganised. The 1/III Northumbrian Brigade was numbered as CCLIII Brigade RFA (251st Brigade) and the batteries were lettered A, B and C. The brigade formed a fourth battery, D, which was exchanged with D Bty from the IV Northumbrian Brigade (CCLIII or 253rd Brigade), equipped with 4.5-inch howitzers. This battery, which originally came from LXI Brigade in Guards Division, became D (H) Bty. The brigade ammunition columns were merged into the divisional ammunition column.[16][22][42]
Somme[]

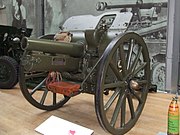
4.5-inch howitzer preserved at the Royal Artillery Museum.
The 50th (Northumbrian) Division was not involved in the Somme Offensive until its third phase (the Battle of Flers–Courcelette). The CCLII Brigade, under Lt-Col F.L. Pickersgill, moved into position at Contalmaison on 19 August 1916, while the infantry took over the front line between 7 and 10 September. The attack was to be delivered on 15 September, preceded by three days' bombardment by the divisional artillery during which the 4.5-inch howitzers pounded the enemy defences during daylight and fired harassing gas shell at night, while the 18-pounders fired shrapnel all night to disrupt repair parties. The infantry attacked behind a creeping barrage of 18-pounder shells, the first time the divisional artillery had fired one. It started 150 yards (140 m) ahead of the British front line at Zero hour (06.20) and then advanced at 50 yards per minute until 200 yards (180 m) beyond the first objective, where it paused for an hour, providing a protective curtain of fire while the infantry reorganised. This procedure was then to be repeated for the second and third objectives. CCLII Brigade, with one battery of CCL Brigade attached, fired the right-hand portion of the divisional barrage, supporting the advance of 4th Battalion, Northumberland Fusiliers. (On other parts of the front the attacking infantry were supported by Mark I tanks.)[22][23][43][44]
The 4th Battalion Northumberland Fusiliers (N.F.) took their first and second objectives (Hook Trench and the Starfish Line), but the 47th (1/2nd London) Division to the right was unable to capture High Wood, and the Fusiliers suffered severe flanking fire from that dominant position. The 4th Battalion N.F. was driven back to Hook Trench, where it consolidated a position. D (H) Battery of CCLII Brigade fired obsolete 4.5-inch shrapnel shell for the last time: noting that a stubbornly held machine gun post in High Wood would have required a large amount of high explosive (HE) fire to get a direct hit, the battery commander, Maj R.M. Knolles ordered the last 12 rounds of shrapnel to be fired. 'The 11th round was a beautiful low burst which totally destroyed the machine-gun detachment, and from the O.P. the 1st Division infantry were soon seen making good the north-western face of the wood'.[45]
The efforts of the 50th Division assisted the 47th Division in finally capturing High Wood. An attempt to continue the attack the following morning after a 15-minute intense bombardment was a failure. It took a week of fighting for the division to reach its final objective.[46]
The division made further piecemeal advances during the Battle of Morval (25–28 September) and then made another setpiece attack at the Battle of the Transloy Ridges at 15.15 on 1 October. The barrage laid down by the divisional artillery was described by participants as 'a perfect wave of fire without any gaps', and by a Royal Flying Corps observer as 'a most magnificent barrage. The timing ... was extremely good. Guns opened simultaneously ... As seen from the air the barrage appeared to be a most perfect wall of fire, in which it was inconceivable that anything could live'. The creeping barrage also acted as a smokescreen, and infantry advancing close behind it were onto their objectives with few casualties.[22][23][47]


William Orpen: The Butte de Warlencourt.
On the night of 3/4 October the division was relieved, but the artillery remained in the line, supporting other formations. The division returned on 24 October for an attack on the Butte de Warlencourt, which was several times delayed. 151st (Durham Light Infantry) Brigade finally attacked on 5 November, supported by all available guns. Because the infantry could only move slowly through the mud, the barrage advanced at only 25 yards (23 m) per minute. Although the 9th Bn Durham Light Infantry crept forward behind the barrage and took their objective, the rest of the assault bogged down. After strong German counter-attacks the infantry had been pushed back to their start line by 13.00 on 6 November, despite the efforts of the gunners to break up the counter-attacks.[48] Further lodgements made in the enemy positions on 14 November were also driven back, and the divisional artillery was relieved that night. The task of hauling the guns out of the mud was particularly onerous.[49][50]
On 16 November a further reorganisation of field artillery was carried out, when the four-gun 18-pounder batteries were increased to six guns each. B/CCLII Battery was split up, Right Section joining A/CCLII and Left Section joining C/CCLII, which was then redesignated B/CCLII. D (H)/CCLII Battery continued with just four howitzers.[22][51] However, in January 1917 the whole brigade was broken up and transferred: A/CCLII Bty became C Bty in CCXLII (242nd, formerly III South Midland) Army Field Brigade and B/CCLII became C Bty in LXXII (72nd) Army Field Brigade on 20 January; D (H)/CCLII had already been split up on 16 January, R Section going to D (H)/CCL (250, the former I Northumbrian) and L Section to D (H)/CCLI (251, the former II Northumbrian). The two remaining Northumbrian field brigades fought on with 50th Division to the end of the war.[16][22] The army field brigades were moved from one higher formation to another as required, CCXLII ending the war with the First Army and LXXII with the Third Army.[52]
2/III Northumbrian Brigade[]
The 2nd Line TF units of the Northumbrian Division slowly assembled around Newcastle upon Tyne, where the 2nd Northumbrian Divisional HQ opened in January 1915. By May 1915, all the division's Home Service men had been transferred to separate units and thenceforth the 2nd Line units had the role of training drafts for the 1st Line serving in France. While under training they were responsible for defending the stretch of coast from Seaham Harbour through Sunderland to Newcastle. The 2nd Northumbrian Division was numbered the 63rd (2nd Northumbrian) Division on 16 August. In November 1915 the division moved into winter quarters around York and Doncaster.[29][30]
In May 1916 the RFA brigades were reorganised, 2/III Northumbrian vbecoming CCCXVII (317th) Brigade, RFA and the batteries becoming A, B and C. The 63rd Divisional Artillery then moved to Heytesbury to train on Salisbury Plain for overseas service. However, the decision had been made to break up the weak 63rd (2nd Northumbrian) Division and its number was transferred to the Royal Naval Division, veterans of the Antwerp and Gallipoli, now arriving on the Western Front. Since the RN Division had no artillery of its own, the 63rd Divisional Artillery was now assigned to it.[29][30][53]
The brigade disembarked at Le Havre on 3 July 1916. On 3 August it was reorganised:[53]
- A Bty (2/1st Durham Bty and R Section 2/3rd Durham Bty) – 6 x 18-pounders
- B Bty (2/2nd Durham Bty and L Section 2/3rd Durham Bty) – 6 x 18-pounders
- C Bty (2/3rd EastRiding and R Section of 2/2nd East Riding from CCCXVI Brigade, the former 2/II Northumbrian Brigade) – 6 x 18-pounders
- D (H) Bty (1/5th Kent (H) Bty, originally from IV Home Counties (223) Brigade, joined from CCCXVI Brigade) – 4 x 4.5-inch howitzers
The 63rd (RN) Division's first major action on the Western Front was the Battle of the Ancre (13–15 November 1916), when the division attacked with the support of all available artillery, securing only partial success.[53]
On 24 January 1917, D (H) Bty was joined by R Section of D (H)/CCCXV (2/I Northumbrian) Brigade (the former 525th (H) Bty), making it up to six howitzers.[53]
The brigade then served with the63rd (RN) Division to the end of the war, taking part in the following actions:[53]
- Operations on the Ancre (20 January–27 February 1917)
- Actions of Miraumont (17–18 February) The 63rd (RN) Division attacked on the north bank of the Ancre on 17 February. The divisional artillery and an army field brigade with 54 × 18-pounders and 18 × 4.5-inch howitzers provided covering fire, with three field batteries from the 62nd Division further north, to place a protective barrage along the northern flank. The creeping barrage moved at 100 yards (91 m) in four minutes, and the German strong-points were quickly overcome. The objective was reached by 06.40 and the defensive flank established, a final German strong-point being captured at 10.50. No German counter-attack was made until the next day, which was stopped by artillery fire.[54]


18-pounder crew in action at Arras, 1917.
- Battle of Arras
- Second Battle of the Scarpe (23–24 April)
- Battle of Arleux (28–29 April)
- Third Battle of Ypres
- Second Battle of Passchendaele (26 October–5 November)
- Welch Ridge (30–31 December)


German barbed wire defences at Quéant, 4 October 1918.
- German Spring Offensive
- Battle of St Quentin (21–28 March 1918)
- First Battle of Bapaume (24–25 March)
- Battle of the Ancre (5 April)
- Hundred Days Offensive
- Battle of Albert (21–23 August)
- Battle of the Drocourt–Quéant Line (2–3 September)
- Battle of the Canal du Nord (27 September–1 October) On 27 September the plan was for the 63rd (RN) Division to advance from Mœuvres and secure the first and second objectives for XVII Corps before the 57th (2nd West Lancashire) Division passed through to capture the third objective. The artillery available included four divisional and four army field brigades: the 18-pounders of seven of these fired the creeping barrage and the eighth a Smoke screen, while the 4.5-inch howitzers fired a standing barrage on chosen targets and then advanced 200 yards (180 m) in front of the creeping barrage. The division's infantry successfully crossed the Canal du Nord and reached the first objective astride the Hindenburg Support Line. Here they were held up by machine gun fire from a sugar factory, and a request for an artillery 'crash' on it at first received no answer. Fresh orders then arrived for an hour's bombardment from 13.15 followed by a second creeping barrage. The second attack was immediately successful until held up at Anneux and Graincourt-lès-Havrincourt (the second objectives), where another barrage was fired to help the 57th Division onto the final objectives.[55]
- Second Battle of Cambrai (8 October)
- Capture of Niergnies (8 October)
- Battle of the Selle (20 October) – the 63rd (RN) Divisional artillery supported the 42nd (East Lancashire) Division[56]
- Passage of the Grande Honnelle (7 November) – the division crossed and advanced rapidly behind a barrage to secure Audregnies and mop up the Bois d'Audregnies.[57]
When the Armistice with Germany came into force on 11 November, the 63rd (RN) Division had advanced as far as Harveng near Mons.[53][58] After the Armistice, the division moved back to Valenciennes, where key personnel such as miners left for early demobilisation. The whole division was disbanded in April 1919.[53]
Interwar[]
When the TF was reconstituted as the Territorial Army (TA), the 3rd Northumbrian reformed and merged with the Northern Cyclist Battalion to form the 3rd (Northumbrian) Medium Brigade, RGA in February 1920. In 1921 the brigade and its batteries were renumbered:[5][16][59][60]
55th (Northumbrian) Medium Brigade, RGA
- HQ at Drill Hall, The Green, Sunderland
- 217th (Durham) Medium Bty (Howitzer) at Drill Hall, The Green, Sunderland
- 218th (Durham) Medium Bty (Howitzer) at Drill Hall, Seaham Harbour
- 219th (Durham) Medium Bty (Howitzer) at the Armoury, West Hartlepool
- 220th (Durham) Medium Bty at Drill Hall, Seaham Harbour
The unit continued to be attached to the 50th (Northumbrian) Divisional area as 'Army Troops'. In 1924 the Royal Field Artillery and Royal Garrison Artillery were subsumed into the Royal Artillery (RA).[16][59][60] In these postwar years the medium artillery was still equipped with wartime 60-pounders and 6-inch howitzers.[61]
In the 1930s the increasing need for anti-aircraft (AA) defence for Britain's cities was addressed by converting a number of TA units to that role.The 55th (Northumbrian) Medium Brigade became the 63rd (Northumbrian) AA Brigade in 1936, and reorganised as three batteries. The unit formed part of the 30th (Northumbrian) AA Group in the 2 AA Division.[5][16][59][62]
63rd (Northumbrian) Anti-Aircraft Brigade, RA
- HQ at Drill Hall, The Green, Sunderland
- 176th (County of Durham) Anti-Aircraft Bty at Drill Hall, The Green, Sunderland
- 177th (County of Durham) Anti-Aircraft Bty at Drill Hall, Seaham Harbour
- 178th (County of Durham) Anti-Aircraft Bty at Drill Hall, The Green, Sunderland
In 1938 the RA replaced its traditional unit designation 'Brigade' by the modern 'Regiment', which allowed the 'AA Groups' to take the more usual formation title of 'Brigades'.[5][16][59]
World War II[]
Mobilisation and Phoney War[]
The TA's AA units were mobilised on 23 September 1938 during the Munich Crisis, with units manning their emergency positions within 24 hours, even though many did not yet have their full complement of men or equipment. The emergency lasted three weeks, and they were stood down on 13 October.[63]
As international tensions increased, the TA's AA strength grew rapidly, all the AA defences came under the control of a new Anti-Aircraft Command in February 1939. 63rd (Northumbrian) AA Regiment formed a new 269 AA Bty at Seaham Harbour early in the year.[5][64]
In June 1939 a partial mobilisation of the TA was begun in a process known as 'couverture', whereby each AA unit did a month's tour of duty in rotation to man selected gun positions. On 24 August, ahead of the declaration of war, AA Command was fully mobilised at its war stations.[65] The 63rd (Northumbrian) AA Rgt was still with the 30th AA Brigade tasked with defending Tyneside, but it was now in the 7th AA Division.[64][66][67][68]
Immediately after mobilisation, equipment was critically short. In August 1939, the 7th AA Division had no modern Heavy AA (HAA) guns, and only a few of the old 3-inch guns that were intended for the Light LAA role.[69] Luckily, the months of the Phoney War that followed mobilisation allowed AA Command to address its equipment shortages. Gun Defence Areas (GDAs) with 3-inch, 3.7-inch or 4.5-inch HAA guns were established around northern cities including Newcastle and Tyneside.[70] By 11 July, the 7th AA Division had 54 HAA guns in the Tyne GDA, manned by the 63rd and 64th (Northumbrian) HAA Rgts.[71]
In the summer of 1940, along with other AA units equipped with 3-inch or larger guns, the 63rd was designated a Heavy AA Regiment.[16][59]
Battle of Britain and Blitz[]


7th AA Division formation badge
Tyneside, Wearside, and Teesside were important strategic targets because of their high concentrations of heavy industry and ports. During the early part of the Battle of Britain, German day and night air raids and mine laying began along the East Coast of England, intensifying through June 1940. The first major raid on Newcastle came on 2 July. Thereafter the Luftwaffe concentrated on Royal Air Force sites in the South of England, with occasional raids on the North East, such as the period 12–15 August.[72]
On 15 August, in the belief that the defences of NE England had been denuded, 65 Heinkel He 111 bombers of Kampfgeschwader 26, escorted by 35 Messerschmitt Bf 110 fighters of Zerstörergeschwader 76, attacked Tyneside from bases in Norway. The bombers were picked up on radar and ambushed by fighters of No. 13 Group RAF before they reached the coast. Those bombers that succeeded in breaking through then split into two groups, one being engaged by the guns of the Tyne GDA the other by the Tees GDA. Bombs were widely scattered and only at Sunderland was any major damage inflicted. kg 26 lost 8 bombers and 7 fighters for no loss to the RAF, in 'one of the most successful air actions of the war'.[73][74]
The Battle of Britain was followed by the Luftwaffe 's night Blitz on London and other industrial cities during the winter of 1940–41. Again, NE England escaped the worst of this, nevertheless hundreds of people died during the Newcastle Blitz and there were notable air raids on Tyneside on 9 April and Sunderland on 25 April.[75][76]
Throughout this period, the 63rd (Northumbrian) HAA Rgt remained in the 30th AA Brigade part of the 7th AA Division.[77][78][79][80]
Ceylon and India[]


3.7-inch HAA gun preserved at Imperial War Museum Duxford.
The main Blitz ended in May 1941, but occasional raids continued. Newly formed units joined AA Command, allowing experienced units to be posted away for service overseas. 63rd (Northumbrian) HAA Rgt came under direct War Office control in December 1941 preparatory to embarking for overseas. The 176th (County of Durham) HAA Battery left the regiment and joined a new 146th HAA Rgt formed in the 30th AA Brigade in January 1942. (It later served in the campaign in North West Europe with that regiment.)[81][82][83][84]
The 63rd (Northumbrian) HAA Rgt sailed from the UK in May 1942 and travelled to Ceylon.[16][62][82] It arrived in Colombo, on 29 July 1942 with 177th, 178th and 269th HAA Btys (24 x 3.7-inch) commanded by Lt-Col C.H. Wright. Ceylon, and particularly the naval base at Trincomalee, had come under air attack in April and was still threatened by the Imperial Japanese Navy Air Service, and the AA defences were being expanded.[85][86] On 24 October the regiment came under the command of The 1st (Royal Marine) AA Brigade, then on 21 March under a new 24th AA Brigade. On 24 April 1944, the unit embarked for India, where it moved to Jubbulpore.[67][87][88][89]
63rd (Northumbrian) Medium Battery[]
However, the reduction in Japanese air power and the manpower crisis in South East Asia Command was leading to a reduction in AA units. On arrival the regiment was placed in suspended animation and many of its gunners sent for infantry raining. The remainder were reduced to battery strength and converted to become the 63rd (Northumbrian) Medium Battery in a newly formed 'C' Medium Rgt, designated the 87th Medium Rgt from 18 August. The 63rd Medium Bty also absorbed the 154 HAA Bty from 53rd (City of London) HAA Rgt.[16][59][62][67][83][90][91][92][93][94]
At first the new regiment was under the command of the 9th AA Brigade at Poona then at Secunderabad. At the end of December it arrived at Ranchi, the base of operations for the Burma Campaign, under the 101st Lines of Communication (LoC) area. In late March 1945 the regiment moved up through Gauhati and came under the command of the 256th LoC Sub Area when it reached Kohima on 30 March. Here, the 63 Med Bty was detached from the regiment and moved into Burma.[90][91][92]


5.5-inch guns of the 63rd Medium Battery firing on Satthinagyon, 1 August 1945.
Equipped with 5.5-inch guns the battery came under the command of IV Corps of the Fourteenth Army for the campaign towards Rangoon. At first it was attached to the 19th Indian Division engaged in mopping up and providing flank guards in difficult country. IV Corps got to within 40 miles (64 km) of Rangoon before being held up. The city was then taken by an amphibious assault (Operation Dracula) on 1 May.[92][94][95][96]
Although the 87th Medium Rgt was disbanded in May 1945, the 63rd (Northumbrian) Bty continued its independent existence, attached to the 17th Indian Division and then the 7th Indian Division.[83][90][94] Shortly after the fall of Rangoon, IV Corps had been placed under the newly activated Twelfth Army, responsible for mopping up the remaining Japanese forces in Burma. It carried this out until the end of the war including the Battle of the Sittang Bend, which involved severe fighting as the Japanese forces attempted to break out. This ended on 3 August. The Surrender of Japan was broadcast on 15 August.[97]
The 63rd Medium Battery was at the time in Rangoon, where on 17 August it came under the command of the 52nd (London) HAA Rgt (the original parent unit of the 154th HAA Bty), which had just arrived and joined IV Corps.[92]
Postwar[]
When the TA was reconstituted in 1947 the regiment reformed with its HQ at Livingstone Road, Sunderland, as the 463 (Durham) HAA Rgt, and the following year it became a 'Mixed' unit, indicating that members of the Women's Royal Army Corps were integrated into it.[16][59][98] Once again it formed part of the 30th AA Brigade, which had been renumbered as the 56th (Northumbrian) AA Brigade, with its HQ at Washington, Co Durham.[99][100][101]
AA Command was disbanded in 1955 and there were wholesale disbandments and mergers among the TA's AA units.[102] On 10 March 1955, the 463rd HAA Rgt amalgamated with the Sunderland-based 582nd (7th Durham Light Infantry) Light Anti-Aircraft/Searchlight Rgt to form the 463rd (7th Durham Light Infantry) Light Anti-Aircraft/Searchlight Rgt, with R Battery contributed by the former 463rd HAA Rgt while the rest of the regiment continued Durham Light Infantry traditions.[16][59][98]
Insignia[]
In about 1865 the unit wore a pouch belt plate comprising an oval strap surmounted by a crown and bearing the words 'SEAHAM VOLUNTEER ARTILLERY', surrounding three gun barrels in pale derived from the arms of the Board of Ordnance.[3]
Honorary Colonels[]
The following served as Honorary Colonel of the unit:[5][7]
- Lt-Col and Hon Col Charles Vane-Tempest-Stewart, 6th Marquess of Londonderry, KG, GCVO, CB, VD, former Commanding Officer, appointed (to III Northumbrian Brigade, RFA) on 7 December 1910.
- Charles Vane-Tempest-Stewart, 7th Marquess of Londonderry, KG, MVO, commissioned into the unit in 1895[103] before entering Royal Military College, Sandhurst and seeing active service with the Royal Horse Guards during World War I, appointed (to 55th Medium Brigade, RGA) on 13 August 1920
Notes[]
- ↑ Beckett.
- ↑ Spiers, pp. 163–8.
- ↑ 3.0 3.1 3.2 3.3 3.4 3.5 3.6 Litchfield & Westlake, pp. 59–61.
- ↑ Beckett, Appendix VIII.
- ↑ 5.00 5.01 5.02 5.03 5.04 5.05 5.06 5.07 5.08 5.09 5.10 Army List, various dates.
- ↑ 6.0 6.1 Beckett, p. 62.
- ↑ 7.0 7.1 7.2 Londonderry at Burke's.
- ↑ 8.0 8.1 London Gazette, 16 July 1869.
- ↑ Beckett, p. 47.
- ↑ Westlake, p. 75.
- ↑ Beckett, p. 178.
- ↑ Litchfield & Westlake, p. 6.
- ↑ Beckett, p. 69.
- ↑ Beckett, p. 82.
- ↑ Litchfield & Westlake, pp. 4–5.
- ↑ 16.00 16.01 16.02 16.03 16.04 16.05 16.06 16.07 16.08 16.09 16.10 16.11 16.12 16.13 Litchfield, pp. 55–6.
- ↑ Dunlop, Chapter 14.
- ↑ Spiers, Chapter 10.
- ↑ London Gazette 20 March 1908.
- ↑ London Gazette 14 October 1910.
- ↑ Kelly's Directory of Durham and Northumberland.
- ↑ 22.00 22.01 22.02 22.03 22.04 22.05 22.06 22.07 22.08 22.09 22.10 22.11 Becke, Pt 2a, 93–100.
- ↑ 23.0 23.1 23.2 23.3 23.4 23.5 23.6 50 Division at Long, Long Trail.
- ↑ 50 Division at Regimental Warpath.
- ↑ Conrad, British Army, 1914.
- ↑ Wyrall, pp. 1–2.
- ↑ Wyrall, p. 2.
- ↑ Wyrall, p.4.
- ↑ 29.0 29.1 29.2 Becke, Pt 2b, pp. 49–54.
- ↑ 30.0 30.1 30.2 63 Division at Long, Long Trail.
- ↑ Becke, Pt 2b, p. 6.
- ↑ Wyrall, pp. 4–5.
- ↑ Wyrall, pp. 5, 12–44.
- ↑ McWilliams & Steel, pp. 141, 161–2, 170–1, 177.
- ↑ Wyrall, pp. 49–57.
- ↑ Wyrall, pp. 57–70.
- ↑ Wyrall, pp. 72–4.
- ↑ Wyrall, pp. 83–6.
- ↑ Wyrall, pp. 90–2.
- ↑ Wyrall, pp. 92–3.
- ↑ Wyrall, pp. 100–4, 114, 118.
- ↑ Wyrall, p. 124 & Appendix D.
- ↑ Wyrall, pp. 136-48.
- ↑ Farndale, Western Front, pp. 151–2.
- ↑ Wyrall, pp. 148-50.
- ↑ Wyrall, pp. 151-9.
- ↑ Wyrall, pp. 161–69.
- ↑ Wyrall, pp. 170–81.
- ↑ Wyrall, pp. 183–90.
- ↑ Farndale, Western Front, p. 154.
- ↑ Wyrall, pp. 190, 201 & Appendix E.
- ↑ Farndale, Western Front, Annex M.
- ↑ 53.0 53.1 53.2 53.3 53.4 53.5 53.6 Becke, Part 3b, pp. 117–28.
- ↑ Falls, pp. 81–2.
- ↑ Edmonds & Maxwell-Hyslop, pp. 32–6.
- ↑ Edmonds & Maxwell-Hyslop, p. 335.
- ↑ Edmonds & Maxwell-Hyslop, pp. 512–3.
- ↑ Edmonds & Maxwell-Hyslop, p. 535.
- ↑ 59.0 59.1 59.2 59.3 59.4 59.5 59.6 59.7 Northern Cyclist Battalion and Northunbrian HAA, RA, at Regiments.org.
- ↑ 60.0 60.1 Titles & Designations.
- ↑ Farndale, Years of Defeat, p. 4.
- ↑ 62.0 62.1 62.2 2nd AA Division at British Military History
- ↑ Routledge, pp. 62–3.
- ↑ 64.0 64.1 7 AA Division 1939 at British Military History
- ↑ Routledge, pp. 65–6, 371.
- ↑ AA Command 3 September 1939 at Patriot Files.
- ↑ 67.0 67.1 67.2 63 HAA Rgt at RA 39–45.
- ↑ Routledge, Table LX, p. 378.
- ↑ Routledge, Table LVIII, p. 376.
- ↑ Routledge, p. 373.
- ↑ Basil Collier, Appendix IX.
- ↑ Routledge, Table LXII, pp. 379–80.
- ↑ Basil Collier pp. 191–4, Map 16.
- ↑ Richard Collier, Eagle Day, pp. 86–8.
- ↑ Basil Collier, Appendices XXX and XXXI.
- ↑ Routledge, pp. 387–404.
- ↑ 7 AA Division 1940 at RA 39–45.
- ↑ Farndale, Years of Defeat, Annex D.
- ↑ Routledge, Table LXV, p. 397.
- ↑ Order of Battle of Non-Field Force Units in the United Kingdom, Part 27: AA Command, 12 May 1941, with amendments, The National Archives (TNA), Kew, file WO 212/79.
- ↑ Order of Battle of Non-Field Force Units in the United Kingdom, Part 27: AA Command, 2 December 1941, with amendments, TNA file WO 212/80.
- ↑ 82.0 82.1 Order of Battle of the Field Force in the United Kingdom, Part 3: Royal Artillery (Non-Divisional units), 2 April 1942, with amendments, TNA file WO 212/515.
- ↑ 83.0 83.1 83.2 Farndale, Years of Defeat, Annex M.
- ↑ Routledge, Table XLIX, p. 319.
- ↑ Woodburn Kirby, Vol II, pp.119–23.
- ↑ Routledge, pp. 237–8.
- ↑ Joslen, p 520.
- ↑ Farndale, Far East, Annex H.
- ↑ Routledge, Table XXXVIII, p. 253.
- ↑ 90.0 90.1 90.2 87 Med Rgt at RA 39–45.
- ↑ 91.0 91.1 Joslen, p 513.
- ↑ 92.0 92.1 92.2 92.3 Farndale, Far East, Annex K.
- ↑ Routledge, p. 244.
- ↑ 94.0 94.1 94.2 87 Med Rgt at British Artillery in World War 2.
- ↑ Farndale, Far East, pp. 291–4.
- ↑ Woodburn Kirby, Vol V, pp. 2–3.
- ↑ Woodburn Kirby, Vol V, pp. 27–9, 35–47.
- ↑ 98.0 98.1 444–473 Regts at British Army units 1945 on.
- ↑ AA Bdes 67–106 at British Army units 1945 on.
- ↑ Watson, Territorial Army 1947
- ↑ Litchfield, Appendix 5.
- ↑ Routledge, pp. 439–40.
- ↑ London Gazette 21 May 1895.
References[]
- Maj A.F. Becke,History of the Great War: Order of Battle of Divisions, Part 2a: The Territorial Force Mounted Divisions and the 1st-Line Territorial Force Divisions (42–56), London: HM Stationery Office, 1935/Uckfield: Naval & Military Press, 2007, ISBN 1-847347-39-8.
- Maj A.F. Becke,History of the Great War: Order of Battle of Divisions, Part 2b: The 2nd-Line Territorial Force Divisions (57th–69th), with the Home-Service Divisions (71st–73rd) and 74th and 75th Divisions, London: HM Stationery Office, 1937/Uckfield: Naval & Military Press, 2007, ISBN 1-847347-39-8.
- Ian F.W. Beckett, Riflemen Form: A Study of the Rifle Volunteer Movement 1859–1908, Aldershot: Ogilby Trusts, 1982, ISBN 0 85936 271 X.
- Burke's Peerage, Baronetage and Knightage, 100th Edn, London, 1953.
- Basil Collier, History of the Second World War, United Kingdom Military Series: The Defence of the United Kingdom, London: HM Stationery Office, 1957.
- Richard Collier, Eagle Day: The Battle of Britain, August 6–September 15, 1940, London: Hodder & Stoughton, 1966/Pan Books, 1968, ISBN 0-330-02105-2.
- Col John K. Dunlop, The Development of the British Army 1899–1914, London: Methuen, 1938.
- Brig-Gen Sir James E. Edmonds & Lt-Col R. Maxwell-Hyslop, History of the Great War: Military Operations, France and Belgium 1918, Vol V, 26th September–11th November, The Advance to Victory, London: HM Stationery Office, 1947/Imperial War Museum and Battery Press, 1993, ISBN 1-870423-06-2.
- Capt Cyril Falls, History of the Great War: Military Operations, France and Belgium 1917, Vol I, The German Retreat to the Hindenburg Line and the Battle of Arras, London: Macmillan, 1940/London: Imperial War Museum & Battery Press/Uckfield: Naval and Military Press, 2009, ISBN 978-1-84574722-0.
- Gen Sir Martin Farndale, History of the Royal Regiment of Artillery: Western Front 1914–18, Woolwich: Royal Artillery Institution, 1986, ISBN 1-870114-00-0.
- Gen Sir Martin Farndale, History of the Royal Regiment of Artillery: The Years of Defeat: Europe and North Africa, 1939–1941, Woolwich: Royal Artillery Institution, 1988/London: Brasseys, 1996, ISBN 1-85753-080-2.
- Gen Sir Martin Farndale, History of the Royal Regiment of Artillery: The Far East Theatre 1939–1946, London: Brasseys, 2002, ISBN 1-85753-302-X.
- Norman E.H. Litchfield, The Territorial Artillery 1908–1988 (Their Lineage, Uniforms and Badges), Nottingham: Sherwood Press, 1992, ISBN 0-9508205-2-0.
- Norman Litchfield & Ray Westlake, The Volunteer Artillery 1859–1908 (Their Lineage, Uniforms and Badges), Nottingham: Sherwood Press, 1982, ISBN 9780950820507.
- Brig N.W. Routledge, History of the Royal Regiment of Artillery: Anti-Aircraft Artillery 1914–55, London: Royal Artillery Institution/Brassey's, 1994, ISBN 1-85753-099-3
- Edward M. Spiers, The Army and Society 1815–1914, London: Longmans, 1980, ISBN 0-582-48565-7.
- Titles and Designations of Formations and Units of the Territorial Army, London: War Office, 7 November 1927 (RA sections also summarised in Litchfield, Appendix IV).
- Ray Westlake, Tracing the Rifle Volunteers, Barnsley: Pen and Sword, 2010, ISBN 978-1-84884-211-3.
- Maj-Gen S. Woodburn Kirby, History of the Second World War, United Kingdom Military Series: The War Against Japan Vol II, India's Most Dangerous Hour, London: HM Stationery Office, 1958/Uckfield: Naval & Military, 2004, ISBN 1-845740-61-0.
- Maj-Gen S. Woodburn Kirby, History of the Second World War, United Kingdom Military Series: The War Against Japan Vol V, The Surrender of Japan', London: HM Stationery Office, 1969/Uckfield: Naval & Military, 2004, ISBN 1-845740-64-5.
- Everard Wyrall, The Fiftieth Division 1914–1919, 1939/Uckfield: Naval & Military, nd, ISBN 1-84342-206-9.
External sources[]
- Mark Conrad, The British Army, 1914 (archive site)
- British Army units from 1945 on
- British Artillery in World War 2
- British Military History
- The Long, Long Trail
- Land Forces of Britain, the Empire and Commonwealth – Regiments.org (archive site)
- The Regimental Warpath 1914–1918 (archive site)
- Royal Artillery 1939–1945
- Graham Watson, The Territorial Army 1947
The original article can be found at 2nd (Seaham) Durham Artillery Volunteer Corps and the edit history here.