| 1st Forfarshire Artillery Volunteers 2nd Highland Brigade, RFA 76th (Highland) Field Regiment, RA 276th (Highland) Regiment, RA The Highland Regiment, RA | |
|---|---|
| Active | 1859–1975 |
| Country |
|
| Branch |
|
| Type | Artillery Regiment |
| Role |
Garrison Artillery Field Artillery |
| Part of | 51st (Highland) Division |
| Garrison/HQ | Dundee |
| Engagements |
Western Front (World War I) Battle of France Dunkirk evacuation Alamein Tunisia Sicily D-Day North West Europe Rhine Crossing |
The 1st Forfarshire Artillery Volunteers was a part-time unit of the British Army's Royal Artillery founded in Forfarshire (now Angus) in Scotland in 1859. It served with 51st (Highland) Division through many of the major battles on the Western Front during World War I. In World War II its regiments saw action in the Battle of France, in the campaigns in North Africa and Sicily, and in North West Europe from D-Day to VE Day. It continued in the postwar Territorial Army until 1975.
Volunteer Force[]
The enthusiasm for the Volunteer movement following an invasion scare in 1859 saw the creation of many Rifle and Artillery Volunteer Corps composed of part-time soldiers eager to supplement the Regular British Army in time of need.[1][2][3][4] By the end of April 1860 seven Artillery Volunteer Corps (AVCs) had been formed in Forfarshire:[5][6][7]
- 1st (Arbroath) Forfarshire AVC formed on 31 October 1859
- 2nd (Montrose) Forfarshire AVC formed on 31 October 1859
- 3rd (Broughty Ferry) Forfarshire AVC formed on 5 December 1859
- 4th (Broughty Ferry) Forfarshire AVC formed on 5 December 1859
- 5th (Dundee) Forfarshire AVC formed on 16 January 1860
- 6th (Dundee) Forfarshire AVC formed on 24 April 1860
- 7th (Dundee) Forfarshire AVC formed on 30 April 1860
On 14 December 1860 these units were brought together as the 1st Administrative Brigade, Forfarshire Artillery Volunteers based in Dundee under the command of Lieutenant-Colonel James Erskine. Each of the original corps consisted of a single battery, but in 1862 the units at Broughty Ferry amalgamated as a two-battery unit (the 3rd) and those at Dundee as a three-battery corps (the 4th). The 1st AVC at Arbroath added batteries in 1865 and 1877, and the 2nd had an additional half battery between 1866 and 1875. In 1867 the 4th AVC was increased to four batteries, in 1868 to six batteries with its own lieutenant-colonel commandant (Frank Stewart-Sandeman, who commanded the Administrative Brigade as well from 1872), and to seven batteries in 1879. The headquarters (HQ) of the Administrative Brigade moved to Broughty Ferry in 1862 and back to Dundee in 1875. In 1876 the 2nd (Johnshaven), 3rd (St Cyrus) and 4th (Bervie) Kincardineshire AVCs were transferred from the 1st Aberdeen Administrative Brigade to the 1st Forfarshire Administrative Brigade.[6][7][8]
In 1880 the Volunteer Force was consolidated into larger units. The 1st Forfar Administrative Brigade became the 1st Forfarshire (Forfar and Kincardine) AVC[lower-alpha 1] in March 1880, but the three Kincardine batteries returned to the 1st Aberdeen in May 1882 and the 'Forfar and Kincardine' subtitle was dropped. The size of the corps was increased again when a new battery was raised at Perth the following year, giving the following organisation:[6][7][8]
- Nos 1–7 Batteries at Dundee
- Nos 8–10 Batteries at Arbroath
- No 11 Battery at Montrose
- Nos 12–13 Batteries at Broughty Ferry
- No 14 Battery at Perth
Position artillery[]
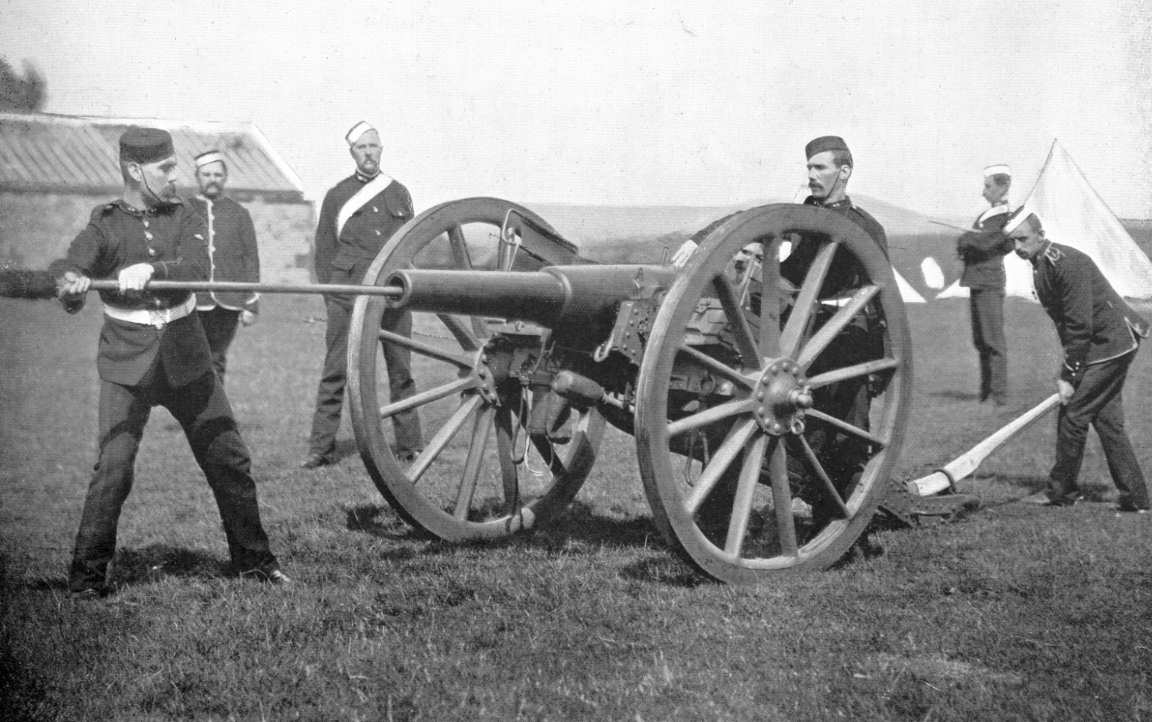
16-Pounder RML gun manned by Artillery Volunteers.
The AVCs were intended to serve as garrison artillery manning fixed defences, but a number of the early units manned semi-mobile 'position batteries' of smooth-bore field guns pulled by agricultural horses. The Dundee batteries of the 1st Forfarshire AVC had two batteries of four field guns from 1868, but they were only occasionally turned out, and were not officially recognised by the War Office (WO). However the concept was revived in 1888 when some Volunteer batteries were reorganised as position artillery to work alongside the Volunteer infantry brigades. In 1889 the 1st Forfarshire AVC was issued with a position battery of 16-pounder Rifled Muzzle-Loading guns, which were manned by two of the Dundee garrison batteries. In 1891 this was numbered the 1st Position Battery and the remaining garrison batteries were redesignated companies (Nos 2–6 at Dundee, 7–9 at Arbroath, 10 at Montrose, 11–12 at Broughty Ferry and 13 at Perth).[6][7][9][10]
Royal Garrison Artillery[]
In 1882 all the AVCs were affiliated to one of the territorial garrison divisions of the Royal Artillery (RA) and the 1st Forfarshire AVC became part of the Scottish Division. In 1889 the structure was altered, and the corps joined the Southern Division. In 1899 the RA was divided into separate field and garrison branches, and the artillery volunteers were all assigned to the Royal Garrison Artillery (RGA). In 1902 their titles were changed, the unit becoming the 1st Forfarshire Royal Garrison Artillery (Volunteers). The following year the position batteries were redesignated as heavy batteries.[7][8][10]
In 1908 the unit's HQ was at Albany Quarters, Bell Street, Dundee, and it had a drill battery at Barry Links for gun practice. The Dundee and Broughty Ferry companies used a rifle range at Monifieth Links, while the other companies used ranges at Eliot Links near Arbroath and near Montrose.[6]
Territorial Force[]
When the Volunteers were subsumed into the new Territorial Force (TF) under the Haldane Reforms of 1908,[11][12] the personnel of the 1st Forfarshire RGA was distributed to two new units:[7][8][13][14][15]
- North Scottish RGA, a defended ports unit at Broughty Ferry, with additional batteries from the 1st Fife RGA (V), 1st Aberdeen RGA (V) and Highland RGA (V)
- II (or 2nd) Highland Brigade, Royal Field Artillery (RFA), with one battery from the 1st Fife RGA (V), giving the following organisation:[8][16]


15-pounder gun issued to TF units.
II Highland Brigade, RFA
- HQ at Dudhope Drill Hall, Brown Street, Dundee[17]
- Forfarshire Battery at 22–26 East Abbey Street, Arbroath[17]
- Fifeshire Battery at Leven[18]
- City of Dundee Battery at Dudhope Drill Hall[17]
- 2nd Highland Ammunition Column at Dudhope Drill Hall[17]
This unit was part of the TF's Highland Division. The batteries were each issued with four 15-pounder guns.[8][14][19][20][21][22][23]
World War I[]
Mobilisation[]
A warning order of the imminence of war was received at the Highland Division's HQ on 29 July 1914, and the order to mobilise was received at 17.35 on Tuesday 4 August 1914. Mobilisation began the following day at unit drill halls. On 12 August the division was ordered to concentrate at Bedford and entrainment began on 15 August. Concentration was completed by 17 August and the division formed part of First Army (Home Forces) in Central Force.[20][21][22]
On the outbreak of war, units of the Territorial Force were invited to volunteer for Overseas Service. On 15 August the WO issued instructions to separate those men who had signed up for Home Service only, and form these into reserve units. Then on 31 August the formation of a reserve or 2nd Line unit was authorised for each 1st Line unit where 60 per cent or more of the men had volunteered for Overseas Service. The titles of these 2nd Line units would be the same as the original, but distinguished by a '2/' prefix. In this way duplicate batteries, brigades and divisions were created, mirroring those TF formations being sent overseas.[20][21][24]
1/II Highland Brigade[]

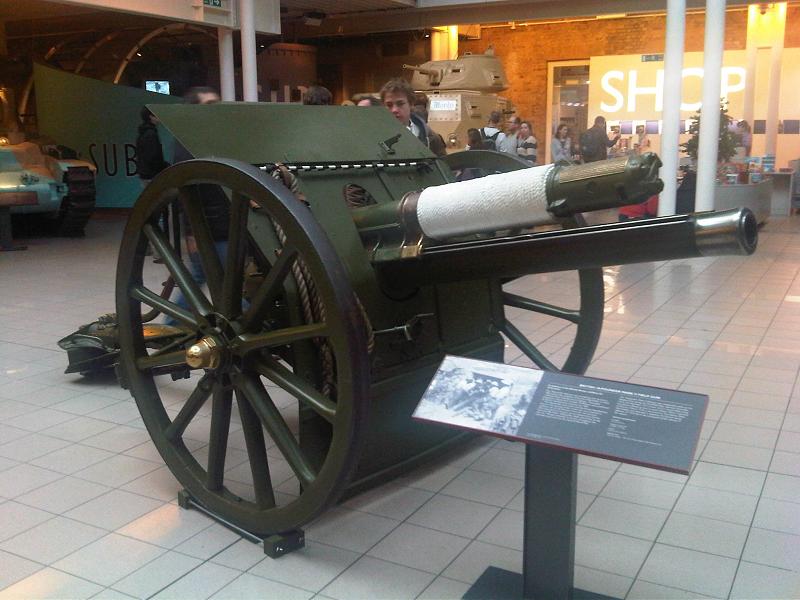
18-pounder field gun preserved at the Imperial War Museum.
During the winter of 1914–15 the division's 1st Line units underwent war training, and a number left to join the British Expeditionary Force (BEF) on the Western Front. The division was warned for overseas service on 13 April and on 3 May it crossed to France, the artillery embarking at Southampton for Le Havre. The Highland Division completed its concentration at Lillers, Busnes and Robecq by 6 May and on 12 May it was officially numbered as the 51st (Highland) Division.[20][21][22]
Western Front[]
The raw division was soon in action at the Battle of Festubert (18–25 May). The 51st (Highland) and 1st Canadian Division together formed 'Alderson's Force', which relieved the attacking divisions at the end of the first day's fighting. It was also engaged at the Battle of Givenchy (15–16 June). Afterwards the division was moved to a quiet front to gain more experience. 1/II Highland Bde's old 15-pounders were replaced with modern 18-pounder guns on 28 August.[20][25]
On 7 April 1916 1/II Highland Bde formed an additional battery (D Bty). Then on 19 May the TF brigades of the RFA received numbers, the 1/II Highland becoming CCLVI (256) Brigade, and the old batteries were redesignated A, B and C. D Battery was then exchanged for R (Howitzer) Bty from the III Highland (CCLVIII) Howitzer Bde, which became D (H) Bty, equipped with 4.5-inch howitzers. (R (H) Battery had originally been C (H) Bty of CLI (1st County Palatine) Bde of 30th Division, a 'Kitchener's Army' unit raised by the Earl of Derby in Lancashire in 1914.) The brigade ammunition columns were abolished at the same time, and absorbed within the divisional ammunition column.[14][20][22][23][26]
Somme[]


18-pounder in action on the Somme
In July 51st (Highland) Division joined in the Somme Offensive.[20][21][22] An attack on 14 July had failed to capture the dominating ground of High Wood, and 51st (H) Division was tasked with renewing the attack on High Wood a week later. A night attack was to be tried: the bombardment began at 19.00 on 22 July, under the direction of low-flying artillery observation aircraft. German sources reported that the shelling was of 'painful accuracy' and prevented the troops in High Wood from being relieved, despite the number of casualties they suffered.[27] At 01.30 the following morning the division attacked, but by 03.00 they were back on their start line having suffered heavy casualties of their own. British gunners had difficulty supporting attacks on High Wood, because they had to fire over Bazentin Ridge. The low elevation of the guns meant that shells skimmed the British trenches, the margin for error was small and numerous complaints were made that British infantry casualties were caused by friendly fire. Worn guns, defective ammunition and inaccurate information about the location of British infantry positions were blamed for short-shooting.[28] The setback seemed to confirm the division's nickname of 'Harper's Duds' (from their commander, Major-General George Harper, and their 'HD' formation badge). The division was withdrawn from the front on 7 August for rest and reorganisation. On 23 August CCLVI Bde was reorganised again: B Bty and the Left Section of C Bty of CCLVIII Bde joined to make A, B and C Btys up to six 18-pounders each.[20][22][23]


_Division_objectives_at_Beaumont_Hamel,_November_1916.png)
51st (Highland) Division's objectives at Beaumont-Hamel on 13 November 1916.
The division returned to the front in October for the Battle of the Ancre Heights, the final series of actions of the Somme Offensive. A mass of guns was assembled, with the artillery of no less than eight divisions and eight heavy artillery groups supporting 51st (H) Division's attack on Beaumont-Hamel, which had been an uncaptured objective on the first day of the offensive on 1 July. The operation was planned for 24 October, and the batteries began firing to cut the barbed wire on 20 October, but it was postponed several times because of bad weather. Eventually 13 November was chosen. H hour was 05.45, when the 18-pounders started a Creeping barrage (a recent innovation) moving in front of the infantry at 100 yards (91 m) every five minutes. A quarter of the 18-pounders deliberately fired 100 yards (91 m) short of the barrage line – this would have suppressed German outposts sheltering in shell craters in No man's land. The attack was helped by a dense fog, which screened the infantry from retaliatory shellfire as they struggled through the mud towards their objectives. The barrage halted for an hour on the first objective before moving on. Some of the infantry were held up by machine guns in the notorious 'Y Ravine', which had caused so much trouble on 1 July, but reserves were employed and both attacking brigades had reached the third German trench line (the Purple Line) by 07.50. The Green Line was next taken, but the fourth wave of attackers lost the barrage on their way to the final (Yellow) objectives and had to pull back to the Green Line to consolidate a position in captured trenches. Beaumont Hamel had finally fallen, and 51st (Highland) Division had gone some way to shaking off the 'Harper's Duds' slur.[20][21][22][29][30]
On 25 January 1917 CCLVI Bde was joined by the Left Section of C (H) Bty from CCLX (I Lowland) Bde to make D (H) Bty up to six howitzers. (C (H)/CCLX Bty had originally been 535 (H) Bty RFA.) The brigade then had the following organisation for the rest of the war:[20][22][23]
- A (1/Forfarshire + section III Highland) Bty – 6 x 18-pdrs
- B (1/Fifeshire + section III Highland) Bty – 6 x 18-pdrs
- C (1/City of Dundee + section III Highland) Bty – 6 x 18-pdrs
- D (C/CLI (1st County Palatine) + section 535) (H) Bty – 6 x 4.5-inch
Arras[]
For the Battle of Arras opening on 9 April, the biggest concentration of guns yet seen was assembled, all working to a single plan. 51st (H) Division was in XVII Corps, where the field batteries were placed from 1,400 yards (1,300 m) to 2,000 yards (1,800 m) yards behind the line. The 18-pdrs began firing a creeping barrage at Zero hour to protect the infantry advance while 4.5s laid down a standing barrage on each objective in turn. The barrage lasted for over 10 hours, advancing at a prescribed rate onto the final objective, over 7,000 yards (6,400 m) from the guns, some of which were moved forward during the day. Overall, XVII Corps' attack was a great success, even though some of 51st Highland's men were held up by unsubdued machine guns and drifted away from their barrage. The following day the brigade's CO, Lt-Col L.M. Dyson, personally went forward to reconnoitre the confused situation on the division's front, finding that the objective of Point de Jour was only partially held. After the first day the successes were harder won: the British guns had to move up through appalling conditions, and the follow-up attacks were less well planned and executed.[31][32] 51st (H) Division attacked again at Gavrelle on 23 April under a full barrage (the 2nd Battle of the Scarpe), with the chemical works and village of Roeux as its objectives, but could not hold Roeux itself.[33] The divisional artillery supported an attack by 34th Division on 28 April (the Battle of Arleux). The fire was not as effective as had been hoped, failing to cut the barbed wire or subdue all the enemy machine guns, although a German counter-attack was 'mown down by the 18-pounders firing shrapnel'.[34] 51st (H) Division distinguished itself in the eventual capture and defence of Roeux; CCLVI Bde first helped 4th Division take the west end of the village on 13 May, then 152nd Bde of 51st (H) Division occupied the rest during the night and held it against counter-attacks over the following days.[20][35]
Ypres[]
An even greater concentration of guns was massed for the Third Ypres Offensive, but the circumstances were less favourable. Gun batteries were packed into the Ypres Salient, where they were under observation and counter-battery (CB) fire from the Germans on the higher ground. Casualties among guns and gunners were high even before Zero hour on 31 July (the Battle of Pilckem Ridge). Two thirds of the field guns fired a creeping barrage, the other third and the 4.5-inch howitzers provided the standing barrage. 51st (H) Division reached the German second line and was consolidating when it was hit by a German counter-bombardment followed by a counter-attack. The British guns fired their pre-arranged protective barrages and destroyed the counterattack. Gains had been made, but now the rain came, and the guns had to move up through shell-churned mud to fresh positions before the attack could be renewed, and continued to suffer badly from German CB fire. 51st (H) Division was relieved on 8 August.[36][37]
The division was back in the line for the Battle of the Menin Road Ridge starting at 05.40 on 20 September. This was a limited attack made with massive artillery support. 51st (H) Division attacked towards the Poelcappelle Spur with one brigade (154th (3rd Highland)), supported by 22 batteries of 18-pdrs and six of 4.5s. At first the going was heavy and there was strong German resistance at 'Pheasant Trench', but thereafter there were no problems and the brigade had occupied its final objective across the spur by 08.25. A heavy German bombardment in the afternoon was followed by a counter-attack, but this was completely destroyed by the British artillery.[38][39]
Cambrai[]
51st (Highland) Division was then moved south to take part in Third Army's surprise attack with tanks against the Hindenburg Line at Cambrai on 20 November. There was no preliminary bombardment, but for the attack the divisional artillery was reinforced, firing a lifting barrage of smoke, high explosive (HE) and shrapnel shells. The initial attack was a brilliant success, but on 51st (H) Division's front the advance stalled once the tanks crossed the Flesquières ridge, where many were knocked out by unsuppressed enemy guns. Artillery support could not be requested because of broken communications. The fight at Flesquières went on all afternoon, but the Highlanders made little ground. However, the defenders in the village were almost cut off, and withdrew during the night. By now the division's guns were moving up into the former No man's land. They began a bombardment at 07.05 and at 07.30 the Highlanders moved on across the Graincourt road, but could not take the village of Cantaing until tanks came up. Although 51st (H) Division took Fontaine by 23 November, German opposition was stiffening, and the troops had to consolidate a line.[40][41][42]
The infantry of 51st (H) Division had been relieved by the time the German counter-attack came in on 30 November, but the divisional artillery remained in the line, supporting 59th (2nd North Midland) Division. The attack against the 59th was easily broken by the guns of 51st (H) and Guards Division. But breakthroughs elsewhere meant a scrambled retirement to a line further back.[43]
Spring Offensive[]
The German Spring Offensive was launched on the misty morning of 21 March 1918 with great initial success against Fifth Army. In Third Army the situation was better: the mist cleared early and despite heavy casualties the batteries could fire at observed targets. On 51st (H) Division's front the attacking Germans described the British artillery fire as 'unbearable'. However, the division's flank had already been turned, and the troops here had to fall back to a 'switch' line. On this flank the division's forward zone was overrun, but the rear of the main battle zone was held from 15.00.[44][45][46] The German pressure was maintained the following day. Attempting to widen the hole in the flank, large numbers of Germans were seen at 2,000 yards (1,800 m) range: all four of CCLVI Bde's batteries hauled their guns out of their pits, swung them round, and engaged the enemy over open sights, inflicting such heavy casualties that further progress was checked for a time. One of the batteries then fired smoke to cover the advance of a battalion of British tanks coming up. When the Germans ran from this counter-attack, the four batteries again did great execution, and were able to catch the German artillery coming up to support their infantry, one 18-pdr battery and the howitzer battery combining to destroy two guns and their teams and prevent the enemy battery from coming into action. Luckily the brigade was close to the divisional ammunition dump, and there was no shortage: the brigade fired 18,100 rounds of 18-pdr ammunition, and 2500 of howitzer; B Bty alone fired 1750 rounds per gun (rpg). By the time the German guns were able to fire it was dusk, and CCLVI Bde slipped away to the new line being taken up by 51st (H) Division.[47][48]
Over the next two days the division retired slowly, its units becoming increasingly tired and reduced in numbers. On 23 March the very weak 152nd Bde threw back three attacks with rifle and artillery fire. Next day the division pulled back into the Red (fourth) Line behind other formations that took over holding the Green (third) Line. On 24 March all the artillery of the divisions in IV Corps was pooled, CCLVI Bde forming part of 'Right Group'. About 14.00 the infantry in front began to give way, and the artillery group had to withdraw. 51st (H) continued to hold the Red Line all day, forming a defensive flank, before falling back during the night. On 25 March 51st (H) Division was presented with some remarkable targets of German masses at long range, which were prevented from closing, but the enemy continued to move round the flank. However, reserves came up, and the exhausted 51st (H) Division was finally withdrawn that evening for rest.[20][49][50]
51st (H) Division was sent north to First Army, absorbing drafts of reinforcements en route. The divisional artillery arrived on the evening of 9 April, just after the second phase of the German offensive (Operation Georgette) had struck First Army (the Battle of the Lys). The division's infantry had already been thrown into the gap left by the defeat of the 2nd Portuguese Division. The infantry and artillery together held the line through the next critical days.[20][51][52]
51st (H) Division was sent back south in July to assist the French in the Second Battle of the Marne. The divisional artillery covered 80 miles (130 km) in three days, crossing the Marne near Épernay at 02.00 on 20 July. After a short halt they pushed on, reaching their assembly position near Nanteuil-la-Fosse, and CCLVI Bde was in action 500 yards (460 m) south west of Pourcy by 11.00, although they were only engaged in harassing fire during the Battle of Tardenois, while the division's infantry had attacked behind a barrage fired by French and Italian field guns. An enemy counter-attack was expected, so the batteries were withdrawn at dusk, leaving a few guns in close support of the infantry during the night. In fact, the Germans withdrew across the Marne, and when the division attacked again the following morning the information on enemy positions was so poor that the barrage was fired too far ahead to be of use. On 23 and 27 July the division put in better-organised attacks behind barrages fired by its own artillery supported by French guns, against the now-retreating Germans. On 28 July, in the closing stages of the battle, CCLVI Bde moved up through the village of Chaumuzy under shellfire, having been misinformed that it was already in friendly hands.[20][53][54][55]
Hundred Days Offensive[]
In August all the Allied armies began attacking in the Hundred Days Offensive. 51st (H) Division returned from the French sector and joined the Canadian Corps in First Army in late August for the Battle of the Scarpe on 26 August. CCLVI Brigade supported the Canadian attack, and then rejoined 51st (H) divisional artillery supplemented by that of 16th (Irish) Division to provide a barrage for its own division's attack on the second objective against little opposition. The division attacked Greenland Hill the following day and failed to capture it, but succeeded two days later behind another barrage from 51st (H) and 16th (I) divisional artillery.[20][56]
After the Battle of the Selle the Allied armies began a pursuit. By 26 October First Army was lagging behind the advance, and 51st (H) Division was among those given the task of pushing on. The divisional artillery was supplemented by that of 39th Division together with army brigades and heavies. The attack went well, even though in some places the infantry lost the barrage.. The Germans were now badly shaken and exhausted, and the campaign developed into a pursuit, although one serious counter-attack was broken up by the guns on 1 November.[57][58] From 29 October the infantry of 51st (H) Division began to be withdrawn from the line, but the divisional artillery remained in action. On 1 November it supported 49th (West Riding) Division's assault crossing of the Rhonelle (the Battle of Valenciennes), and it remained in action until the Armistice with Germany came into force on 11 November.[20][59][60]
After the Armistice the division went into billets and demobilisation began. This was completed by mid-March 1919, and CCLVI Bde passed into suspended animation.[14][20]
2/II Highland Brigade[]
Recruiting for the 2nd Line unit was good, and 2/II Highland Bde was completed by the end of 1914.[14][61][62] 2nd Highland Division formed in January 1915 (numbered as 64th (2nd Highland) Division in August) but the lack of equipment and need to supply drafts to 1st Line units delayed training. 2/II Highland Brigade remained around the Forfar area throughout 1915. In March 1916 the division moved south to Norfolk and joined Northern Army (Home Forces), with the artillery around Blickling and Worstead. It continued to send drafts to units serving overseas. By May, the artillery brigades had received 18-pounders and that month they were numbered: 2/II Highland became CCCXXI (321) Brigade and the batteries became A, B and C; later a D (H) Bty joined (probably from CCCXXIII (2/III Highland) (H) Bde, which was broken up).[61][62][63] In Autumn 1916, B/CCXCIII (2/III County of London) Bty from 58th (2/1st London) Division was temporarily attached to the brigade. In November a new CCCXXII Bde of 18-pdr batteries was raised by V Reserve Bde, RFA, and joined the division, but on 29 January 1917 this was broken up to bring the existing batteries up to six guns each.[61]
By the winter of 1917 the division had become solely a training organisation, with no Highland associations. The artillery were quartered around Norwich, Aylsham and Haveringland, then in the summer of 1918 Westwick Park replaced Haveringland. In the winter of 1918 quarters at Reepham replaced Westwick Park. The division remained in Norfolk until after the Armistice, and was demobilised by April 1919.[14][61]
Interwar[]
The brigade was reformed in 1920 and redesignated as the 76th (Highland) Brigade, RFA, when the TF was reorganised as the Territorial Army (TA) in 1921 (becoming a Field Brigade, RA, in 1924 when the RFA was subsumed into the Royal Artillery). The brigade was once more in 51st (H) Division, with the following organisation:[8][14][64]
76th (Highland) Field Brigade, RA
- HQ at Douglas Street Drill Hall, Dundee
- 301 (The Forfarshire) Field Bty at East Abbey Street, Arbroath
- 302 (The Fifeshire) Field Bty at Drill Hall, Leven
- 303 (The City of Dundee) Field Bty at Dundee
- 304 (The City of Dundee) Field Bty (Howitzers) at Dundee
Field Brigades were termed Field Regiments from 1938 onwards.[14]
World War II[]
Mobilisation[]
The TA was doubled in size following the Munich Crisis of 1938, with existing units splitting to form duplicates before the outbreak of World War II. 76th Field Regiment reorganised as follows:[14][65] [66]
76th (Highland) Field Regiment
- RHQ at Dundee
- 302 (Fife) Field Bty at Leven
- 303 (City of Dundee) Field Bty at Dundee
127th (Highland) Field Regiment
- RHQ at Leven
- 301 (Angus) Field Bty at Arbroath
- 304 (City of Dundee) Field Bty at Dundee
The establishment of a field battery was increased to 12 guns organised into three Troops.[67]
76th (Highland) Field Regiment[]
On the outbreak of war 76th (Highland) Field Rgt mobilised in 51st (H) Division under the command of Lt-Col J.S.C. Sharp, still equipped with its World War I era 18-pounders and 4.5-inch howitzer, though now on pneumatic tyres and towed by gun tractors. On 1 October 1939 it moved to Ewshot and started to train hard, though many equipment problems were reported. It left Aldershot and landed at Le Havre on 31 January to join the new British Expeditionary Force (BEF), deploying at Avelin near Lille. On 5 March the regiment exchanged with a field regiment of 3rd Division, and remained with this Regular Army formation for the rest of the war.[66][67][68][69][70][71]
Battle of France[]

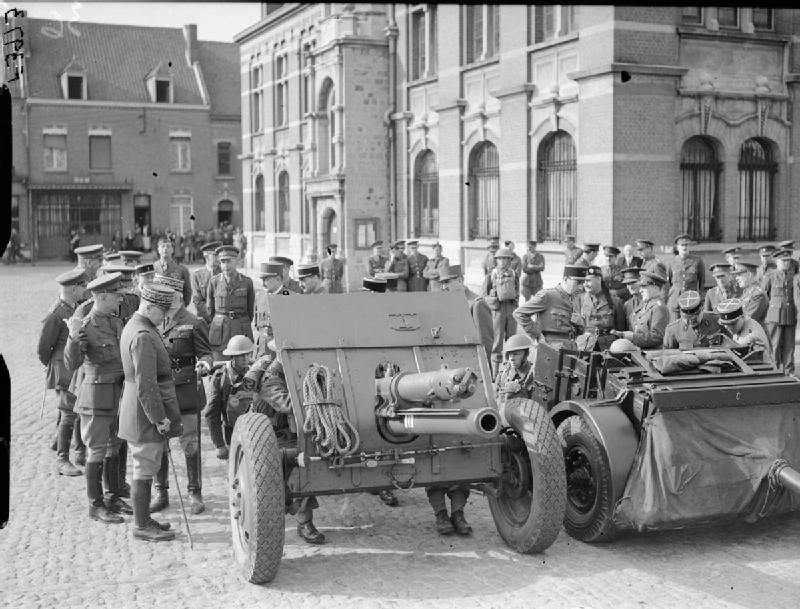
An 18-pounder being inspected in France, April 1940.
The Battle of France began on 10 May with the German invasion of the Low Countries. The BEF responded by executing the pre-arranged Plan D, advancing into Belgium to take up defences along the River Dyle. 76th Field Rgt, now commanded by Lt-Col W.E. Vaudry, left on 12 May for its assigned position at Diegem on the north west outskirts of Brussels, arriving to a great reception from the Belgians. At dawn the following day the regiment deployed at Berthem to cover Louvain, with RHQ at Eegenhoven. The heavily wooded position was difficult to occupy, but 303 Battery with 4.5-inch howitzers straddled the road running east from Berthem, while 302 Bty with its 18-pdrs was south of the main Louvain–Maline road. The Observation Posts (OPs) were with 9th Infantry Brigade on the line of the Dyle Canal. On the afternoon of 14 May the regiment did great damage to German units closing up to the Dyle. At one point the regiment fired 200 rpg in 1.5 hours. The Wehrmacht's Army Group B had been ordered to break through quickly between Louvain and Namur, but the artillery concentrations caused the leading troops to draw back. In the evening they began a series of attacks on 3rd Division's positions. During 15 May the regiment came under air attack, and there were several casualties in RHQ and 302 Bty.[72][73] However, the Panzers of Army Group A had broken through the Ardennes and threatened the BEF's flank, so on 16 May it began to withdraw to the River Escaut. For 76th Field Rgt firing continued throughout the day, with some of the Troops taking up alternate positions at Ste Veronique in the evening, but with B and E Trps still in forward positions. At 17.00 on 17 May the regiment was ordered to pull out and retire to Vondelin, about 13 miles (21 km) west of Brussels. It was a difficult night move along roads packed with refugees and under bombing, but at dawn the regiment deployed in good positions in support of 9th Bde on the River Dendre. After the rearguard (4th Division) passed through, the regiment fired defensive tasks. Its next move, under air attack, was 50 miles (80 km) back to the Escaut Canal line, where it deployed to support 7th Guards Brigade.[72][74][75]
By 22 May the bulk of the BEF was cut off from the south and began to withdraw into a 'pocket' round Dunkirk from which it was preparing to evacuate (Operation Dynamo). On 28 May the regiment was ordered to move as soon as possible to Oostduinkerke on the Belgian coast where there had been an enemy breakthrough. It went into action near Coxyde, putting rifle parties on the canal near Westvleteren. They were ready by the morning, and from 13.00 on 29 May they were engaged in an infantry fight while the guns fired over open sights. That night the 'riflemen' joined the newly-arrived South Lancashires in a counter-attack that restored the situation somewhat. The regimental historian comments that 'undoubtedly these Gunners save d a potentially critical situation by their rapid action'. The regiment remained in action during 30 May, firing all day and receiving many casualties from shelling and bombing. At 15.00 on 31 May Lt-Col Vaudrey was ordered to destroy all equipment and move to the beaches for embarkation that night. The regiment lost further casualties from enemy shellfire while marching along the beach to Bray-Dunes. Other parties got away from La Panne[ in small boats but sustained casualties after they had transferred to the Isle of Wight ferry Gracie Fields when she was sunk 40 minutes after sailing for England.[76][77][78][79][80]
Home Defence[]


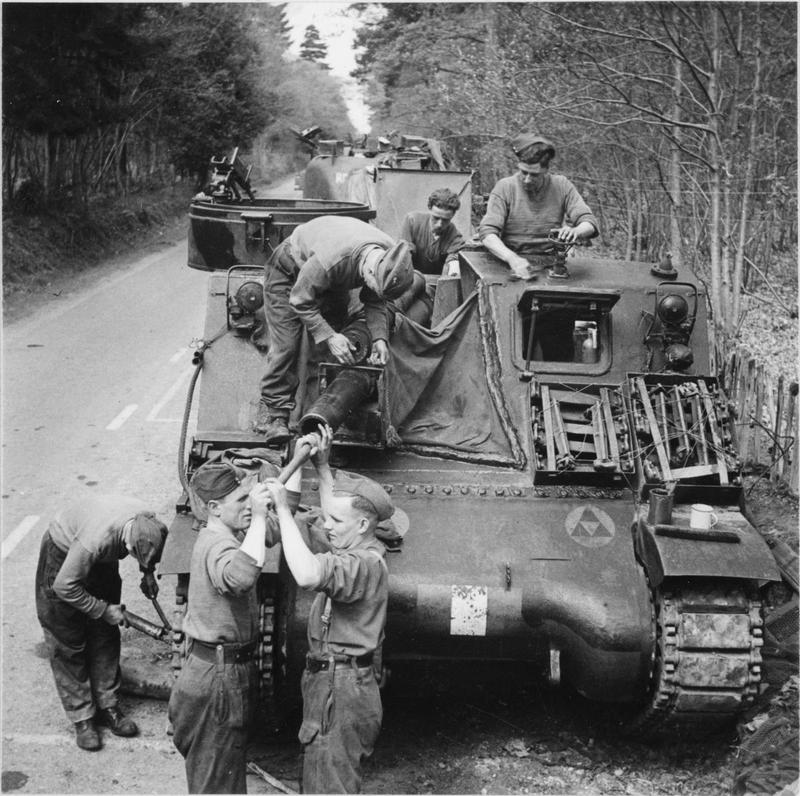
Gunners sponging out an 18/25-pounder Mk V P during exercises in the UK.
The survivors of 76th (H) Fd Rgt concentrated at Glastonbury where it collected eight 18/25-pounder guns and then moved to Chichester for anti-invasion duties in mid-June 1940. Later it deployed with 302 Bty on Cissbury Ring near Worthing and 303 Bty at Steepdown Hill near Lancing College. 3rd Division was then pulled back from the Sussex coast to act as a counter-attack division in case of invasion and on 10 July the regiment went to Winchcomb in Savernake Forest. By the end of the year 76th was at Dorchester.[76][81][82]
Units returned from Dunkirk were progressively brought back up to strength and re-equipped. The establishment of a field regiment from 1941 onwards was three batteries, each of two four-gun troops of 25-pounders with Quad gun tractors. 76th (Highland) Fd Rgt formed 454 Fd Bty as its additional battery.[83][84]

Gunners of 303 Fd Bty of 76th (Highland) Fd Rgt cleaning the gun of their Priest at Emsworth, Hampshire, 29 April 1944.
In 1943, 3rd Division was assigned to 21st Army Group training for the Allied invasion of Normandy (Operation Overlord).[85] The division was chosen to spearhead the assault landings on Sword Beach and was given specialist training and equipment. 76th (H) Field Rgt became a self-propelled (SP) regiment operating US-built M7 Priest SP guns equipped with the 105 mm howitzer, with M4 Sherman tanks as armoured OPs.[71][84][86]
D-Day[]
The Normandy landings were launched on D Day, 6 June 1944. 76th (H) Field Rgt's Priests were aboard Landing craft tanks (LCTs), from which they gave support fire during the run-in to the shore, then landed shortly after the assault troops of 8th Brigade. Of the 18 LCTs taking in 3rd Division's three SP field regiments, six were damaged by enemy fire, five by beach obstacles and three by mines; two of these were total wrecks. There were significant casualties among the SP guns and crews.[70][84][86][87] 3rd Division's advance was slowed by congestion on the beaches and by enemy strongpoints. Artillery support and two attacks were required to overcome the strongpoint codenamed 'Hillman', and the division failed in its bid to take Caen in the first day. The field guns helped to drive off a tank attack by 21st Panzer Division.[88] Over the following days the Germans attempted to drive in the bridgehead over the Orne Canal that had been seized by British airborne troops on D-Day. The most serious attack came on 9 June, when 3rd Division's field guns fired 'devastatingly accurate pre-arranged defensive fire' (DF) tasks across the Orne that broke up the attack.[89]


One of 3rd Division's Priests near Hemanville-sur-Mer, 6 June 1944.[lower-alpha 2]
For the rest of June 3 Division slowly inched forward towards Caen, capturing the Chateau de la Londe after a two-day battle. It then took part in Operation Charnwood to capture Caen, which was proceeded by air and naval bombardment before the full artillery barrage opened at 04.20 on 8 July. The infantry followed the barrage and made good progress, and by the end of the day 3rd Division was pushing along the Orne towards the city centre. The operation was completed the following day.[70][91] For Operation Goodwood the division crossed the Orne and attacked along the left flank of the main armoured thrust. The infantry attacked behind their barrage at 07.45, and it took all day to work through the villages on the left flank. Attempts to advance on the following day failed.[70][92] In early August 3 Division was shifted west to support 11th Armoured Division's thrust towards Mont Pinçon in Operation Bluecoat.[70][93]
Shortly afterwards, 21st Army Group broke out of the Normandy bridgehead and began driving across Northern France and Belgium before pausing at the Albert Canal. 3rd Division played a minor role on the flank of Operation Market Garden (the attempt to seize bridges as far as the Lower Rhine). It then endured the low-level winter fighting of 1944–45.[70]
Rhineland[]
3rd Division was engaged in Operation Veritable, the battle to clear the Reichswald. After a colossal artillery barrage on 8 February, the operation devolved into what XXX Corps', commander, Lt-Gen Sir Brian Horrocks described as 'slogging match'. 3rd Division took Kerverheim on 1 March and Winnekendonk two days later.[70][94][95]
3rd Division then held the line of the Rhine while the rest of XXX Corps pulled back to organise and train for the assault crossing Operation Plunder. On the evening of 23 March all the guns in XXX Corps fired a four-hour programme in support of 51st (H) Division's assault (see below), then switched to support 15th (Scottish) Division's later assault.[70][96][97][98][99]
3rd Division later crossed the Rhine and took part in the advance across North Germany, capturing Lingen and cutting the Bremen–Delmenhorst road en route to the city of Bremen, which fell after five days' stiff fighting on 27 April. The fighting ended on 5 May after the German surrender at Lüneburg Heath.[100][101]
76th (Highland) Field Regiment was placed in suspended animation in 1946.[14]
127th (Highland) Field Regiment[]
127th (Highland) Field Rgt mobilised in 9th (Highland) Division, the 2nd Line duplicate of 51st (H) Division. It remained training in Scottish Command until 7 August 1940 when 9th (H) Division was redesignated as 51st (H) Division to replace the original formation, most of which had been captured at Saint-Valery-en-Caux at the end of the Battle of France.[66][69][102] 127th Field Rgt usually supported the division's 153 Brigade. 491 Field Battery was later formed as its third battery.[103][104] After two more years' training in Scotland, the division sailed for Egypt on 16 June 1942, landing on 12 August.[69]
North Africa[]


A 25-pounder firing in the British night barrage that launched the Second Battle of El Alamein
The division's first action was the Second Battle of El Alamein. it moved up during the preceding nights, occupying gun positions and dumping ammunition, and remaining concealed during daylight. For the first time in the Western Desert Campaign, the British Eighth Army had enough 25-pounders to allow them to be concentrated and switched from one set-piece target to another. Almost every gun was used to neutralise enemy batteries. The bombardment began at 21.40 on 23 October and lasted for 15 minutes; then after 5 minutes silence they opened again on the enemy's forward positions and the infantry began to advance. After a further 7 minutes the guns began firing concentrations at a succession of specific locations. The whole artillery programme lated for 5 hours 30 minutes. 51st (H) Division ran into several centres of resistance and only on the extreme left did it reach its final objective; however, the 'break-in' phase of the battle had started well.[69][105]
On the second night of the battle, 51st (H) Division's guns fired a similar succession of CB tasks, concentrations and then a barrage to support 1st Armoured Division's attack. On the night of 25/26 October 51st (H) Division made progress towards its own objective as the 'dog-fight' phase continued. The 'break-out' phase began on the night of 1/2 November with Operation Supercharge, preceded by another powerful barrage. In the early hours of 4 November 51st (H) Division broke through to the Rahman Track, and the Axis forces began to retreat.[106]
51st (H) Division then took part in the pursuit to El Agheila and Tripoli in January 1943. 491 Field Bty claimed that four of its guns were the first Eighth Army guns in the deserted city, having used all of the regiment's available petrol to get there. The regiment took part in the victory parade in the city. By 25 February it was past Medenine in Tunisia and facing the Mareth Line.[104][107][108] The Axis force made a spoiling attack on 6 March (the Battle of Medenine) but there was plenty of warning and the advance was easily repulsed. 51st (H) Division had already moved most of its artillery south in waiting for the attack, leaving three Troops to move and fire between various positions to simulate the whole divisional artillery remaining in its old positions. 127th Fd Rgt fired one full regimental task against a group of Axis infantry but was otherwise hardly engaged. Thereafter it was on harassing fire (HF) tasks.[69][109][110][111]


25-pounder gun in action at night during the assault on the Mareth Line.
The Battle of the Mareth Line began on the night of 16/17 March when 51st (H) Division took the outpost line against negligible opposition, though the Forward Observation Officers (FOOs) of 127th Fd Rgt going forward with the sappers came under heavy shellfire. The main attack followed on 20/21 March with another massive night barrage, 127th Fd Rgt's guns firing an average of 430 rounds each. But little progress was made over the Wadi Zigzaou for the first two days and the line held until it was outflanked by other forces in the south. The Axis defence collapsed on 28 March and the following day 51st (H) Division was on its way to Gabès.[69][112][113][114]
The next Axis defence line was along Wadi Akarit. The barrage for 51st (H) Division's assault began at 04.15 on 6 April, followed by four other barrages over five hours, one involving a difficult change of direction, and the division's attack, in the words of the Official History, 'went like clockwork'. Axis troops then began counter-attacks and the Highlanders had to fight hard to hold their gains. The pursuit was resumed the following day, through Sfax. By 22 April the regiment was in action near Enfidaville, with the OPs in the hills. This lasted until the fall of Tunis and the end of the campaign on 15 May.[69][104][115][116]
Sicily[]
127th Field Rgt then rested at Bougie in Algeria and trained for the Allied landings in Sicily (Operation Husky). The regiment's advanced party sailed from Sfax harbour on 8 July and landed from the second Landing Ship, Tank, near Pachino four hours after the assault infantry on 10 July. The division was moving forward by nightfall, with the objectives of Palazzolo Acreide and Vizzini, which it reached by the night of 14/15 July. 127th Field Rgt described a 'fierce fight' at Vizzini and suffered some casualties, but the division continued with scarcely a pause towards the Dittaino river.[69][104][117][118]
On 17 July the division deployed to cross the Dittaino and attempt to capture Paternò. It achieved a bridgehead but further advance was checked, so on the night of 20/21 July the division sent a composite force of infantry and armour against the main enemy defences at Gerbini Airfield, supported by 127th Fd Rgt and other artillery. Although the attack succeeded, fierce counter-attacks by the Hermann Goring Division drove the Highlanders out the following morning, after which 51st (H) Division was put onto the defensive. Further counter-attacks and heavy shelling on 23/24 July led to more casualties for the regiment.[119][120]
51st (H) Division's artillery joined in XXX Corps' artillery preparation for operations against Adrano (the battles round Etna). This began at 23.50 on 31 July with 220 rpg while 51st (H) took bridgeheads over the Dittaino. Paternò fell on 4 August, Biancavilla on 6 August, and another 250 rpg programme was fired from midnight on 6/7 August. The division began a 50 miles (80 km) 'sidestep' on 12 August and the guns came into action north of Zafferana the following night. By now the Axis forces were evacuating Sicily, which was completed on 17 August.[69][121][122]
51st (H) Division did not take part in the subsequent Italian Campaign, having been earmarked for Operation Overlord. However, its guns did assist in the massive bombardment covering the assault crossing of the Strait of Messina on 3 September (Operation Baytown). One gun of E Troop, 127th Fd Rgt, fired a test round on the evening of 2 September, claiming to be the first British field gun to drop a round on mainland Italy during the war, and OP parties did cross with the assault troops to direct the fire.[104][123][124]
The regiment embarked aboard the SS Argentina bound for the UK on 9 November and disembarked at Liverpool on 27 November. It then went into training at Beaconsfield and Long Melford.[69][104][125]
Normandy[]
51st (Highland) Division was in the first follow-up wave of formations in Overlord. On 2 June 1944 it embarked on Liberty ships at East India Docks, London, bound for Normandy and began landing on 7 June (D + 1). 127th Field Rgt landed the following day and went straight into action near Blainville-sur-Orne on the Caen Canal supporting the Orne bridgehead. This position was heavily shelled and the regiment pulled back to Bénouville on 11 June. It was mainly engaged in Defensive Fire (DF) tasks: several German counter-attacks were broken up by shellfire, but the regiment's own casualties mounted steadily.[69][126][127]
On 23 June the division expanded the bridgehead by a night attack at Ste Honorine la Chardonnerette. The guns had remained silent before the attack to ensure surprise, after which the enemy's successive attempts to recover the village were stopped by artillery fire.[128] The division supported 3rd Division's attack on the flank of Operation Goodwood (see above).[69][129] On 8 August 51st (H) Division spearheaded II Canadian Corps' attack towards Falaise (Operation Totalize), preceded by a massive barrage.[lower-alpha 3] The attack began before dawn and by first light the break-in was going well, with a number of villages taken. After a second artillery preparation the 4th Canadian and 1st Polish Armoured Divisions passed through to continue the advance.[69][131] The Canadians renewed the advance to Falaise on 14 August in Operation Tractable, with 51st (H) Division attacking towards the Liason Valley on the left flank. RHQ of 127th Fd Rgt lost 15 vehicles to misdirected Royal Air Force bombs. By 21 August the Falaise Pocket had been closed and the division was advancing eastwards towards Lisieux.[132][133]
51st (H) Division then moved up to and across the Seine for the assault on Le Havre (Operation Astonia). This was a major operation, with the regiment allotted 500 rpg, alongside support from medium guns and RAF bombers, which cowed the opposition. It was followed by a similar assault to take Boulogne (Operation Wellhit).[104][134][135][136] The regiment next made a long move to the Antwerp area at the end of September, then spent three weeks in the line at Sint-Oedenrode.[137][138]
Low Countries[]

25-pounder firing during the advance on 's-Hertogenbosch on 23 October 1944.
The division's next offensive action was west of 's-Hertogenbosch on the night of 23 October, when 300 guns were used and the infantry took all their objectives, with follow-up advances over succeeding days through Loon op Zand and across the Afwaterings Canal towards the Maas by early November.[139][140][141] On 14 November the division carried out an assault crossing of the Willems Canal near Weert accompanied by another heavy artillery barrage, then moved on to the Zig Canal and crossed that on 17 November with much less preparation.[142][143][144]
51st (H) Division was then moved to hold 'The Island', the wet low-lying country between Nijmegen and Arnhem that had been captured during Operation Market Garden (see above). In mid-December the division was pulled out of the line for rest.[145][146][147] On 21 December 127th Fd Rgt was suddenly moved south as part of the response to the German breakthrough in the Ardennes (the Battle of the Bulge). It was attached to XII Corps near Sittard covering the approaches to Antwerp, and then south of Liège on 25 December. Reports of German troops disguised in American uniforms led to heightened security: without his identity card the regiment's CO, Lt-Col Maurice Burnett, was required by US troops to take down his trousers to check that he was not wearing German underpants. On 2 January the regiment moved to support 153 Bde and 53rd (Welsh) Division in counter-attacks. 153 Brigade attacked southwards from Marche-en-Famenne on 9 January, and then 51st (H) Division fought its way into the flank of the 'Bulge' in winter conditions.[148][149][150]
Rhineland[]
Like 3rd Division, 51st (H) Division was engaged in the fighting in the Reichswald (Operation Veritable, see above). It began at 05.00 on 8 February with a huge artillery preparation, after which 153 Bde attacked at 13.00 and were on their objectives by 23.00 that night. Over the next two days the regiment fired smoke and HE to help the brigade continue the advance through the forest. Captain Swaab acting as FOO brought down fire on Germans retreating along the Maas bank from 1st Battalion Gordon Highlanders. The slow advance continued through Gennep on 11 February, then German counter-attacks were driven off by DF fire. The final phase of the operation for 51st (H) Division began on 18 February against Goch, which was successfully taken after stiff fighting.[69][95][151][152][153]
The division took a leading part in the Rhine crossing (Operation Plunder, see above). OP parties from the regiment were among the first troops across the river on the night of 23/24 March, while the guns fired throughout the night just 600 yards from the river and under frequent return fire. The division fought its way into Rees, and 127th Fd Rgt's guns were brought over the river on 26 March, firing in support of 154 Bde and 43rd (Wessex) Division which had also crossed. The division then continued through Isselburg and Anholt.[69][96][97][98][99][104][154][155]
After a rest, the regiment moved forward on 5 April as part of 153 Brigade Group forming the divisional spearhead, and reached the Dortmund–Ems Canal on 8 April. After a pause at the canal, the division advanced rapidly towards Bremen against delaying actions. It reached Delmenhorst on 20 April and closed in on the centre of Bremen. The regiment was still under fire on 3 May, but the German surrender at Lüneburg Heath ended the fighting the next day.[156][157][158][159] The regiment began occupation duties at Bevern, Lower Saxony, moving to Verden in June, and handed in its guns at the end of July.[160]
127th (Highland) Field Regiment was placed in suspended animation in 1946 and disbanded in 1947.[65][161]
Postwar[]
When the TA was reconstituted in 1947, the regiment reformed as 276th (Highland) Field Regiment, no longer in 51st (Highland) Division, but now in 84 (Field) Army Group Royal Artillery until that formation was disbanded in 1950.[14][162][163][164] In 1955, on the disbandment of Anti-Aircraft Command, the regiment absorbed 586 (Highland) Light Anti-Aircraft/Searchlight Rgt.[14][164][165]
On the reduction of the TA in 1961, the regiment amalgamated with 275th (Highland) Field Rgt, HQ 51st Infantry Division Counter-Battery Staff Trp and 862 Locating Bty (successor to the North Scottish RGA, see above), to form 400th (Highland) (Aberdeen/Angus) Field Regiment with the following organisation:[14][164][166][167][168]
- RHQ at Dundee – from 276 (H) Fd Rgt
- P (City of Aberdeen) Bty – from 275 (H) Fd Rgt
- Q (Arbroath/Montrose) Bty – from 862 Bty
- R (City of Dundee) Bty – from 276 (H) Fd Rgt
while P Bty of 276th Fd Rgt was merged into 277 (Fife) Field Squadron, Royal Engineers (RE).[164][169]
In 1967 the TA was reduced further into the Territorial and Army Volunteer Reserve and 400th Rgt amalgamated with Q (Orkney & Zetland) Bty from 540th (Lovat Scouts) Light Air Defence Rgt as The Highland Regiment, RA:[14]
- RHQ at Dundee – from 400 (H) Rgt
- Q (Arbroath/Montrose) Bty – from 400 (H) Rgt
- R (City of Dundee) Bty – from 400 (H) Rgt
- Orkney & Zetland (Lovat Scouts) Bty – from 540 (LS) LAD Rgt
However, in 1969 the Highland Regiment was reduced to a cadre sponsored by 117 (Highland) Field Park Squadron, RE, and then disbanded in 1975.[14][164] In 1986 105 (Scottish) Air Defence Regiment was designated as its successor unit.[14]
Uniforms[]
The original uniform of the 1st Forfarshire AVC at Arbroath was a blue hooked tunic and trousers, the latter carrying a broad red stripe and the former with scarlet collar and cuffs, black braid round the front and black cord Austrian knots on the sleeves. White belts and a Busby completed the uniform. The 3rd AVC at Broughty Ferry wore a buttoned blue tunic with red piping and black Austrian knot; the headgear was a blue Shako with red band and white feather plume, while the belts were black. The original 4th AVC at Broughty Ferry wore the same uniform as the 1st; the renumbered 4th AVC at Dundee wore the same uniform as the 3rd, but the shako had an olive green band and red piping. From 1878 to 1908 the whole unit wore a standard Royal Artillery helmet.[6][7][170]
Commanding officers[]
The commanding officers of the unit have included:
- Lt-Col James E. Erskine, 14 December 1860[6][8]
- Lt-Col Frank Stewart-Sandeman, VD, 20 July 1870 (Lt-Col of the 4th AVC 28 July 1868)[6][8]
- Lt-Col Thomas Couper, VD, 3 December 1898[6][8]
- Lt-Col William G. Thompson, VD, 3 April 1901[6][8]
- Lt-Col Theodore G. Luis, VD, 4 February 1903[6][8]
- Lt-Col James Lindsay Henderson, 31 March 1906[6][8]
- Lt-Col D. Laing, TD, 6 January 1912[8]
- Brevet Colonel J. McPherson, DSO, TD, 16 February 1920[8]
- Brevet Colonel J.L. Carmichael, 16 February 1929[8]
- Lt-Col J.S.C. Sharp, 20 May 1938[8][68]
- Lt-Col W.E. Vaudrey (76th Fd Rgt) 1940[68]
- Lt-Col C.H.D. Springfeld (127th Fd Rgt)[104]
- Lt-Col H. St M. Perry (127th Fd Rgt)[104]
- Lt-Col G.H. Barker, OBE, MC (127th Fd Rgt)[104]
- Lt-Col Maurice 'Bubbly' Burnett, DSO (127th Fd Rgt) Normandy[103][104][171]
- Lt-Col R.S. Burton, MC (127th Fd Rgt)[104]
Honorary Colonels[]
The following served as Honorary Colonel of the unit:
- James E. Erskine (first CO), appointed 29 July 1870[6][8]
- George James, 2nd Lord Playfair, (retired Colonel, RA, and Hon Brigadier-General), appointed 12 December 1903[6][8]
- Brevet Colonel J. McPherson, DSO, TD (former CO), appointed 12 December 1929[8]
- Brevet Colonel J.L. Carmichael, TD (former CO), appointed 16 February 1936[8]
Prominent members[]
Other prominent members of the regiment included:
- Maj James Owen 'Jock' Cochrane, MC, son of Rear-Admiral Sir Edward Owen Cochrane, battery commander in 127th Fd Rgt, killed by a mine 13 February 1943.[172][173]
- Capt Jack Swaab, MC, served with 127th Fd Rgt 1943–45; his diary for that period was published in 2005.[174]
Footnotes[]
- ↑ Not to be confused with the Forfar and Kincardine Artillery Militia of the same period.
- ↑ The figure '43' on the mudguard on the partially obscured vehicle on right indicates that this is 33rd Fd Rgt; 76th (Highland) Fd Rgt would have carried at '44'[90]
- ↑ The infantry of 51st (H) Division rode in Priests stripped of their 105 mm gun (known as 'defrocked Priests') and used as armoured personnel carriers. By now the field regiments such as 76th had reverted to using normal 25-pounder guns.[130]
Notes[]
- ↑ Beckett.
- ↑ Grierson, pp. 1–12.
- ↑ Litchfield & Westlake, pp. 1–4.
- ↑ Spiers, pp. 163–8.
- ↑ Beckett, Appendix VIII.
- ↑ 6.00 6.01 6.02 6.03 6.04 6.05 6.06 6.07 6.08 6.09 6.10 6.11 6.12 6.13 Grierson, pp. 135–7.
- ↑ 7.0 7.1 7.2 7.3 7.4 7.5 7.6 Litchfield & Westlake, pp. 77–80.
- ↑ 8.00 8.01 8.02 8.03 8.04 8.05 8.06 8.07 8.08 8.09 8.10 8.11 8.12 8.13 8.14 8.15 8.16 8.17 8.18 8.19 8.20 Army List, various dates.
- ↑ Beckett, pp. 178–9.
- ↑ 10.0 10.1 Litchfield and Westlake, pp. 3–6.
- ↑ Dunlop, Chapter 14.
- ↑ Spiers, Chapter 10.
- ↑ London Gazette 20 March 1908.
- ↑ 14.00 14.01 14.02 14.03 14.04 14.05 14.06 14.07 14.08 14.09 14.10 14.11 14.12 14.13 14.14 14.15 Litchfield, pp. 273–5.
- ↑ Litchfield & Westlake, pp. 21, 72, 77.
- ↑ Angus at Drill Hall Project.
- ↑ 17.0 17.1 17.2 17.3 Angus at Great War Centenary Drill Halls.
- ↑ Fife at Great War Centenary Drill Halls.
- ↑ "Conrad, British Army, 1914.". http://home.comcast.net/~markconrad/BRIT14.html.
- ↑ 20.00 20.01 20.02 20.03 20.04 20.05 20.06 20.07 20.08 20.09 20.10 20.11 20.12 20.13 20.14 20.15 20.16 Becke, Pt 2a, pp. 101–7.
- ↑ 21.0 21.1 21.2 21.3 21.4 21.5 51 (H) Division at Long, Long Trail.
- ↑ 22.0 22.1 22.2 22.3 22.4 22.5 22.6 22.7 "51 (H) Division at Regimental Warpath.". http://warpath.orbat.com/divs/51_div.htm.
- ↑ 23.0 23.1 23.2 23.3 51 Divisional RA at Long, Long Trail.
- ↑ Becke, Pt 2b, p. 6.
- ↑ Festubert at Long, Long Trail.
- ↑ Becke, Pt 3b, pp. 4–7.
- ↑ Miles, p. 136.
- ↑ Miles, p. 195.
- ↑ Farndale, Western Front, pp. 154–6.
- ↑ Cave, pp. 75–98.
- ↑ Falls 1917, Vol I, pp. 234–6, 256–7.
- ↑ Farndale, Western Front, pp. 169–74, Map 23.
- ↑ Falls, 1917, Vol I, pp. 382, 394–5.
- ↑ Farndale, Western Front, p. 178.
- ↑ Falls, 1917, Vol I, pp. 512–3.
- ↑ Farndale, Western Front, pp. 197–204, Map 26.
- ↑ Edmonds, 1917, Vol II, pp. 150-1, 158–60, 163, 174, 185.
- ↑ Farndale, Western Front, pp. 205–8, Map 28.
- ↑ Edmonds, 1917, Vol II, pp. 268–70, 276.
- ↑ Cooper, pp. 101–9, 125–9, 139, 141–7, 151.
- ↑ Miles, 1917, Vol III, pp. 56–8, 82–4, 108–11.
- ↑ Farndale, Western Front, pp. 216–30, Map 32.
- ↑ Farndale, Western Front, p. 255, Map 33.
- ↑ Blaxland, p. 48.
- ↑ Edmonds, 1918, Vol I, pp. 222–4, 245.
- ↑ Farndale, Western Front, p. 265.
- ↑ Edmonds, 1918, Vol I, pp. 308–11.
- ↑ Farndale, Western Front, p. 268.
- ↑ Edmonds, 1918, Vol I, pp. 380–4, 434–9, 484–7.
- ↑ Farndale, Western Front, p. 271.
- ↑ Blaxland, pp. 119–20.
- ↑ Edmonds, 1918, Vol II, pp. 148, 160, 177, 189, 254.
- ↑ Blaxland, p. 153.
- ↑ Edmonds, 1918, Vol III, pp. 225, 235, 245–9, 254–7, 263, 272–9.
- ↑ Farndale, Western Front, p. 285.
- ↑ Edmonds, 1918, Vol IV, pp. 5, 298, 305–9, 328–9, 338, 347.
- ↑ Edmonds & Maxwell-Hyslop, pp. 393–4.
- ↑ Farndale, Western Front, pp. 313–6.
- ↑ Edmonds & Maxwell-Hyslop, 1918, Vol V, pp. 396, 455, 458.
- ↑ Farndale, Western Front, p. 317.
- ↑ 61.0 61.1 61.2 61.3 Becke, Pt 2b, pp. 55–9.
- ↑ 62.0 62.1 64 (2nd H) Division at Long, Long Trail.
- ↑ Litchfield, p. 304.
- ↑ Titles and Designations, 1927.
- ↑ 65.0 65.1 Litchfield, p. 283.
- ↑ 66.0 66.1 66.2 Scottish Command 3 September 1939 at Patriot Files.
- ↑ 67.0 67.1 Ellis France and Flanders, Appendix I.
- ↑ 68.0 68.1 68.2 Farndale, Years of Defeat, pp. 4, 10, Annex A.
- ↑ 69.00 69.01 69.02 69.03 69.04 69.05 69.06 69.07 69.08 69.09 69.10 69.11 69.12 69.13 69.14 Joslen, p. 83.
- ↑ 70.0 70.1 70.2 70.3 70.4 70.5 70.6 70.7 Joslen, p. 43.
- ↑ 71.0 71.1 76 Fd Rgt at RA 1939–45.
- ↑ 72.0 72.1 Farndale, Years of Defeat, pp. 37–8, 47–8, Maps 7 & 8.
- ↑ Ellis, France and Flanders, Chapter III.
- ↑ Ellis, France and Flanders, Chapter IV.
- ↑ Farndale, Years of Defeat, pp. 47–8, Map 9.
- ↑ 76.0 76.1 Farndale, Years of Defeat, pp. 81–2, Map 18.
- ↑ Ellis, France and Flanders, Chapter VIII.
- ↑ Ellis, France and Flanders, Chapter IX.
- ↑ Ellis, France and Flanders, Chapter XII.
- ↑ Ellis, France and Flanders, Chapter XV.
- ↑ Farndale, Years of Defeat, p. 102.
- ↑ Horrocks, p. 96.
- ↑ Farndale, p. 99.
- ↑ 84.0 84.1 84.2 Joslen, p. 584.
- ↑ Order of Battle of the Forces in the United Kingdom, Part 2: 21 Army Group, 24 July 1943, with amendments, The National Archives (TNA), Kew, file WO 212/238.
- ↑ 86.0 86.1 Ellis, Normandy, pp. 184–7.
- ↑ Ellis, Normandy, pp. 172–3.
- ↑ Ellis, Normandy, pp. 201–6.
- ↑ Ellis, Normandy, p. 227.
- ↑ 3rd Division Tac Signs at RA 1939–45.
- ↑ Ellis, Normandy, pp. 286, 311–6.
- ↑ Ellis, Normandy, pp. 333, 336, 339–40, 343, 346.
- ↑ Ellis, Normandy, pp. 402, 410.
- ↑ Ellis, Germany, p. 273.
- ↑ 95.0 95.1 Horrocks, pp. 248–55.
- ↑ 96.0 96.1 Ellis, Germany, pp. 288–92.
- ↑ 97.0 97.1 Horrocks, p. 257.
- ↑ 98.0 98.1 Lindsay, p. 218.
- ↑ 99.0 99.1 Saunders, pp. 46, 66–7.
- ↑ Ellis, Germany, pp. 305, 307, 309, 311, 339–40.
- ↑ Horrocks, pp. 261–7.
- ↑ Joslen, p. 55.
- ↑ 103.0 103.1 Lindsay, p. 49.
- ↑ 104.00 104.01 104.02 104.03 104.04 104.05 104.06 104.07 104.08 104.09 104.10 104.11 104.12 'From the Nile to the Weser at 51st Highland Division website.
- ↑ Playfair, Vol IV, pp. 31, 35–8.
- ↑ Playfair, Vol IV, pp. 45, 48, 56–7, 66, 74–5.
- ↑ Playfair, Vol IV, pp. 107, 223–4, 232, 234–6, 316, 320.
- ↑ Swaab, pp. 15–41.
- ↑ Horrocks, p. 147.
- ↑ Playfair, Vol IV, pp. 324–6.
- ↑ Swaab, pp. 41–51.
- ↑ Horrocks, pp. 148–55.
- ↑ Playfair, Vol IV, pp. 335, 338–41, 353.
- ↑ Swaab, pp. 51–8.
- ↑ Playfair, Vol IV, pp. 364–7, 370–2, 377.
- ↑ Swaab, pp. 59–71.
- ↑ Molony, Vol V, pp. 61, 78, 82, 93.
- ↑ Swaab, pp. 71–9.
- ↑ Molony, Vol V, pp. 115–7.
- ↑ Swaab, pp. 79–83.
- ↑ Molony, Vol V, pp. 150–2, 158–9, 179.
- ↑ Swaab, pp. 84–90.
- ↑ Molony, Vol V, pp. 239, 455.
- ↑ Swaab, p. 94.
- ↑ Swaab, pp. 117–23.
- ↑ Ellis, Normandy, pp. 79, 247–50.
- ↑ Swaab, pp. 130–43.
- ↑ Ellis, Normandy, pp. 274–5.
- ↑ Ellis, Normandy, p. 343.
- ↑ Ellis, Normandy, p. 420.
- ↑ Ellis, Normandy, pp. 419–24.
- ↑ Ellis, Normandy, pp. 430–1, 449.
- ↑ Swaab, pp. 153–8.
- ↑ Ellis, Germany, pp. 14–5.
- ↑ Lindsay, pp. 76–81.
- ↑ Swaab, pp. 160–72.
- ↑ Lindsay, pp. 82–95.
- ↑ Swaab, pp. 176–83.
- ↑ Ellis, Germany, pp. 126–7.
- ↑ Lindsay, pp. 95–110.
- ↑ Swaab, pp. 184–9.
- ↑ Ellis, Germany, p. 160.
- ↑ Lindsay, pp. 116–24.
- ↑ Swaab, pp. 191–2.
- ↑ Ellis, Germany, p. 237.
- ↑ Lindsay, pp. 124–37.
- ↑ Swaab, pp. 194–8.
- ↑ Horrocks, pp. 238–41.
- ↑ Lindsay, pp. 138, 141, 150–64.
- ↑ Swaab, pp. 201–08.
- ↑ Ellis, Germany, pp. 258–67.
- ↑ Lindsay, pp. 173–208.
- ↑ Swaab, pp. 216–21.
- ↑ Saunders, pp. 195–218.
- ↑ Swaab, pp. 237–42.
- ↑ Ellis, Germany, pp. 307, 311–2, 316, 339–40.
- ↑ Horrocks, pp. 262–6.
- ↑ Lindsay, pp. 237–54.
- ↑ Swaab, pp. 243–54.
- ↑ Swaab, pp. 253–76.
- ↑ Farndale, Years of Defeat, Annex M.
- ↑ Litchfield, Appendix 5.
- ↑ Watson, TA 1947.
- ↑ 164.0 164.1 164.2 164.3 164.4 266–288 Rgts RA at British Army 1945 on.
- ↑ 564–591 Rgts RA at British Army 1945 on.
- ↑ Litchfield, p. 270.
- ↑ 372–413 Rgts RA at British Army 1945 on.
- ↑ 850–70 Btys RA at British Army 1945 on.
- ↑ 256–300 Sqns RE at British Army 1945 on.
- ↑ Grierson, Plate III.
- ↑ Swaab, p. 235.
- ↑ Burke: Dundonald'.
- ↑ Swaab, pp. 34–5.
- ↑ Swaab.
References[]
- Maj A.F. Becke,History of the Great War: Order of Battle of Divisions, Part 2a: The Territorial Force Mounted Divisions and the 1st-Line Territorial Force Divisions (42–56), London: HM Stationery Office, 1935/Uckfield: Naval & Military Press, 2007, ISBN 1-847347-39-8.
- Maj A.F. Becke,History of the Great War: Order of Battle of Divisions, Part 2b: The 2nd-Line Territorial Force Divisions (57th–69th), with the Home-Service Divisions (71st–73rd) and 74th and 75th Divisions, London: HM Stationery Office, 1937/Uckfield: Naval & Military Press, 2007, ISBN 1-847347-39-8.
- Ian F.W. Beckett, Riflemen Form: A Study of the Rifle Volunteer Movement 1859–1908, Aldershot: Ogilby Trusts, 1982, ISBN 0 85936 271 X.
- Gregory Blaxland, Amiens: 1918, London: Frederick Muller, 1968/Star, 1981, ISBN 0-352-30833-8.
- Burke's Peerage, Baronetage and Knightage, 100th Edn, London, 1953.
- Nigel Cave, Battleground Europe: Somme: Beaumont Hamel, Newfoundland Park, Barnsley: Leo Cooper, 1994, ISBN 978-0-85052-648-6.
- Bryan Cooper, The Ironclads of Cambrai, London: Souvenir Press, 1967/Pan Books, 1970, ISBN 0-330-02579-1.
- Col John K. Dunlop, The Development of the British Army 1899–1914, London: Methuen, 1938.
- Brig-Gen Sir James E. Edmonds, History of the Great War: Military Operations, France and Belgium 1917, Vol II, Messines and Third Ypres (Passchendaele), London: HM Stationery Office, 1948//Uckfield: Imperial War Museum and Naval and Military Press, 2009, ISBN 978-1-845747-23-7.
- Brig-Gen Sir James E. Edmonds, History of the Great War: Military Operations, France and Belgium 1918, Vol I, The German March Offensive and its Preliminaries, London: Macmillan, 1935/Imperial War Museum and Battery Press, 1995, ISBN 0-89839-219-5.
- Brig-Gen Sir James E. Edmonds, History of the Great War: Military Operations, France and Belgium 1918, Vol II, March–April: Continuation of the German Offensives, London: Macmillan, 1937/Imperial War Museum and Battery Press, 1995, ISBN 1-87042394-1.
- Brig-Gen Sir James E. Edmonds, History of the Great War: Military Operations, France and Belgium 1918, Vol III, May–July: The German Diversion Offensives and the First Allied Counter-Offensive, London: Macmillan, 1939/Imperial War Museum and Battery Press, 1994, ISBN 0-89839-211-X.
- Brig-Gen Sir James E. Edmonds & Lt-Col R. Maxwell-Hyslop, History of the Great War: Military Operations, France and Belgium 1918, Vol V, 26th September–11th November, The Advance to Victory, London: HM Stationery Office, 1947/Imperial War Museum and Battery Press, 1993, ISBN 1-870423-06-2.
- Major L.F. Ellis, History of the Second World War, United Kingdom Military Series: The War in France and Flanders 1939–1940, London: HM Stationery Office, 1954/Uckfield, Naval & Military Press, 2004.
- Major L.F. Ellis, History of the Second World War, United Kingdom Military Series: Victory in the West, Vol I: The Battle of Normandy, London: HM Stationery Office, 1962/Uckfield: Naval & Military, 2004, ISBN 1-845740-58-0.
- Major L.F. Ellis, History of the Second World War, United Kingdom Military Series: Victory in the West, Vol II: The Defeat of Germany, London: HM Stationery Office, 1968/Uckfield: Naval & Military, 2004, ISBN 1-845740-59-9.
- Capt Cyril Falls, History of the Great War: Military Operations, France and Belgium 1917, Vol I, The German Retreat to the Hindenburg Line and the Battle of Arras, London: Macmillan, 1940/London: Imperial War Museum & Battery Press/Uckfield: Naval and Military Press, 2009, ISBN 978-1-84574722-0.
- Gen Sir Martin Farndale, History of the Royal Regiment of Artillery: Western Front 1914–18, Woolwich: Royal Artillery Institution, 1986, ISBN 1-870114-00-0.
- Gen Sir Martin Farndale, History of the Royal Regiment of Artillery: The Years of Defeat: Europe and North Africa, 1939–1941, Woolwich: Royal Artillery Institution, 1988/London: Brasseys, 1996, ISBN 1-85753-080-2.
- Maj-Gen James Grierson, Records of the Scottish Volunteer Force 1859–1908, Edinburgh: Blackwood, 1909.
- Lt-Gen Sir Brian Horrocks, A Full Life, London: Collins, 1960.
- Lt-Col H.F. Joslen, Orders of Battle, United Kingdom and Colonial Formations and Units in the Second World War, 1939–1945, London: HM Stationery Office, 1960/Uckfield: Naval & Military Press, 2003, ISBN 1-843424-74-6.
- Lt-Col Martin Lindsay, "So Few Got Through", London: Collins, 1946/Arrow Books (pbk; nd)/Leo Cooper, 2000, ISBN 0850527546.
- Norman E.H. Litchfield, The Territorial Artillery 1908–1988 (Their Lineage, Uniforms and Badges), Nottingham: Sherwood Press, 1992, ISBN 0-9508205-2-0.
- Norman Litchfield & Ray Westlake, The Volunteer Artillery 1859–1908 (Their Lineage, Uniforms and Badges), Nottingham: Sherwood Press, 1982, ISBN 0-9508205-0-4.
- Capt Wilfred Miles, History of the Great War: Military Operations, France and Belgium 1916, Vol II, 2nd July 1916 to the End of the Battles of the Somme, London: Macmillan, 1938/Imperial War Museum & Battery Press, 1992, ISBN 0-89839-169-5.
- Capt Wilfred Miles, History of the Great War: Military Operations, France and Belgium 1917, Vol III, The Battle of Cambrai, London: HM Stationery Office, 1948/Uckfield: Naval and Military Press, 2009, ISBN 978-1-84574724-4.
- Maj-Gen I.S.O. Playfair & Brig C.J.C. Molony, History of the Second World War, United Kingdom Military Series: The Mediterranean and Middle East, Vol IV: The Destruction of the Axis forces in Africa, London: HMSO, 1966/Uckfield, Naval & Military Press, 2004, ISBN 1-845740-68-8
- Brig C.J.C. Molony,History of the Second World War, United Kingdom Military Series: The Mediterranean and Middle East, Vol V: The Campaign in Sicily 1943 and the Campaign in Italy 3rd September 1943 to 31st March 1944, London: HMSO, 1973/Uckfield, Naval & Military Press, 2004, ISBN 1-845740-69-6.
- Tim Saunders, Operation Plunder: The British and Canadian Rhine Crossing, Barnsley: Pen & Sword Books, 2006, ISBN 1-84415-221-9.
- Edward M. Spiers, The Army and Society 1815–1914, London: Longmans, 1980, ISBN 0-582-48565-7.
- Jack Swaab, Field of Fire: Diary of a Gunner Officer, Stroud: Sutton, 2005, ISBN 0-7509-4275-4.
- War Office, Titles and Designations of Formations and Units of the Territorial Army, London: War Office, 7 November 1927 (RA sections also summarised in Litchfield, Appendix IV).
External sources[]
- Mark Conrad, The British Army, 1914 (archive site)
- British Army units from 1945 on
- Great War Centenary Drill Halls.
- 51st Highland Division website and online museum
- The Long, Long Trail
- Orders of Battle at Patriot Files
- The Regimental Warpath 1914–1918 (archive site)
- Graham Watson, The Territorial Army 1947
The original article can be found at 1st Forfarshire Artillery Volunteers and the edit history here.