| 1st Devonshire Artillery Volunteers IV Wessex Brigade, RFA 51st (Devon) LAA Regiment, RA 55th (Devon) LAA Regiment, RA 256th (Devon) LAA Regiment, RA | |
|---|---|
|
Royal Artillery cap badge | |
| Active | 1860–1961 |
| Country |
|
| Branch |
|
| Role |
Garrison Artillery Field Artillery Air Defence Artillery |
| Size |
10 Batteries (RGA) 2 Brigades (RFA) 2 Regiments (LAA) |
| Garrison/HQ | Exeter |
| Engagements |
3rd Afghan War Norwegian campaign Dunkirk evacuation Battle of Britain Tunisian campaign Italian campaign Burma campaign |
| Commanders | |
| Notable commanders | Lawrence Palk, 1st Baron Haldon |
The 1st Devonshire Artillery Volunteers and its successor units served in the British Army's Reserve Forces from 1859 to 1961. During World War I it carried out garrison duty in British India but went on to see active service in the Third Anglo-Afghan War. Converting to an air defence role before World War II its units participated in the Norwegian campaign and the Dunkirk evacuation, the Battle of Britain and then the campaigns in North Africa, Italy, and Burma
Volunteer Force[]
The Volunteer Force came into existence in 1859 as a result of an invasion scare and the consequent enthusiasm for joining local Rifle, Artillery and Engineer Volunteer Corps.[1] By August 1860 there were already enough Artillery Volunteer Corps (AVCs) in Devonshire to form an Administrative Brigade with its Headquarters (HQ) at Teignmouth:[2][3][4][5]
1st Administrative Brigade, Devonshire Artillery Volunteers
- HQ at Teignmouth; moved to Torquay in 1863 and to Exeter in 1865
- 1st (United Woodbury and Topsham 'Royal') Devonshire AVC, raised 18 August 1859 at Woodbury by Robert Brent, formerly a Lieutenant in the Devon Artillery Militia; moved to Lympstone in 1874
- 2nd (Sidmouth) Devonshire AVC, raised 4 September 1859; disbanded November 1871
- 3rd (Teignmouth) Devonshire AVC, raised 15 November 1859
- 4th (Torquay) Devonshire AVC, raised 15 February 1860
- 5th (Exeter) Devonshire AVC, raised 8 February 1860
- 6th (Dartmouth) Devonshire AVC, raised 25 January 1860; transferred to 2nd Administrative Brigade in January 1861
- 7th (Weymouth) Devonshire AVC, raised at Weymouth, Dorsetshire, 11 March 1860; moved to Exmouth, Devonshire in July 1860
- 8th (Woodbury) Devonshire AVC, raised 31 March 1860; moved to Topsham in late 1861 and to Heavitree in 1875
- 9th (Paignton) Devonshire AVC, raised 2 June 1860
- 10th (Salcombe) Devonshire AVC, raised 7 July 1860; transferred to 2nd Administrative Brigade in January 1861
- 11th (Brixham) Devonshire AVC, raised 20 July 1860
- 12th (Devonport Dockyard) Devonshire AVC, raised 20 December 1860; transferred to 2nd Administrative Brigade in February 1862
- 14th (Ilfracombe) Devonshire AVC, raised 23 June 1875
In January 1861, a 2nd Administrative Brigade was formed, taking over the units in the west of the county.[4][6]
Sir Lawrence Palk, 4th Bt, a former officer in 1st The Royal Dragoons, became lieutenant-colonel commanding the brigade on 2 September 1863, and honorary colonel in 1868, when Brent (promoted to lieutenant-colonel on 13 February 1866) took over command and Palk's son, Lawrence, (formerly an officer in the Scots Fusilier Guards) became a major in the unit.[5] In January 1866, the 1st (Lyme Regis), 3rd (Bridport) and 4th (Portland) AVCs from the neighbouring county of Dorsetshire were included in the 1st Devonshire Administrative Brigade, joined by the 5th (Charmouth) and 6th (Swanage) upon formation in 1868 and 1869. All the Dorsetshire AVCs were transferred to the 1st Hampshire Administrative Brigade in January 1873.[3][4]
In 1880, the AVCs were consolidated, and the 1st Devonshire Administrative Brigade became the 1st Devonshire AVC with the following composition:[3][4]
- No 1 Battery at Lympstone; later at Tor Square, Torquay,[7] with detachment at Lympstone,[8] former 1st Corps
- No 2 Battery at Drill Hall, New Market Buildings, Brixham,[9] former 11th Corps
- No 3 Battery at Northumberland Place, West Teignmouth,[10] former 3rd Corps
- No 4 Battery at at Market Hall, Torquay,[7] former 4th Corps
- Nos 5 & 6 Batteries at Exeter, former 5th Corps
- No 7 Battery HQ at Exeter Road (later at Ferry Road), Exmouth, with the guns at the beach,[11] former 7th Corps
- No 8 Battery at Fore Street, Heavitree,[12] former 8th Corps
- No 9 Battery at Public Hall, Paignton,[13] former 9th Corps
- No 10 Battery HQ at Drill Hall, Avenue Road, and Armoury at 24 Oxford Grove, Ilfracombe,[14] later HQ and Armoury at 2 Croft Side, High Street, Ilfracombe,[14] former 14th Corps
The corps was attached to the Western Division of the Royal Artillery in April 1882 and changed its name to 1st Devonshire Volunteer Artillery in November 1891. In October 1902 it was attached to the Royal Garrison Artillery (RGA) and became the 1st Devonshire RGA (Volunteers).[3]
Armament[]
The 14th (Ilfracombe) Devonshire AVC was issued with a rifled gun together with a store of shot and powder in 1876, and it was installed on Beacon Point. In 1885 the battery at Beacon Point consisted of a 64-pounder RML gun and a 32-pounder mortar. In succeeding years the old 64-pounder was sent to Combe Martin, where the unit had formed a half-battery, and two new 64-pounders replaced it and the mortar at Beacon Point. In 1905, two new 6-inch breechloading guns were installed at Beacon Point.[15]
Territorial Force[]
When the Volunteers were subsumed into the new Territorial Force (TF) under the Haldane Reforms of 1908, the 1st Devonshire RGA became a brigade in the Royal Field Artillery (RFA), the IV (or 4th) Wessex, with its HQ at Exeter. Its planned organisation was to have been:[3][4][16][17]
- 1st Devonshire Battery
- 2nd Devonshire Battery
- 3rd Wessex Ammunition Column
However, the final organisation of the IV Wessex in 1910 was as follows:[3][5][18][19]
IV Wessex Brigade, RFA
- HQ and 1st Devonshire Battery at Drill Hall, 24 Friars' Walk, Exeter[12]
- Detachment 1st Bty at Exmouth[11]
- 2nd Devonshire Battery at Drill Hall South Parade, Dartmouth[20]
- 3rd Devonshire Battery HQ and Gun Room at Crelake, Tavistock[21]
- Detachment 3rd Bty at Milton Abbot[22]
- IV Wessex Brigade Ammunition Column at Crediton
The IV Wessex formed part of the Wessex Division of the TF.[19]
World War I[]
Mobilisation[]
On 26 July 1914, the Wessex Division was on Salisbury Plain, beginning its annual training. Three days later, with the international situation deteriorating, the division was warned to take 'precautionary measures'. The divisional HQ returned to Exeter and the units took up their precautionary posts across South West England. On 4 August the division was ordered to mobilise for war. Between 10 and 13 August the division returned to Salisbury Plain, this time under war conditions.[19]
In September, the War Office decided to raise 2nd Line TF units and formations, so the IV Wessex (now designated the 1/IV Wessex) began recruiting a duplicate unit, the 2/IV Wessex Brigade, RFA, which would serve in the 2nd Wessex Division.[23]
1/IV Wessex Brigade[]
On 24 September, the 1st Wessex Division accepted liability for service in British India to relieve Regular Army units for the Western Front. The division's infantry battalions and field artillery brigades (less the ammunition columns, which were left behind) embarked at Southampton on 9 October and sailed via Gibraltar, Malta, and the Suez Canal to Bombay, where they disembarked on 9 November. Each of the brigade's three batteries arrived in India with five officers and 140 other ranks, manning four 15-pounder field guns.[19]
Although the 1st Wessex was officially numbered the 43rd (Wessex) Division in early 1915, it never served as a complete formation during the war: on arrival in India all its units were distributed to various garrisons, the individual batteries of the 1/IV Wessex Bde being posted to separate stations. No reinforcements reached the units during 1915, and their strength began to dwindle, made worse by the requirement to provide drafts for other theatres of war, while many of the best Non-Commissioned Officers (NCOs) were taken away for officer training.[19]
By 1916 it was clear that the complete division could not be returned to the Western Front as intended, so instead training was pushed forwards in India, some drafts were received from home, and the obsolescent 15-pounders were replaced by modern 18-pounder guns, to enable individual units to be sent to reinforce other theatres of war. The RFA brigades received numbers, the 1/IV Wessex becoming the CCXVIII (218th) Brigade, and in 1917 the batteries were also numbered, the 1/1st, 1/2nd and 1/3rd Devonshire Batteries becoming the 1094th, 1095th and 1096th. Subsequently, the batteries were increased to a strength of six guns by splitting one battery (1095th) up amongst the others. In July 1918 the brigade was returned to three-battery strength by the addition of 1104th (2/1st Wiltshire) Battery from 45th (2nd Wessex) Division (see below), so that by the end of the war the brigade had the following organisation:[16][19][23]
CCXVIII Brigade, RFA
- 1094th (1/1st Devonshire) Battery
- 1096th (1/3rd Devonshire) Battery
- 1104th (2/1st Wiltshire) Battery
2/IV Wessex Brigade[]
The units of the 2nd Wessex Division began to form as soon as the 1st Wessex had embarked for India. Any officers and men left behind by the 1st Line units were used to train the 2nd Line. On 25 November the War Office decided to send the 2nd Wessex to India as well, despite its lack of training. On 12 December 1914 the whole division embarked at Southampton and disembarked at Bombay 4–8 January 1915. The RFA batteries arrived with the same strength of five officers and 140 other ranks, equipped with four 15-pounders. Only in March 1915 was it discovered that half the 15-pounders had obturator pads made of wood, and could not be used for practice until these items had been replaced from England.[23]
Once the units were trained, they suffered from the same drain as the 1st Line, having to provide drafts for active theatres of war and losing their best NCOs for officer training. As with the 43rd Division, the artillery brigades of the 45th Division were gradually re-armed with the 18-pounder and received numbers, the 2/IV Wessex becoming CCXXVIII (228th).[23]
On 12 August 1916 the 2/1st Devonshire Bty (later renumbered 1105th), was sent to Aden where it was re-equipped with 5-inch howitzers. It remained there until demobilisation in March 1919.[23]
The 2/2nd Devonshire Bty received the number 1106, but was broken up during 1917 to bring other batteries up to 6-gun establishment.[23]
By April 1917 the CCXXVIII Bde had disappeared: the 2/1st Devonshire Bty at Aden was formally attached to the CCXXVII (former 2/III Wessex) Bde and the 2/3rd Devonshire (which had become 1107th (Howitzer) Battery) joined XXI Bde RFA in 4th (Quetta) Division, stationed in Baluchistan in the southern part of the North West Frontier, where it remained until the end of World War I.[23][24]
3rd Afghan War[]
When World War I ended in November 1918, very few of the two Wessex Divisions' original units remained in India; CCXVIII Brigade represented the largest remaining group of Wessex field gun batteries.[19][23] The TF units could have expected to be demobilised and returned home, but instead several of them were retained for service in the Third Anglo-Afghan War of 1919.[25][26]
4th (Quetta) Division was a designated reserve formation for mobilisation on the North West Frontier. Its field artillery consisted of XXI Brigade RFA, which already included 1107th (2/3rd Devonshire) (H) Bty and was joined for the campaign by 1104th (2/1st Wiltshire) Bty from CCXVIII Bde. Meanwhile, the 1096th (1/3rd Devonshire) Bty from CCXVIII Bde joined the 46th Mobile Indian Brigade, and later the Kohat–Kurram Field Force.[19][23][24][27]
Fighting on the Afghan frontier started in May 1919, and reinforcements were sent into Baluchistan so that the area commander was able to concentrate a force at New Chaman for an attack on the Afghan frontier stronghold of Spin Boldak. The artillery of this force consisted of the 102nd Bty (with 18-pounders) and the 1107th (2/3rd Devonshire) Bty (with 4.5-inch and 5-inch howitzers), both from XXI Bde RFA. The attack on 27 May began with a creeping barrage fired by the 18-pounders while the howitzers of the Devonshires bombarded the fort and its outlying towers. The fort fell that afternoon, prompting strenuous attempts by the Afghans to retake it before the peace was signed in August.[28]
Interwar[]
When the renamed Territorial Army (TA) was reconstituted after the war, the unit was reformed in February 1920 as the new 3rd Wessex Brigade, RFA, with the 1st, 2nd and 3rd Devonshire Btys and a Dorsetshire Bty from the old III Wessex Bde. However, it was redesignated the 56th Wessex in 1921, and the batteries lost the 'shire' from their titles in June 1924, when the RFA was amalgamated into the RA. The new unit was not part of the 43rd (Wessex) Division but was designated an Army Field Brigade:[3][5][16][29]
56th (Wessex) Army Field Brigade, RA
- HQ and 221st (Devon) Bty, Drill Hall, Barrack Lane, Exeter
- 222nd (Devon) Bty (Howitzers), Drill Hall, Paignton
- 223rd (Devon) Bty, Drill Hall, Crelake, Tavistock
- 224th (Dorset) Bty, Royal Horse Artillery Barracks, Dorchester
The title was changed to 56th (Devon) in March 1928, and in July 1929 the 224th (Dorset) Bty was transferred to the 94th (Queen's Own Dorset Yeomanry) Army Field Bde.[3][5][16]
In November 1938, the RA replaced its unit designation of 'brigade' by the more normal 'regiment'; the 56th was due to become the 56th (Devon) Field Regiment, but the RA was also beginning a programme of converting units to the Anti-Aircraft (AA) role. The 56th became the 51st (Devon) Light Anti-Aircraft Regiment, RA (one of the first Light AA (LAA) units to be formed in the TA):[3][5][16][30]
- 151st (Devon) LAA Bty at Exeter
- 152nd (Devon) LAA Bty at Paignton
- 153rd (Devon) LAA Bty at Crelake, Tavistock.
After the Munich Crisis in 1938, the TA was doubled in size, and the 51st formed a duplicate unit at Exeter in 1939, the 55th (Devon) Light Anti-Aircraft Regiment, RA:[16][31]
- 163rd LAA Bty
- 164th LAA Bty
- 165th LAA Bty
World War II[]
51st (Devon) LAA[]
Dunkirk[]

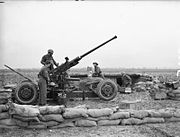
Bofors gun of 152nd Bty, 51st (Devon) LAA Rgt in France, 13 November 1939
The Territorial Army mobilised on the outbreak of war. The War Office's plan was that the first four newly formed TA LAA regiments would go to France as soon as they could be mobilised, in order to provide AA cover for the British Expeditionary Force (BEF).[32] 51st (Devon) LAA Regiment therefore crossed to France as part of 2nd Anti-Aircraft Brigade (2nd AA Bde).[33][34][35][36] The new LAA regiments were still badly under-equipped for overseas service, having only a small number of their establishment of Bofors 40 mm guns and a lot of Light machine guns (LMGs), usually old Lewis guns, and a reduced scale of transport for a mobile role. In November 1939, 51st LAA only possessed 12 Bofors and 48 LMGs.[32][37][38]
When the German offensive began on 10 May 1940, 2nd AA Bde's task was to defend the airfields of the BEF's Air Component.[39] As the Luftwaffe began the air raids that heralded the German offensive, 151st LAA Bty was in action at Abbeville airfield with A and C Troops. C Troop soon registered a hit, and A Trp claimed 11 hits during the day, but a Battery Quartermaster Sergeant (BQMS) and three gunners were killed.[40]
The BEF began its planned advanced into Belgium, but the German Army broke through the Ardennes, forcing the BEF to withdraw again, the AA batteries giving cover leap-frog fashion. Soon they were sucked into the ground battle, split into sub-units to join rearguard actions or moved back from one key point to another, with all the roads choked with refugees. By 21 May, 151st Bty had A Trp defending Hazebrouck, where an enemy aircraft was brought down, while B Trp was at Merville. Next, A Trp went to the defence of Cassel, where it was attacked by tanks and aircraft. One gun was hit and one had to be abandoned. Second Lieutenant Forbes went out to find the remaining two guns but was never heard of again. Sergeant Lord and 22 men eventually got out at Dunkirk.[40]
By now the BEF was withdrawing towards the coast and beginning its evacuation from Dunkirk. 2nd AA Brigade took over control of all AA defences in Dunkirk on 24 May, with 51st LAA Rgt providing air defence in the northern sector of the pocket.[41][42] At Dunkirk the last three guns of B Trp were constantly in action on Bray-Dunes, one gun being destroyed by a direct hit. Here they were joined by 152nd LAA Bty, with D, E and F Trps, which took up positions on the Dunkirk beaches and went into action at once. They were in continuous action from 21 to 25 May and many aircraft were brought down. The Bty commander, Major F.C. MacKenzie, was killed and buried in the dunes, the second-in-command, Capt A.M. Hicks, was wounded and a 2/Lt took over. By 27 May, all ammunition was expended and the guns were destroyed before the crews were evacuated. The RA history comments: 'This gallant battery had done much to save the BEF from the incessant air attacks n the beaches'.[40]
Home defence[]


6th Armoured Division's emblem
AA units returning from France were rapidly reinforced, re-equipped where possible, and redeployed for future integration into Anti-Aircraft Command's existing defence plans. 51st LAA, with 151st, 152nd and 153rd Btys under command, went to No 12 AA Practice Camp, Penhale, where it re-equipped with Bofors guns.[43] 152nd LAA Bty was soon back in action defending Tangmere airfield during the Battle of Britain, destroying numerous enemy aircraft.[40]
On 15 January 1941, 51st (Devon) LAA Rgt joined 6th Support Group in 6th Armoured Division, which had recently been formed as part of the GHQ Reserve. Support Groups at the time consisted of a brigade of mobile field, anti-tank (A/T) and LAA artillery together with lorried infantry, intended to support the armoured brigades of the division. The LAA regiment was equipped with towed Bofors guns. However, the support group concept was soon scrapped and from 1 June 1942 the regiment served directly under the HQ RA of 6th Armoured Division.[30][44][45][46]
Tunisia[]


A British Bofors gun in action during the drive on Tunis, May 1943
6th Armoured Division sailed from England on 8 November 1942, and landed at Algiers as part of Operation Torch, completing its concentration by 22 November.[44][47] In December, V Corps took over operational control of the advance into Tunisia, and sent 6th Armoured to reinforce the infantry of 78th Division. With a front spread over 60 miles, the fighting consisted of confused encounter battles and enemy counter-attacks making skilled use of the terrain, so that British spearhead forces were often outflanked and encircled. AA guns were often involved in ground fighting. 51st (Devon) LAA Rgt had a hard time in these encounters, losing men and guns in actions in which they were encircled by the enemy.[48]
During the Tunisian campaign, 6th Armoured took part in the following major actions:[44][49]
- Bou Arada (18–25 January 1943)
- Fondouk (7–11 April 1943)
- El Kourzia (22–26 April 1943)
- Tunis (Operation Vulcan, 5–12 May 1943)
At the end of the campaign, 51st (Devon) LAA Rgt claimed to have destroyed 45 enemy aircraft for the expenditure of 62,300 rounds of ammunition – a high figure, but many of these rounds were fired in ground combats.[citation needed]
Italy[]
6th Armoured Division did not participate in the Allied invasion of Sicily nor the early stages of the Italian Campaign, remaining in North Africa until 18 March 1944. It then went to Italy and was operational by April, in time for Eighth Army's Spring campaign.[44][50]
During the campaign, 6th Armoured Division took part in the following actions:[44][51][52]
- Liri Valley (18–30 May 1944)
- Arezzo (4–17 July 1944)
- Advance to Florence (17 July–10 August 1944)
By September 1944 the Axis air forces were suffering such shortages of pilots, aircraft and fuel that serious aerial attacks were rare, and AA units began to be put to other uses. 51st (Devon) LAA Rgt left 6th Armoured Division and rejoined 2nd AA Bde, which was supporting XIII Corps. Although it was responsible for defending a few airfields and other vital points, the brigade's role was mainly to provide Heavy AA guns firing in ground roles, while some of its LAA batteries were being retrained as infantry support troops to meet the increasing manpower crisis.[53]
By the end of the year 51st (Devon) LAA Rgt had been reduced from 54 to 36 Bofors guns. In January 1945 it had one battery in AA defence of bridges and 6th Armoured Division's gun areas, while the other batteries were carrying out labour duties for the Royal Engineers, transporting ammunition, and firing mortars for infantry support and for projecting smoke screens.[54]
In February, first 152nd and then 153rd LAA Btys manned 4.2-inch mortars in support of 6th Armoured Division, then at the end of the month 153rd moved its mortars to support the Folgore Group of the Italian Co-belligerent Army. At the end of March, just before the final Allied offensive in Italy began, 2nd AA Bde had 51st Rgt disposed with 151st and 152nd LAA Btys in AA defence of 10th Indian Infantry Division's gun areas, while 153rd LAA Bty manned its mortars behind the Folgore Group.[54]
The Allied armies in Italy launched their spring offensive (Operation Grapeshot) on 6 April 1945 and it made rapid progress. 2nd AA Brigade accompanied X Corps, but had little to do – its guns had trouble keeping up with the speed of the advance.[54] The campaign ended with the surrender of German forces in Italy on 2 May 1945.
51st (Devon) LAA Rgt was placed in 'suspended animation' in 1947.[16]
55th (Devon) LAA[]
Norway[]
55th (Devon) LAA Regiment had already joined the BEF in France, but in April 1940 was diverted to the Allied expedition against Narvik, in Norway. It was sent as part of a new 6th AA Bde to provide AA cover for the forces that had landed at Harstad, an island town just outside Narvikfjord, in mid-April 1940.[55][56][57][58] Its three batteries each had 12 Bofors guns, although like all the units in the brigade it was short of men, instruments and vehicles. The regiment arrived at Harstad on 9 May, where the brigade's guns were already engaged against almost daily attacks on the shipping in the fjord. The regiment was sent to defend Harstad airfield, with a Troop of 164th LAA Bty detached to the expedition's naval base at Skånland. The regiment shot down its first aircraft on 10 May, capturing the downed German pilot. By 18 May, 164th LAA Bty had its HQ and eight guns defending Bardufos airfield where Royal Air Force Gloster Gladiator and later Hawker Hurricane fighters were based.[57][59][60]
Narvik was captured on 28 May, but immediately afterwards orders were received to destroy the port and evacuate to the UK. (The BEF was simultaneously being evacuated from Dunkirk). To cover the evacuation, AA units were ordered to maintain maximum activity and especially to prevent reconnaissance overflights. At the same time, 6th AA Bde was ordered by London to recover its guns as a matter of priority. This was done by progressively thinning out defences. Although much of the force's equipment was saved, 164th LAA Bty at Bardufoss was ordered to destroy all guns on 5 June after the aircraft had flown out and the runways had been cratered. 6th AA Brigade ended all AA defence on 6 June and by 8 June the British troops had embarked with their surviving equipment and the convoy sailed for the UK, still under air attack.[57][59][61]
Home defence[]
After evacuation, 55th (Devon) LAA Rgt landed in the UK on 13 June and was sent to Troon to re-equip with Bofors guns and then supplement AA Command's defences.[43][59] In early 1941 it joined 45th AA Bde, covering South Wales in 9th AA Division. Simultaneously the regiment was part of the War Office Reserve, available for service overseas.[62][63]
Ceylon and India[]
War with Japan broke out in December 1941 and reinforcements were urgently sent to bolster British forces in Asia. 55th (Devon) LAA Regiment, joined by a newly raised 524th LAA Bty, sailed early in 1942, landing in Ceylon in March. There it joined 1st Royal Marine AA Bde.[31][64]
After the fall of Singapore and Burma in early 1942, the Imperial Japanese Navy decided to neutralise the important British naval base of Ceylon. Air raids against Colombo and Trincomalee began on 5 April and continued for months. As the AA defences built up and the threat of low-level attacks by carrier-based fighters receded, the LAA units could be redeployed. 55th (Devon) LAA had left Ceylon for India by October 1942.[65]
In 1942–3, Fourteenth Army fighting in Burma, adopted a new policy with the formation of composite Light Anti-Aircraft/Anti-Tank regiments, each containing two LAA and two A/T batteries. This format was intended to help divisions distribute sub-units with balanced firepower and mutual support in close jungle fighting where battle groups often had to move independently.[66] 55th (Devon) LAA Rgt was one of those selected for conversion, exchanging two batteries with 56th (King's Own) A/T Rgt to become 55th Light Anti-Aircraft/Anti-Tank Regiment, RA.[31][67]
56th Anti-Tank Regiment (The King's Own), RA, formerly the 4th Bn King's Own Royal Regiment (Lancaster),[68][69] had been heavily engaged in the defence of the River Lys during the Battle of France and then evacuated through Dunkirk.[70] It had subsequently been joined by a newly formed 290th A/T Bty and by 203rd (Ross) A/T Bty from 51st (West Highland) A/T Rgt, which had evacuated through Cherbourg after the rest of the regiment was destroyed at St Valery with 51st (Highland) Division.[71][72][73][74] When the exchange with 55th (Devon) LAA Rgt took place, these were the two A/T batteries transferred, while 56th LAA/AT Rgt kept its original King's Own batteries, joined by 163rd and 164th from the 55th. Thus the composition of 55th LAA/AT Rgt, formed on 29 July in the Calcutta area, was as follows:[64][67]
- 165th LAA Bty – TA raised at Exeter 1939
- 524th LAA Bty – raised 1941
- 203rd (Ross) A/T Bty – prewar TA
- 290th A/T Bty – raised 1940
In September 1943, 55th LAA/AT Rgt was in training at Marol, Bombay, preparing to join 20th Indian Infantry Division.[75] In October it moved to Ranchi with the division, and on 1 December it moved to Imphal on the Burma/Assam border.[64]
Burma[]
Fourteenth Army's planned attack from Imphal was forestalled by a Japanese offensive that resulted in the Battle of Imphal. 20th Indian Division was holding Tamu, with its troops disposed in a series of brigade 'keeps' or 'boxes' on defensible high ground, and a screen on the Imphal plain. LAA batteries in the forward areas had problems in getting their guns up steep tracks to join infantry positions. 55th LAA/AT Rgt resorted to breaking its Bofors guns down into packs that could be loaded onto transport elephants. In the front line the Bofors crews developed a technique for destroying Japanese log bunkers by shooting away the front supports until the whole thing collapsed. However, in their AA role the gunners found it difficult to depress their weapons to hit Zero fighters making sweeps along valley floors.[76]
When the Japanese offensive opened on 6 March 1944, it penetrated between the divisional boxes and 20th Indian Division began withdrawing from its forward screen to its main defensive positions on the Shenan Saddle just short of Palel.The two LAA batteries of 55th LAA/AT Rgt worked with infantry groups leap-frogging back to successive pre-prepared fall-back positions. They suffered shelling and tank attacks, but air attacks were slight (although 524th LAA Bty shot down one attacker). By the first week in April, the regiment was back in the main Imphal defences, in the boxes at Shenam and Bishenpur. Here they were subject to increased air attack by Nakajima Ki-43 fighter-bombers. On 6 April, 165th LAA Bty shot down three with 175 rounds, and another on 10 April. 524th LAA Bty set up outlying 'trap' positions and destroyed two more. By the end of the battle 20th Indian Division's LAA guns had destroyed 12 aircraft. During the battle Imphal had been cut off and supplied by air until the Kohima road was reopened in June, after which 20th Indian Division began to advance.[76]
The other two batteries from 55th (Devon) LAA Rgt, 163rd and 164th, served with 56th LAA/AT Rgt in 5th Indian Infantry Division on the Arakan front.[77][78][79] Again, the British had formed air-supplied defensive 'boxes'. 56th LAA/AT Rgt provided AA defence for 5th Indian Division's HQ box, with Bofors guns operating in field gun areas, brigade boxes, in ground role actions against enemy strongpoints and in ambushes against infiltrators, while the A/T gunners were employed as infantry. The division's boxes were besieged from 7 to 13 February, with the gunners in frequent actions against air attacks and infantry, but it was the Japanese supplies that failed first. Reinforcements cleared the road block behind 5th Indian Division, which then resumed its advance, while 56th LAA/AT Rgt was responsible for defending North Island at Maungdaw. In March the Monsoon broke and 5th Indian Division was relieved, 56th LAA/AT Rgt returning to Elephant Point near Cox's Bazaar for a rest.[64][76][80] The division then took part in the relief of Imphal, 163rd and 164th LAA batteries moving by road to Dimapur where they assumed an infantry role while the A/T batteries were flown into the box. When the British counter-offensive began in May, RHQ and the AA batteries of 56th LAA/AT Rgt accompanied 2nd British Division in the advance from Kohima to Imphal[81]
By mid-1944, the Allies were achieving air superiority over Burma, sightings of Japanese aircraft had become rare and LAA guns were more often being used against ground targets in jungle fighting. Some LAA units were broken up to provide reinforcements for the infantry, while the LAA/AT units became solely A/T.[82] On 1 September 1944, while back at Yairipok in India, 55th LAA/AT Rgt became 111th Anti-Tank Regiment, RA with 165th, 203rd and 290th A/T Btys.[64][67][82][83][84]
56th LAA/AT Rgt reverted to 56th A/T Rgt on 1 October 1944, when 163rd LAA Bty became 351st A/T Bty, but operated infantry support mortars, while 164th LAA Bty left the regiment and remained directly under 5th Indian Division HQ.[64][77][78][79][82]
In December 1944, 111th A/T Rgt went back into Burma with 20th Indian Division.[83] In February 1945 the division established a bridgehead across the Irrawaddy River west of Mandalay, and in March it attacked southwards down the Irrawaddy, reaching Rangoon soon after its capture in Operation Dracula. 111th A/T Rgt remained with 20th India Division until the end of June, but no further information is known.[83][85] The regiment was placed in 'suspended animation' before the end of 1945.[16]
On 21 March 1945, 56th A/T Rgt set out from Assam to join the last phase of the war in Burma. By the beginning of April the regiment was concentrated at Meiktila airfield, defending against repeated Japanese attempts to retake it. 5th Indian Division then took part in the advance towards Rangoon, with 56th A/T supporting 4/7th Rajputs in successful attacks on two enemy strongpoints with their 6-pounders and mortars.[86] Once Rangoon had been captured, the regiment returned by sea to India, where it came under command of RA Training HQ No 40 until the end of the war.[77][78]
Postwar[]
When the TA was reconstituted in 1947, the 51st (Devon) LAA Rgt at Exeter was renumbered the 256th and took its place in 81 AA Brigade of Anti-Aircraft Command based in Plymouth.[16][87][88]
The 55th (Devon) LAA Rgt was intended to be reconstituted as 852nd (Devon) Tractor Battery, RA, but was instead transferred to the Royal Army Service Corps.[16]
In 1949 the 256th was redesignated the 256th (Devon) (Mixed) LAA/Searchlight Rgt ('Mixed' indicating that members of the Women's Royal Army Corps were integrated into the unit). In 1950 it absorbed 396th (Devon) LAA Rgt, which had originally been 7th (Haytor) Bn of the Devonshire Regiment at Newton Abbot and had served in World War II as the 87th Anti-Tank Rgt, RA. By now the regiment had dropped the 'Searchlight' part of its designation. In 1954 it absorbed the 668th (Devon and Cornwall) (M) Heavy AA Rgt (a new unit that had been formed at Plymouth in 1947). Then in 1955, when AA Command was disbanded and there was a major reduction in the TA's AA units, the regiment merged with 524th (M) LAA/SL Rgt (7th Bn The Royal Hampshire Regiment) to form:[16][87][89][90][91]
256th (Wessex) LAA Regiment, RA
- HQ: Devonport
- P (Royal Hampshire) Bty – from 524 Rgt
- Q (Devon) Bty – from 256 Rgt
- R (Devon) Bty – from 256 Rgt
The following year, the amalgamations continued, with 256th LAA Rgt absorbing 407th (Devon) Coast Rgt, RA (which had originally been the 2nd Admin Brigade of Devonshire Artillery Volunteers, see above).[16][87][89]
Finally, in 1961, the regiment's lineage ended when it was absorbed into 296th (Royal Devon Yeomanry) Field Rgt, RA, except P (Royal Hampshire) Bty, which joined 383rd Light Rgt (The Duke of Connaught's Royal Hampshire), RA.[16][87][89][92]
Honorary Colonels[]
The following officers served as Honorary Colonel of the regiment:[5]
- Lawrence Palk, 1st Baron Haldon (formerly Sir Lawrence Palk, 4th Bt), Lt-Col Commanding 1863–68, appointed 10 July 1868, died 22 March 1883.
- Hon Leonard Allen Addington, son of 2nd Viscount Sidmouth and former Major, RA, appointed 23 May 1883, died 4 June 1888.
- H.C. Adams, VD, Lt-Col Commanding 1874–96, appointed 21 October 1896.
- George Reginald FitzRoy Talbot, former Captain in the Regular RA and Major in the Devon RGA Militia, appointed (to IV Wessex) 18 May 1918 and (to 56th (Wessex)) 12 January 1921, died 1931.[93][94][95]
- Major-General Sir Edward May, KCB, CMG, appointed 25 August 1926.
- Brevet Colonel R.DeV. Williams, appointed 25 March 1934.
Prominent members[]
- Robert Grosvenor, 5th Baron Ebury, DSO, commanded 151st (Devon) LAA Bty during the final stages of the Italian campaign.[54]
Memorials[]
The units' World War II memorials are at Exeter Guildhall.
- The 51st's consists of a bronze plaque bearing the mailed fist emblem of the 6th Armoured Division, with the inscription: 'ROYAL ARTILLERY 6TH ARMOURED DIVISION/1939–1945/51ST (DEVON) LIGHT ANTI AIRCRAFT REGIMENT R.A. T.A./RHQ 151 BATTERY R.A. T.A. EXETER/152 BATTERY R.A. T.A. TORQUAY/153 BATTERY R.A. T.A. TAVISTOCK/B.E.F. N. AFRICA ITALY AUSTRIA'.[96]
- The 55th's plaque bears the Royal Artillery badge, with the inscription: 'ROYAL REGIMENT OF ARTILLERY/1939–1945/55TH LIGHT ANTI AIRCRAFT REGIMENT R.A. (T.A.)/A TERRITORIAL REGIMENT RAISED IN 1939 FROM DEVON VOLUNTEERS WITH HEADQUARTERS AT EXETER/FRANCE NORWAY BATTLE OF BRITAIN CEYLON INDIA BURMA'.[97]
Notes[]
- ↑ Beckett.
- ↑ Beckett, Appendix VIII.
- ↑ 3.0 3.1 3.2 3.3 3.4 3.5 3.6 3.7 3.8 1st Devonshire Artillery Volunteers at Regiments.org.
- ↑ 4.0 4.1 4.2 4.3 4.4 Litchfield & Westlake, pp. 52–4.
- ↑ 5.0 5.1 5.2 5.3 5.4 5.5 5.6 Army Lists.
- ↑ 2nd Devonshire Artillery Volunteers at Regiments.org.
- ↑ 7.0 7.1 7.2 Torquay at Drill Hall Project.
- ↑ Lympstone at Drill Hall Project.
- ↑ Brixham at Drill Hall Project.
- ↑ Teignmouth at Drill Hall Project.
- ↑ 11.0 11.1 Exmouth at Drill Hall Project.
- ↑ 12.0 12.1 Exeter at Drill Hall Project.
- ↑ 13.0 13.1 Paignton at Drill Hall Project.
- ↑ 14.0 14.1 Ilfracombe at Drill Hall Project.
- ↑ Artillery Volunteer Battery at John Moore's History of Hele.
- ↑ 16.00 16.01 16.02 16.03 16.04 16.05 16.06 16.07 16.08 16.09 16.10 16.11 16.12 Litchfield, pp. 42–8.
- ↑ London Gazette 20 March 1908.
- ↑ London Gazette 14 October 1910.
- ↑ 19.0 19.1 19.2 19.3 19.4 19.5 19.6 19.7 Becke, Pt 2a, pp. 43–8.
- ↑ Dartmouth at Drill Hall Project.
- ↑ Tavistock at Drill Hall Project.
- ↑ Milton Abbot at Drill Hall Project.
- ↑ 23.0 23.1 23.2 23.3 23.4 23.5 23.6 23.7 23.8 Becke, Pt 2a, pp. 55–60.
- ↑ 24.0 24.1 Perry, p. 65.
- ↑ Robson, pp. 12 & 26.
- ↑ Miller, pp. 318–9.
- ↑ Robson, Appendix 1, p. 281.
- ↑ Robson, pp. 111–6.
- ↑ Titles and Designations 1927.
- ↑ 30.0 30.1 51 LAA Rgt at RA 39–45.
- ↑ 31.0 31.1 31.2 55 LAA Rgt at RA 39–45.
- ↑ 32.0 32.1 Routledge, pp. 113 & 373.
- ↑ Farndale, Annex A, p. 237.
- ↑ Ellis, Appendix A.
- ↑ Joslen, p. 462.
- ↑ Routledge, Table p. 373.
- ↑ Farndale, p. 241.
- ↑ Routledge, Table XVII, p. 125.
- ↑ Routledge, Table XVIII, p. 126.
- ↑ 40.0 40.1 40.2 40.3 Farndale, p. 63.
- ↑ Ellis, p. 180.
- ↑ Farndale, p. 77.
- ↑ 43.0 43.1 Farndale, p. 98.
- ↑ 44.0 44.1 44.2 44.3 44.4 Joslen, pp. 17–8.
- ↑ Joslen, p. 217.
- ↑ Order of Battle of the Field Force in the United Kingdom, Part 3: Royal Artillery (Non-Divisional Units), 25 March 1941, The National Archives (TNA), Kew, file WO 212/5.
- ↑ Playfair & Molony, p. 167.
- ↑ Routledge, p. 181.
- ↑ Playfair.
- ↑ Molony, p. 13.
- ↑ Molony.
- ↑ Jackson, Vol VI, Pts II & III.
- ↑ Routledge, p. 282.
- ↑ 54.0 54.1 54.2 54.3 2 AA Bde War Diary 1945, TNA file WO 204/7240.
- ↑ Joslen, p. 461.
- ↑ Farndale, Annex C, p. 250.
- ↑ 57.0 57.1 57.2 Routledge, pp. 109–10.
- ↑ Derry, Appendix B, p. 267.
- ↑ 59.0 59.1 59.2 Farndale, p. 27.
- ↑ Derry, pp. 149–50, 164 201.
- ↑ Derry, pp. 220–2.
- ↑ Order of Battle of Non-Field Force Units in the United Kingdom, Part 27: AA Command, 12 May 1941, TNA file WO 212/79.
- ↑ Order of Battle of the Field Force in the United Kingdom, Part 3: Royal Artillery (Non-Divisional Units), 25 March 1941, TNA file WO 212/5.
- ↑ 64.0 64.1 64.2 64.3 64.4 64.5 Joslen, pp. 524–7.
- ↑ Routledge, p. 237; Table XXXVIII, p. 253.
- ↑ Routledge, p. 239.
- ↑ 67.0 67.1 67.2 55 LAA/AT Rgt at RA 39–45.
- ↑ Cowper, p. 277.
- ↑ Litchfield, p. 124.
- ↑ Cowper, pp. 317–30.
- ↑ 51 (H) Division 1939 at British Military History
- ↑ Joslen, p. 83.
- ↑ Farndale,pp. 85–91.
- ↑ 51 A/T Rgt at RA 39–45.
- ↑ Routledge, Table XXXVII, p. 253.
- ↑ 76.0 76.1 76.2 Routledge, pp. 240–3.
- ↑ 77.0 77.1 77.2 Joslen, p. 514.
- ↑ 78.0 78.1 78.2 56 A/T Rgt at RA 39–45.
- ↑ 79.0 79.1 56 LAA/AT Rgt at RA 39–45.
- ↑ Cowper, pp. 427, 432–9..
- ↑ Cowper, pp. 432, 438-9.
- ↑ 82.0 82.1 82.2 Routledge, pp. 244–6.
- ↑ 83.0 83.1 83.2 Joslen, p. 516.
- ↑ 111 A/T Rgt at RA 39–45.
- ↑ 20 Ind Div at Orders of Battle.
- ↑ Cowper, p. 466.
- ↑ 87.0 87.1 87.2 87.3 235–265 Rgts RA at British Army 1945 on.
- ↑ 67–106 AA Bdes at British Army 1945 on.
- ↑ 89.0 89.1 89.2 372–413 Rgts RA at British Army 1945 on.
- ↑ 520–563 Rgts RA at British Army 1945 on.
- ↑ 638–677 Rgts RA at British Army 1945 on.
- ↑ 289–322 Rgts RA at British Army 1945 on.
- ↑ London Gazette, 4 April 1893.
- ↑ London Gazette, 3 August 1903.
- ↑ Talbot at Geneall
- ↑ IWMMR Ref 25207.
- ↑ IWMMR Ref 25208.
References[]
- Maj A.F. Becke,History of the Great War: Order of Battle of Divisions, Part 2a: The Territorial Force Mounted Divisions and the 1st-Line Territorial Force Divisions (42–56), London: HM Stationery Office, 1935/Uckfield: Naval & Military Press, 2007, ISBN 1-847347-39-8.
- Maj A.F. Becke,History of the Great War: Order of Battle of Divisions, Part 2b: The 2nd-Line Territorial Force Divisions (57th–69th), with the Home-Service Divisions (71st–73rd) and 74th and 75th Divisions, London: HM Stationery Office, 1937/Uckfield: Naval & Military Press, 2007, ISBN 1-847347-39-8.
- Ian F.W. Beckett, Riflemen Form: A Study of the Rifle Volunteer Movement 1859–1908, Aldershot: Ogilby Trusts, 1982, ISBN 0 85936 271 X.
- Col Julia Cowper, The King's Own: The Story of a Royal Regiment, Volume III: 1914–1950, Aldershot: Gale & Polden, 1957.
- T.K. Derry, History of the Second World War: The Campaign in Norway, London, HM Stationery Office, 1952.
- Major L.F. Ellis, History of the Second World War, United Kingdom Military Series: The War in France and Flanders 1939–1940, London: HM Stationery Office, 1954.
- Gen Sir Martin Farndale, History of the Royal Regiment of Artillery: The Years of Defeat: Europe and North Africa, 1939–1941, Woolwich: Royal Artillery Institution, 1988/London: Brasseys, 1996, ISBN 1-85753-080-2.
- Gen Sir William Jackson, "History of the Second World War, United Kingdom Military Series: The Mediterranean and Middle East, Vol VI: Victory in the Mediterranean, Part I|: June to October 1944, London: HMSO, 1987/Uckfield, Naval & Military Press, 2004, ISBN 1-845740-71-8.
- Gen Sir William Jackson, "History of the Second World War, United Kingdom Military Series: The Mediterranean and Middle East, Vol VI: Victory in the Mediterranean, Part I|I: November 1944 to May 1945, London: HMSO, 1988/Uckfield, Naval & Military Press, 2004, ISBN 1-845740-72-6.
- Lt-Col H.F. Joslen, Orders of Battle, United Kingdom and Colonial Formations and Units in the Second World War, 1939–1945, London: HM Stationery Office, 1960/Uckfield: Naval & Military Press, 2003, ISBN 1-843424-74-6.
- Norman E.H. Litchfield, The Territorial Artillery 1908–1988 (Their Lineage, Uniforms and Badges), Nottingham: Sherwood Press, 1992, ISBN 0-9508205-2-0.
- Norman Litchfield & Ray Westlake, The Volunteer Artillery 1859–1908: Their Lineage, Uniforms and Badges, Nottingham: Sherwood Press, 1982, ISBN 9780950820507.
- Charles Miller, Khyber: British India's North West Frontier: The Story of an Imperial Migraine, London: Macdonald & Jane's, 1977, ISBN 0-354-04167-3.
- Brig C.J.C. Molony (Revised by Gen Sir William Jackson), "History of the Second World War, United Kingdom Military Series: The Mediterranean and Middle East, Vol VI: Victory in the Mediterranean, Part I: 1 April to 4 June 1944, London: HMSO, nd/Uckfield, Naval & Military Press, 2004, ISBN 1-845740-70-X.
- F.W. Perry, History of the Great War: Order of Battle of Divisions, Part 5b: Indian Army Divisions, Newport, Gwent: Ray Westlake, 1993, ISBN 1-871167-23-X.
- Maj-Gen I.S.O. Playfair & Brig C.J.C. Molony, "History of the Second World War, United Kingdom Military Series: The Mediterranean and Middle East, Vol IV: The Destruction of the Axis forces in Africa, London: HMSO, 1966/Uckfield, Naval & Military Press, 2004, ISBN 1-845740-68-8
- Brian Robson, Crisis on the Frontier: The Third Afghan War and the Campaign in Waziristan 1919–20, Staplehurst: Spellmount, 2004, ISBN 978-1862272118.
- Brig N.W. Routledge, History of the Royal Regiment of Artillery: Anti-Aircraft Artillery 1914–55, London: Royal Artillery Institution/Brassey's, 1994, ISBN 1-85753-099-3.
- Titles and Designations of Formations and Units of the Territorial Army, London: War Office, 7 November 1927.
External sources[]
- British Army units from 1945 on.
- The Drill Hall Project
- Imperial War Museums War Memorial Register.
- Land Forces of Britain, the Empire and Commonwealth (Regiments.org) - archive site
- John Moore, A History of Hele.
- Orders of Battle
- Orders of Battle at Patriot Files
- Royal Artillery 1939–1945
The original article can be found at 1st Devonshire Artillery Volunteers and the edit history here.