| London Heavy Brigade, RGA | |
|---|---|
| Active | 1908–1961 |
| Country |
|
| Branch |
|
| Type | Artillery Brigade |
| Role |
Heavy Artillery Medium Artillery Heavy Anti-Aircraft Artillery |
| Size | 2 Batteries; later 2 Regiments |
| Garrison/HQ | Islington |
| Engagements |
Western Front (World War I) Battle of France North African Campaign Battle of Greece Battle of Crete Sicily Campaign Operation Overlord North West Europe |
- 1st London Engineer Volunteers redirects here
The London Heavy Brigade, Royal Garrison Artillery was a unit of the British Territorial Force formed in 1908. It fought on the Western Front during World War I, and its successors served in the Mediterranean and North-West Europe theatres during World War II.
Origin[]
When the Territorial Force was created in 1908 by the Haldane Reforms, each infantry division was allocated a heavy battery of the Royal Garrison Artillery (RGA). London provided two divisions, whose heavy batteries were manned by converting the existing 1st London Engineer Volunteer Corps (EVC) into the 1st London Heavy Brigade, RGA. The 1st London EVC had originally been raised in 1862 as the 1st City of London Engineer Volunteer Corps, nicknamed 'Old Jewry' from the quarter of the City of London where it was initially based, though the unit moved to the Barbican in 1868 and then to Islington in North London in 1877. From 1863 to 1868 it was attached for administrative purposes to the 1st Middlesex EVC based at the South Kensington museums[1][2][3][4][5][6]
The RGA brigade formed in 1908 was an administrative unit for the 1st and 2nd London Heavy Batteries, assigned to the 1st and 2nd London Divisions respectively. Its drill hall was at Offord Road in Islington.
World War I[]
The two London divisions had just begun their annual training on Salisbury Plain when war was declared in August 1914: they promptly returned to their drill halls to mobilise. Each of the two London heavy batteries was equipped with four 4.7-inch guns.[7][8]
1/1st London Heavy Battery[]
During the autumn of 1914 the 1st London Division sent most of its infantry battalions to relieve Regular troops in Malta or to supplement the British Expeditionary Force (BEF) in France. By January 1915, what remained of the division in the UK was broken up and its support units, including 1st London Heavy Battery, were assigned to a new 2nd Line division (the 2/1st London) that was being organised. The battery organised its own 2nd Line unit, designated 2/1st.[8][9]
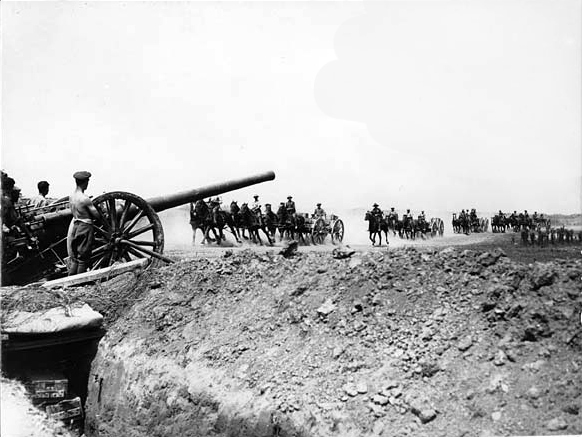
Transport limbers gallop past a battery of British 4.7 inch guns on the Somme
The new division, now numbered 58th (2/1st London) Division, spent 1915 and the early part of 1916 training around Ipswich. On 11 February 1916 the 1/1st London Heavy Battery left the division and moved to Woolwich to prepare for independent service overseas, the 2/1st London Heavy Battery having already joined 58th Division the previous September. The 1/1st Bty disembarked at Le Havre on 3 March 1916 and joined XXVII Heavy Artillery Group, RGA. Subsequently, it passed from one mobile or mixed-gun Heavy Artillery Group (HAG) to another, supporting the various armies of the BEF as operations dictated.[9]
On 12 February 1917 the four-gun battery was made up to six guns when it was joined by a section from the 193rd Heavy Battery, a New Army unit that had just arrived from England. By now, the heavy batteries on the Western Front had adopted the 60-pounder in place of the 4.7-inch. The battery was finally posted to 42nd HAG (later 42nd Heavy Brigade) on 23 December 1917 and remained with it (apart from short detachments) for the rest of the war.[10][11][12]
1/2nd London Heavy Battery[]
The 2nd London Heavy Battery also formed 1st and 2nd Line units. The 1/2nd Bty landed in France with 2nd London Division (soon afterwards renamed 47th (1/2nd London) Division) on 15 March 1915. However, artillery policy in the British Expeditionary Force was to withdraw heavy batteries from the divisions and allocate them to HAGs.[10] The 1/2nd Bty therefore transferred from the division to I Group, Heavy Artillery Reserve, on 31 March.[7][13] It joined the 13th HAG, supporting V Corps, on 19 April 1915.[12]
Kitchener's Wood[]


German soldiers with captured British QF 4.7 inch gun during World War I, apparently in Belgium
On 22 April, the battery was camped at 'Kitchener's Wood' en route to Ypres to be attached to the Indian Corps when the Germans launched a surprise attack (the 2nd Battle of Ypres) behind a gas cloud and broke through the French defenders. Although reportedly armed with only seven rifles, the Londoners fought a stubborn rearguard action as the Germans entered the wood, allowing the gunners to remove the breechblocks and firing pins from their 4.7s before escaping. The guns were recaptured by the 2nd Canadian Division but the position could not be held and the guns were abandoned.[14][15] The Germans subsequently reported their capture of the guns marked 'London', causing 'considerable anxiety in London, from the impression thereby created that the London Division had been at Ypres in the gas attack, and had been driven back to such an extent as to lose their heavy guns'.[16]
The battery was subsequently re-equipped. On 1 March 1917 it was made up to six guns when a section joined from 199th Heavy Battery. Like the 1/1st, the 1/2nd London Heavy Battery moved from one HAG to another as required until 8 July 1917, when it returned to become a permanent part of the mobile 13th HAG (later 13th Heavy Brigade) for the rest of the war.[10][11][12]
2/1st London Heavy Battery[]
Raised in 1914 from volunteers, this battery joined 58th (2/1st London) Division at Ipswich on 24 September 1915, initially serving alongside its 1st Line battery. In July 1916, 2/1st and 2/2nd London Heavy Batteries formed part of 'C' Brigade of RGA heavy batteries attached to Southern Army defending Eastern England.[17] The battery did not accompany 58th Division when it went to France in January 1917. Instead it joined the newly formed 71st Division on 9 March 1917. On 12 February 1918 it formed part of 226th Mixed Brigade when it was transferred to 67th (2nd Home Counties) Division, and the battery served as a training unit with this formation until the end of the war, without leaving the UK.[18]
2/2nd London Heavy Battery[]
This battery served with 60th (2/2nd London) Division from 9 April 1915 until 24 January 1916, when it transferred to 61st (2nd South Midland) Division. It did not accompany the division to France in June 1916 but, like 2/1st Battery, it was part of 'C' Brigade RGA in Southern Army and then joined 71st Division.[19] From then on its career was the same as the 2/1st Battery.
Interwar[]
The brigade reformed at Offord Road in 1920 as 14th (London) Medium Brigade, RGA, soon being renumbered as 53rd (London) Medium Brigade, in the Territorial Army. It served as 'Army Troops' in 47th (2nd London) Divisional Area with the following composition:[4][5][20]
- 209 (London) Battery
- 210 (London) Battery (Howitzer)
- 211 (London) Battery (Howitzer)
- 212 (London) Battery (Howitzer)
There were minor changes in designation, in 1924 when the RGA was absorbed by the Royal Artillery (RA), and in 1938 when RA brigades were redesignated as regiments. Just before the outbreak of war in 1939, 211 and 212 (London) Batteries were split off to form a duplicate regiment, numbered '64th Medium Regiment.[4]
World War II[]
53rd (London) Medium Regiment[]
On the outbreak of war in September 1939 the regiment formed part of London District.[21][22][23] Once again, orders to mobilise arrived during the regiment's annual summer camp. The regiment was to be included in the first contingent of the British Expeditionary Force (BEF) to go to France, so it returned to Offord Road for mobilisation. On the day war was declared (3 September) it moved to Kempton Park Racecourse, where drafts of reservists arrived to replace the men who were under-age or unfit for overseas service. It embarked on 2 October.[24][25]
Dunkirk[]
The regiment formed part of II Corps of the BEF.[24][26][27][28][29] The BEF was deployed along the Franco-Belgian border during the months of the Phoney War, but when the Germans attacked Belgium on 10 May 1940 it began a carefully-planned advance to the line of the River Dyle. 53rd Medium Regiment was in position behind this line by 15 May, firing its first shots in support of 7th Guards Brigade.[24][30] But the Germans had penetrated the French line on the River Meuse on the night of 12/13 May, and on 16 May the BEF began retiring to avoid being cut off. By 21 May, II Corps artillery, including 53rd Medium Regt, was in position to support the infantry dug in along the River Escaut and attempting to hold off the Germans.[24][31]
However, because of pressure elsewhere, the Escaut line could not be held and the BEF continued its retreat to the Ypres–Comines Canal where it halted again. The 53rd Regiment reached Marcq on 26 May. By now, German troops had broken through to the coast to the south on 20 May, and the BEF was encircled. It began a withdrawal to the seaports. The British artillery put down harassing fire to delay the German forces following up, but ammunition was running short. On the night of 26 May the Corps Commander RA (CRA) ordered the 53rd to fire off as much ammunition as possible and then put its guns out of action. The regiment joined the retreat the following day.[24][32][33]
II Corps' flank was now threatened by the retreat and later surrender of Belgian forces and on 28 May the Germans reached the extreme left of the BEF's perimeter at Nieuwpoort. Brigadier Hon E.F. Lawson, the CRA of 48th (South Midland) Division was given the task of shoring up the perimeter. Lawson seized on the gunners of 53rd Medium Regiment who were marching that way. Fighting as infantry alongside other II Corps artillery and engineer units and some French detachments, they were the only troops available to defend the line. They endured heavy mortar and machine-gun fire, and the Germans established a bridgehead in Nieuwpoort, but the gunners repulsed all subsequent attacks that day until relieved by 4th Division. This prevented a German breakthrough to the beaches east of Dunkirk where General Headquarters was positioned and where the evacuation of the BEF (Operation Dynamo) was proceeding.[34][35][36] II Corps withdrew for evacuation on the night of 31 May/1 June, destroying and abandoning all its guns, transport and equipment.[37]
Home defence[]
For the next four years, 53 Medium Regiment served in Home Forces, initially in Southern Command to defend the British Isles,[38] later preparing for the liberation of Continental Europe as part of 4th Army Group Royal Artillery (AGRA) in I Corps.[39]
D-Day[]
In May 1944 the regiment was assigned to 21st Army Group for Operation Overlord.[23] For D-Day itself, the Regimental HQ of 53 Medium Regiment was attached to 3rd Division in I Corps, assaulting Sword Beach, making it the leading medium artillery unit of Second Army.[40][41] It supported 6th Airborne Division in the fighting on the Orne Canal.
The regiment then served in 4th AGRA during the campaign in North West Europe.[42][43] In the first week of December, single guns were being used to knock down windmills and church towers that might have been used as enemy observation posts. In late January 1945 the regiment fired in support of Operation Elephant, an attack to flatten out an enemy bridgehead across the River Maas. On 15 April, it supported 49th (West Riding) Division's attack on Arnhem. The regiment was in Germany on VE-day.[44]
53rd Medium Regiment was placed in suspended animation in 1946.[4]
64th (London) Medium Regiment[]


6-inch 26 cwt Howitzer on World War II pneumatic tyres at Firepower - The Royal Artillery Museum
This regiment (the 'London' was added to the title in 1942) was created in London District just before the outbreak of war from two batteries (211 and 212 (London)) of 53rd Medium Regiment.[4][21][22] By July 1940 the regiment had been assigned to IV Corps, first at Tetbury, later at High Wycombe. Initially it was equipped with iron-tyred 6-inch howitzers, but in August it re-equipped with the 4.5-inch Gun Mk I (relined 60-pounders on Carriage Mk4P) for 211 Bty, and 6-inch howitzers on Carriage Mk1P for 212 Bty. By the end of August, during the Battle of Britain, it was placed on aerodrome defence, with RHQ at Haddenham, Cambridgeshire, 211 Bty less B Trp at Herringswell, Suffolk, B Trp at Hardwick, Cambridgeshire, and 212 Bty at St Ives, Cambridgeshire. The regiment reassembled at High Wycombe at the end of September.[45]
Capture of Tobruk[]

In late 1940 the regiment sailed for Egypt, joining British Troops Egypt (BTE) in January 1941 before moving out into Libya as part of XIII Corps during the capture of Tobruk.[39][45][46]
Greece[]
In March 1941, 64th was one of two medium regiments sent to Greece with I Australian Corps as part of 'W Force' in Operation Lustre to support the Greek Army in the Greco-Italian War. Before it sailed, 64th Medium Rgt exchanged 212 Bty with 234 Bty from 68th (4th West Lancashire) Medium Rgt, so that the whole regiment was equipped with 4.5-inch guns. (212 (London) Bty served with 68 Medium Rgt in Eritrea.)[45][47]
The Germans invaded Greece and Yugoslavia at dawn on 6 April, beginning the Battle of Greece. The Commonwealth commander, Lt-Gen Henry Maitland Wilson, had anticipated the German advance through Yugoslavia, and had placed a force to protect this dangerous flank. Known as the Amyntaion detachment it included 64 Medium Regiment (less one Troop) alongside 3rd Royal Tank Regiment, 27th New Zealand Machine-Gun Battalion and 1st Australian Anti-Tank Regiment (less one battery), initially under the commander of the Corps medium artillery, Brig E.A. Lee.[48]
As the campaign developed, Wilson expanded the Amyntaion detachment to cover the Greek retreat: on 10 April it shelled the advancing Leibstandarte SS Adolf Hitler Brigade.[49] But within days 'Force W' was withdrawing to the Thermopylae position. The roads over the Pindus mountains were entrusted to Brig Stanley Savige of 17th Australian Infantry Brigade, whose 'Savige Force' included 64th Medium Regiment as well as New Zealand field guns and Australian anti-tank guns.[50] On the night of 17/18 April Savige Force withdrew towards Larissa. Germans tanks appeared in front of the New Zealand rearguard at mid-day on 18 April, and were engaged for the rest of the day by a troop of 64th Medium Regiment.[51]
The decision to withdraw the Commonwealth forces was made on 21 April and evacuation was carried out over the following week. When ordered to evacuate, most of the regiment was taken off the beaches at Marathon by HMS Carlisle and landed at Suda Bay, Crete, but some were taken by other ships back to Egypt.[45] The guns were lost.
Crete[]
On Crete, 234 (West Lancashire) Bty and A Trp of 211 (London) Bty were equipped with captured Italian 100 mm howitzers and 72 mm guns to defend Heraklion airfield. The rest of the regiment was stationed near Canea as infantry.[45] The Germans launched an airborne attack on Crete on 20 May 1941, launching the Battle of Crete, and after fierce fighting the Commonwealth forces were once again forced to evacuate. The gun party of 64 Medium Rgt from Heraklion were evacuated on the night of 29/30 May, while the remainder marched over the mountains to Sphakia, where they were evacuated the following night.[45]
Middle East[]
After the regiment had been evacuated to Egypt, 234 Bty rejoined 68 Medium Rgt. 212 (London) Bty, which had participated in the campaign in Eritrea, returned, and 64th Medium Rgt re-assembled in Syria under the command of I Australian Corps when it was re-equipped with 6-inch howitzers.[39][45][52] In October the regiment returned to Egypt, where it joined Eighth Army in December, with 211 Bty attached to 2nd South African Division during the capture of Bardia.[39][45][53]
North Africa[]


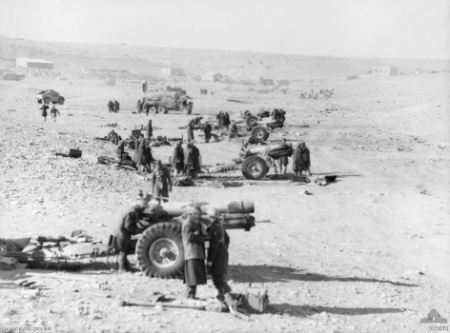
212 Battery firing 155mm Howitzers in North Africa 1942
In February 1942 the regiment was re-equipped with 16 French-built 155mm howitzers obtained from the US under Lend-Lease and its first two of the new Mk 2 4.5-inch guns.[45][54]
It was with X Corps in June 1942 and fought with the 2nd New Zealand Division at the Battle of Mersa Matruh, when the division was surrounded and had to break out. 211 Bty was reduced to five guns and 212 to four guns; the regiment lost over 250 men during the withdrawal. At Ruweisat Ridge, 211 Bty had received three new 4.5-inch guns, but 212 lost two more to air attack and was withdrawn to Cairo to refit, where it was issued with the new 5.5-inch gun. In August, 212 Bty was with 44th (Home Counties) Infantry Division at the Battle of Alam Halfa [45]
64th Medium Rgt was attached to XXX Corps for the Second Battle of El Alamein, by which time it had been fully re-equipped with eight 4.5-inch and eight 5.5-inch guns.[39][55] During the pursuit after Alamein, 211 Bty operated with 2nd New Zealand Division during November, detaching B Trp to 4th Light Armoured Brigade. The regiment then fought its way across North Africa and into Tunisia under Eighth Army, including the Battle of the Mareth Line.[45]
By now, Eighth Army was forming its medium artillery into Army Groups Royal Artillery (AGRAs). In Tunisia, 64th Medium Rgt joined 5th AGRA, and remained with this headquarters for the rest of the war apart from a short spell with 1st AGRA in May 1943.[45]
Sicily[]
For the Allied invasion of Sicily in July 1943, 5th AGRA supported 51st (Highland) Division, attacking towards the Gerbini airfields and Randazzo. At the close of the campaign, XXX Corps did not participate in the invasion of mainland Italy, but was withdrawn to prepare for Operation Overlord. 64th Medium Rgt handed over its heavy equipment and embarked on 9 November for Algeria, re-embarking on 29 November for the UK and landing at Liverpool on 9 December.[39][45]
Normandy[]
When the Normandy landings took place in June 1944, there were only two batteries of 4.5-inch guns in 21st Army Group: 211 Bty of 64th Medium Rgt, and one battery of 7th Medium Rgt. The gun had a lighter shell but longer range than the 5.5-inch, and XXX Corps wanted both batteries landed first. 211 Battery was therefore exchanged with 25/26 Bty of 7th Medium for the assault phase, returning to 64th by 11 June.[45][56]
As part of 5th AGRA, 64th Medium Rgt supported 21st Army Group throughout the Normandy campaign and the advance across Belgium.[39][42][45][57]
Arnhem[]
On 20 September 1944 the regiment was ordered to move up behind the advancing troops of XXX Corps, and the following day it assembled four miles south of Nijmegen. Here it picked up wireless transmissions from the RA of 1st Airborne Division, which was isolated at Arnhem with few working radios. The regiment responded to appeals for fire support with the 4.5-inch battery, firing at extreme range. The battery moved up about 4000 yards about midday to shorten the range, while a 155 mm battery was being hurried up the road and attached to 64 Medium Rgt about 16.00, while an officer was sent out with a relay wireless as far forward as possible. The following day the regiment engaged 31 targets for 1st Airborne, and the regiment's 5.5-inch battery, which had been supporting the advance of XXX Corps, was brought up and positioned with the 4.5s by first light on 23 September. A battery of 3.7 inch Heavy Anti-Aircraft guns and a further 4.5-inch battery came under command, but the road behind them had been cut, so ammunition supply became a problem, as 25 targets were engaged. By the night of 25 September, 1st Airborne could hold out no longer, and the remnants were evacuated across the Nederrijn under cover of a heavy barrage from 64 Medium Rgt and its attached guns.[58][59]
Rhineland[]
64th Medium Rgt continued to support 21st Army Group as part of 5th AGRA until the end of the war in Europe.[45] For example, it was part of XXX Corps' artillery concentration for the clearance of the Reichswald (Operation Veritable),[60] After VE Day, the regiment handed in its guns and undertook occupation duties in Germany. 64th Medium Regiment was placed in suspended animation on 1 April 1946 and was formally disbanded in 1947.[4][45]
Postwar[]
When the TA was reformed in 1947, 53 Medium Regiment was reconstituted at Islington as 353 Heavy Anti-Aircraft Regiment (London), and was adopted by the Borough of Islington. It formed part of 97 (AA) AGRA based at Chelsea.[61][62][63] The regiment returned to the medium artillery role in 1954 as 353 (London) Medium Regiment, and in 1956 it absorbed the Essex batteries of 415 Coast Regiment (Thames & Medway). Finally, in 1961 the regiment (less one Essex battery) merged with 264 (7th London) Field Regiment, 290 (City of London) Field Regiment, and 452 (London) Heavy Anti-Aircraft Regiment to form 254 (City of London) Field Regiment. The remaining battery at Canvey Island and Southend-on-Sea joined 304 (Essex Yeomanry RHA) Field Regiment.[4][64][65]
Memorials[]


The artilleryman depicted on the London Troops Memorial.
The London Heavy Brigade's World War I memorial, consisting of two bronze plaques to the 1st and 2nd Batteries (listing 32 and 35 names respectively of men who died in WWI) and another to 53rd Medium Regiment 1939–45, was moved to St Mary Magdalene Church, Holloway Road, when the Offord Road drill hall was demolished.[66][67][68]
The 1st and 2nd Heavy Batteries RGA are listed on the City and County of London Troops Memorial in front of the Royal Exchange, with architectural design by Sir Aston Webb and sculpture by Alfred Drury.[69][70] The left-hand (northern) bronze figure flanking this memorial depicts a Royal Artilleryman representative of the various London Artillery units.
Honorary Colonels[]
Brevet-Col A.E. Marnham, MC, TD, was appointed Honorary Colonel of the regiment on 17 June 1931.[5]
References[]
- ↑ Beckett, Appendix IX.
- ↑ Westlake, p. 11.
- ↑ Barnes, Appendices III & IV.
- ↑ 4.0 4.1 4.2 4.3 4.4 4.5 4.6 Litchfield pp. 162–3.
- ↑ 5.0 5.1 5.2 Monthly Army Lists.
- ↑ Post Office London Directories.
- ↑ 7.0 7.1 Becke, Pt 2a, pp. 69–75.
- ↑ 8.0 8.1 Becke, Pt 2a, pp. 141-7.
- ↑ 9.0 9.1 Becke, Pt 2b, pp. 9–15.
- ↑ 10.0 10.1 10.2 Farndale, Annex E.
- ↑ 11.0 11.1 Farndale, Annex M.
- ↑ 12.0 12.1 12.2 The National Archives (TNA), Kew, file WO 95/5494 C & I.
- ↑ Maude, Appendix C.
- ↑ McWilliams & Steel, p. 47.
- ↑ Sir John French's despatch at FirstWorldWar.com
- ↑ Maude, p. 12.
- ↑ TNA file WO 33/765.
- ↑ Becke, Pt 2b, p. 104.
- ↑ Becke, Pt 2b, p. 27.
- ↑ Titles and Designations.
- ↑ 21.0 21.1 British London District on 3 September 1939 at Patriot Files
- ↑ 22.0 22.1 London District 1939 at British Military History
- ↑ 23.0 23.1 53 Med Rgt at RA 39–45.
- ↑ 24.0 24.1 24.2 24.3 24.4 Chronology at 53rd Regt website.
- ↑ BBC People's War
- ↑ Joslen, p. 462.
- ↑ Ellis, France & Flanders, Appendix I
- ↑ II Corps 1940 at British Military History
- ↑ 2 Corps at RA 39–45.
- ↑ Ellis, France & Flanders, Ch. 3 [1].
- ↑ Ellis, France & Flanders, Ch. IV [2].
- ↑ Ellis, France & Flanders, Ch. VIII [3].
- ↑ Ellis, France & Flanders, Ch. IX [4].
- ↑ Butler & Bradford, pp. 158–9.
- ↑ Bryant, pp. 144–5, 149.
- ↑ Ellis, France & Flanders, Ch. XIII [5].
- ↑ Ellis, France & Flanders, Ch. XV [6].
- ↑ Southern Command at RA 39–45.
- ↑ 39.0 39.1 39.2 39.3 39.4 39.5 39.6 British Artillery in World War 2.
- ↑ Joslen, p. 585.
- ↑ 3 Div at RA 39–45.
- ↑ 42.0 42.1 Joslen, p. 463.
- ↑ Ellis, Victory, Vol I, Appendix IV & Vol II, Appendix I.
- ↑ 53 Med Rgt at RA Netherlands
- ↑ 45.00 45.01 45.02 45.03 45.04 45.05 45.06 45.07 45.08 45.09 45.10 45.11 45.12 45.13 45.14 45.15 45.16 64 Med Rgt at RA 39–45
- ↑ Joslen, pp. 479, 484-5.
- ↑ Playfair, Vol II, p. 79.
- ↑ Playfair, p. 80.
- ↑ Playfair, p. 87.
- ↑ Playfair, p. 90.
- ↑ Playfair, p. 93.
- ↑ Joslen, p. 482.
- ↑ Joslen, p. 486.
- ↑ 8th Army Medium Artillery stats at the Crusader Project.
- ↑ Joslen, p. 574.
- ↑ Ellis, Victory, Vol I, p. 542.
- ↑ Ellis, Victory, Vol 1, Appendix IV & Vol II Appendix IV.
- ↑ 64 Med Rgt at RA Netherlands
- ↑ Support 1st Airborne at at RA Netherlands.
- ↑ Ellis, Victory, Vol II, pp. 256 & 269.
- ↑ Litchfield, pp. 162, 330.
- ↑ AGRA at British Army units from 1945 on
- ↑ Territorial Army 1947 at Orbat.com
- ↑ Barnes, Appendix V.
- ↑ 289–322 Regts at British Army units from 1945 on
- ↑ IWM WMA Ref 12652
- ↑ IWM WMA Ref 12653
- ↑ Cherry & Pevsner, p. 658.
- ↑ IWM WMA Ref 11796
- ↑ 'Sir Aston Webb' and 'Alfred Drury' in Quinlan.
Full names of references[]
- Maj R. Money Barnes, The Soldiers of London, London: Seeley Service, 1963.
- Maj A.F. Becke,History of the Great War: Order of Battle of Divisions, Part 2a: The Territorial Force Mounted Divisions and the 1st-Line Territorial Force Divisions (42–56), London: HM Stationery Office, 1935/Uckfield: Naval & Military Press, 2007, ISBN 1-847347-39-8.
- Maj A.F. Becke,History of the Great War: Order of Battle of Divisions, Part 2b: The 2nd-Line Territorial Force Divisions (57th–69th), with the Home-Service Divisions (71st–73rd) and 74th and 75th Divisions, London: HM Stationery Office, 1937/Uckfield: Naval & Military Press, 2007, ISBN 1-847347-39-8.
- Ian F.W. Beckett, Riflemen Form: A study of the Rifle Volunteer Movement 1859–1908, Aldershot: Ogilby Trusts, 1982, ISBN 0-85936-271-X.
- Sir Arthur Bryant, The Turn of the Tide, 1939–1943, London: Collins, 1957.
- Lt-Col Ewan Butler and Maj J.S. Bradford, The Story of Dunkirk, London: Hutchinson/Arrow, nd.
- Bridget Cherry & Nikolaus Pevsner, The Buildings of England: London 4: North, new edn, London: Yale University Press, 1999, ISBN 0-300-09653-4.
- Major L.F. Ellis, History of the Second World War, United Kingdom Military Series: The War in France and Flanders 1939–1940, London: HM Stationery Office, 1954. (Online at [7].)
- Major L.F. Ellis, History of the Second World War, United Kingdom Military Series: Victory in the West, Vol I: The Battle of Normandy, London: HM Stationery Office, 1962/Uckfield: Naval & Military, 2004, ISBN 1-845740-58-0.
- Major L.F. Ellis, History of the Second World War, United Kingdom Military Series: Victory in the West, Vol II: The Defeat of Germany, London: HM Stationery Office, 1968/Uckfield: Naval & Military, 2004, ISBN 1-845740-59-9.
- Gen Sir Martin Farndale, History of the Royal Regiment of Artillery: Western Front 1914–18, Woolwich: Royal Artillery Institution, 1986, ISBN 1-870114-00-0.
- Lt-Col H.F. Joslen, Orders of Battle, United Kingdom and Colonial Formations and Units in the Second World War, 1939–1945, London: HM Stationery Office, 1960/Uckfield: Naval & Military Press, 2003, ISBN 1-843424-74-6.
- Norman E.H. Litchfield, The Territorial Artillery 1908–1988 (Their Lineage, Uniforms and Badges), Nottingham: Sherwood Press, 1992, ISBN 0-9508205-2-0.
- Alan H. Maude (ed.), The History of the 47th (London) Division 1914–1919, London: Amalgamated Press, 1922/Uckfield: Naval & Military Press, 2002, ISBN 1-84342-205-0.
- J. McWilliams & R.J. Steel, Gas! The Battle for Ypres, 1915, St Catherines, Ontario: Vanwell Publishing, 1985, ISBN 0-920277-01-2.
- Mark Quinlan, Sculptors and Architects of Remembrance, Sandy: Authors Online, 2007, ISBN 978-0755203-98-7.
- Titles and Designations of Formations and Units of the Territorial Army, London: War Office, 7 November 1927. (RA units reprinted as Appendix 4 in Litchfield).
- R.A. Westlake, Royal Engineers (Volunteers) 1859–1908, Wembley: R.A. Westlake, 1983, ISBN 0-9508530-0-3.
External links[]
- 53rd London Medium Regiment website
- Brutish Artillery in World War 2.
- Crusader Project
- FirstWorldWar.com Primary Sources
- Imperial War Museum War Memorials Archive
- The Long, Long Trail
- Orders of Battle at Patriot Files
- The Regimental Warpath 1914–1918
- The Royal Artillery 1939–45
- Royal Artillery Netherlands 1944–45
- A Youtube tribute to men of 64th Medium Regiment
The original article can be found at London Heavy Brigade, Royal Garrison Artillery and the edit history here.