| 191st Heavy Anti-Aircraft Battery, Royal Artillery | |
|---|---|
|
Royal Warwickshire Regiment Cap Badge | |
| Active | 10 December 1936–10 March 1955 |
| Country |
|
| Branch |
|
| Role | Air defence |
| Size | Battery |
| Part of |
69th (Royal Warwicks) HAA Regiment 10th HAA Regiment 68th (North Midland) HAA Regiment 469th (Royal Warwicks) HAA Regiment |
| Garrison/HQ | Alum Rock, Birmingham |
| Engagements |
Battle of Britain Siege of Malta |
191st Heavy Anti-Aircraft Battery, Royal Artillery, was an air defence unit of Britain's Territorial Army formed in Birmingham before World War II. It defended the West Midlands against attack during the Battle of Britain, and was then shipped to Malta, where it served through most of the long siege when the island fortress was bombed incessantly.
Origin[]
In the 1930s the increasing need for anti-aircraft (AA) defence for Britain's cities was addressed by converting a number of Territorial Army (TA) infantry units into AA gun units of the Royal Artillery (RA). The Birmingham-based 6th Battalion, Royal Warwickshire Regiment was one unit selected for this role, becoming 69th (Royal Warwickshire Regiment) Anti-Aircraft Brigade, Royal Artillery, on 10 December 1936, consisting of four batteries, including 191 AA Battery. The brigade continued to wear its Royal Warwicks cap badge, together with RA collar badges. The newly converted 191 AA Bty established Battery Headquarters (BHQ) at Fernbank House, Alum Rock Road. (From 1 January 1939, RA gun 'brigades' (such as the 69th) were termed regiments.)[1][2][3][4][5]
World War II[]
Mobilisation and Phoney War[]


A TA crew manning a 3-inch AA gun, May 1940.
The TA's AA units were mobilised on 23 September 1938 during the Munich Crisis, with units manning their emergency positions within 24 hours, even though many did not yet have their full complement of men or equipment. The emergency lasted three weeks, and they were stood down on 13 October.[6] In June 1939, as the international situation deteriorated, a partial mobilisation of TA units was begun in a process known as 'couverture', whereby each AA unit did a month's tour of duty in rotation to man selected AA positions. On 24 August, ahead of the declaration of war, the units of Anti-Aircraft Command were fully mobilised at their war stations.[7] 69th (Royal Warwickshire) AA Rgt was under the command of 34th (South Midland) Anti-Aircraft Brigade, which controlled the Gun Defended Areas (GDAs) of Birmingham and Coventry. 191 AA Battery was manning 3-inch guns at Coventry Sites B (2 guns) and D (4 guns), as well as providing detachments manning Light machine guns (LMGs) at the Ryton aircraft factory, which was designated a Vulnerable Point (VP).[8][9][10][11]
Shortly after war was declared on 3 September, 191 AA Bty was ordered to move via Gloucester to Newport, Wales, with its six mobile 3-inch guns together with another section of two taken from 190 AA Bty. It set out from Ryton on 8 September and all guns were in position by the end of 9 September; it then commenced building command points (CPs). After that there was little to do during the so-called Phoney War. A group of officers from the regiment volunteered to join the Regular 4th AA Rgt for service with the British Expeditionary Force (BEF) in France. The battery returned to Birmingham on 8 October, taking over Sites N and O. On 2 December BHQ left Fernbank House and set up in Hamstead Hill. At the end of the year the battery was manning 2 x 4.5-inch guns at Site N and 3 x 3.7-inch guns at Site O.[10][11]
Battle of Britain[]
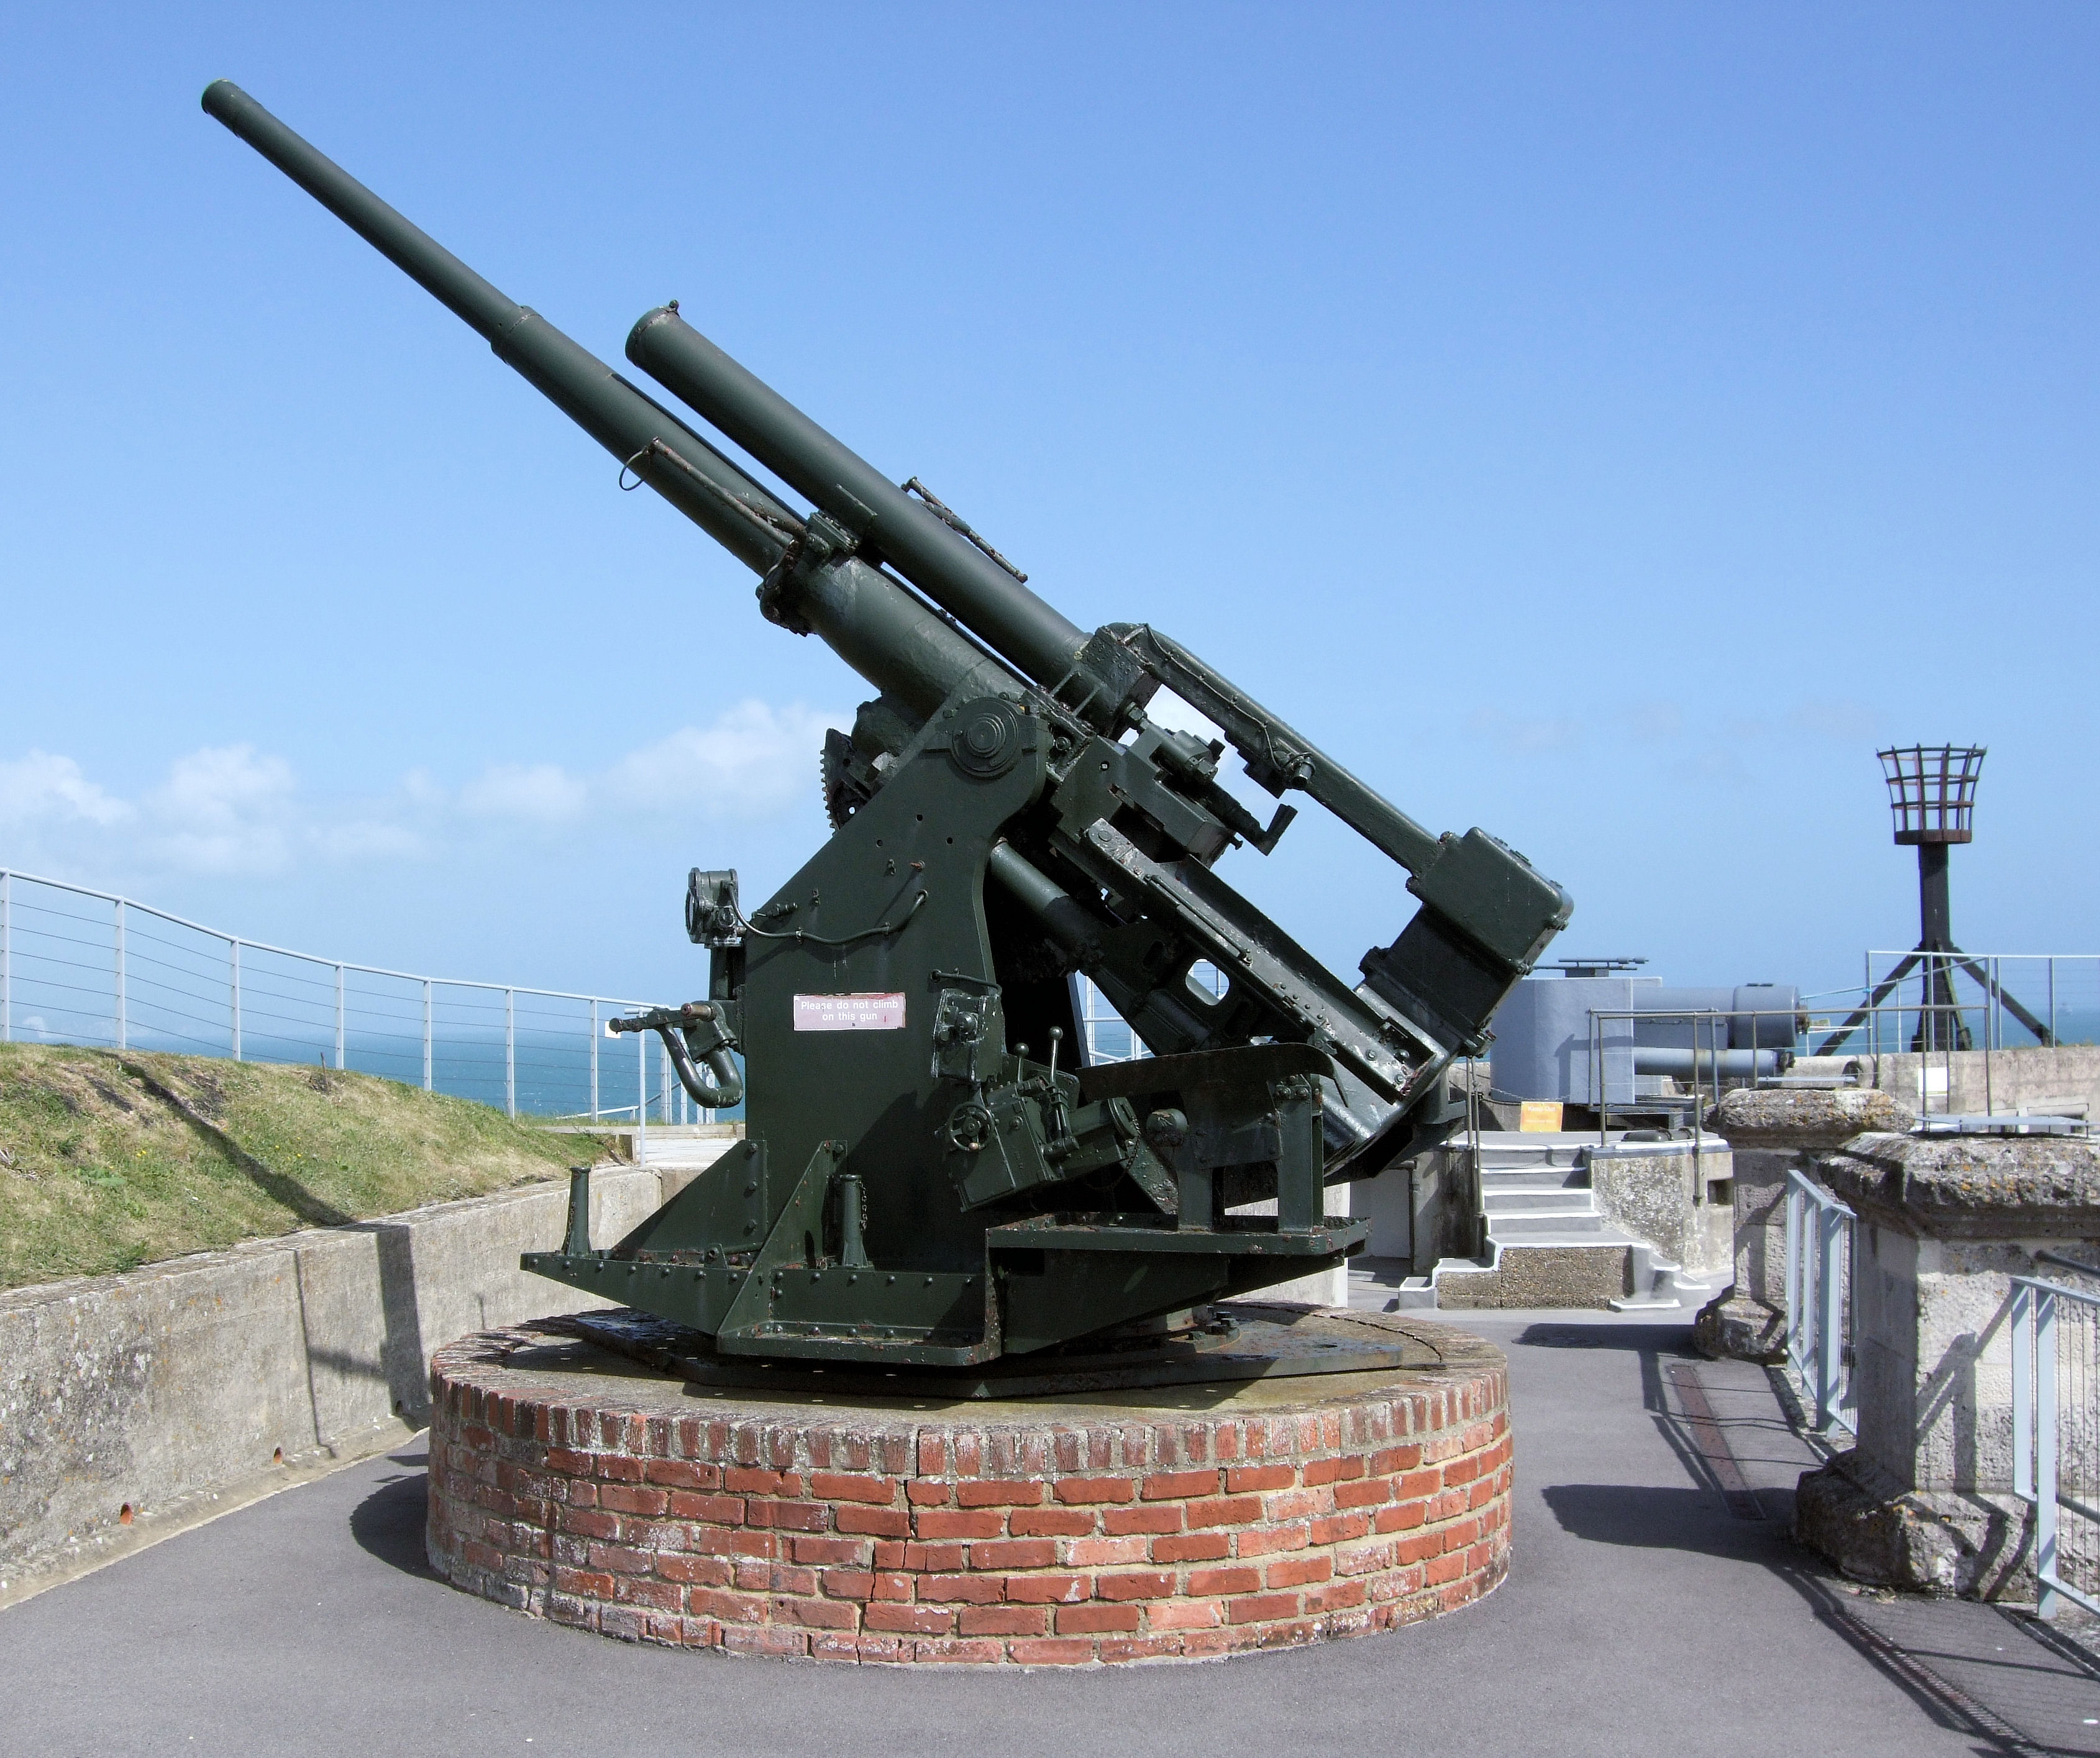

Static 3.7-inch HAA gun preserved at Nothe Fort.
The Phoney War ended with the German invasion of the Low Countries on 10 May, and all gunsites were put on high alert, with ammunition ready, and all crews armed with rifles to deal with German paratroops.[12] However, there was no immediate attack. On 1 June 1940, along with other units equipped with 3-inch or heavier guns, the 69th was designated a Heavy AA (HAA) Regiment and its batteries were similarly retitled.[1][2] GL Mk I gun-laying radar began to be delivered to the regiment's gun sites during the summer.[10]
Although most of the Luftwaffe air raids during the Battle of Britain were concentrated on London and the South and East Coasts, the West Midlands also suffered badly, with Birmingham and Coventry experiencing heavy raids in August.[13][14] Before the next wave of raids, 191 HAA Bty left the regiment on 6 October and became an independent battery under War Office control, preparatory to going overseas.[10]
Siege of Malta[]
191 HAA Battery formed part of a group of reinforcements bound for Malta that also included 222 (Derby) HAA Bty (formerly of 68th (North Midland) HAA Rgt), together with spare AA guns and barrels. It sailed from Liverpool aboard fast liners and arrived at Gibraltar on 6 November. Here the party picked up Regimental HQ of 10th HAA Rgt and boarded Royal Navy warships for the dash to Malta (Operation Coat). The ships were attacked by enemy aircraft but got through unharmed. 191 HAA Battery arrived in Grand Harbour on 10 November under the command of Maj K.W. Davies with five officers and 198 other ranks. Together with 222 HAA Bty it now comprised 10th HAA Rgt, joined a month later by 190 HAA Bty from 69th (RWR) HAA Rgt.[15][16][17][18][19][20]


HMS Illustrious (right of crane) under attack.
Malta had been under air attack since the day Italy entered the war (11 June 1940) and in January 1941 the German Luftwaffe joined the Regia Aeronautica in attacks on the island, which urgently needed AA reinforcements. Soon after the battery arrived, the aircraft carrier HMS Illustrious put into Grand Harbour to repair damage sustained during Operation Excess and all the available AA guns concentrated to protect her during furious air attacks. She put to sea again on 23 January.[15][21][22][23][24][25]
In February the Luftwaffe 's Fliegerkorps X was ordered to neutralise Malta, and it began a series of heavy bombing raids, mainly at night, accompanied by mine-dropping in and around the harbour, and daylight sweeps by Messerschmitt Bf 109 single-engined fighters. In March there was dive-bombing against the RAF airfields, defended by 10th HAA Rgt, and attacks on a supply convoy on 23 March. The HAA guns were engaged almost every day, taking a steady toll of the bombers, but the ammunition expenditure was very great. By the beginning of June the depleted Fliegerkorps X handed responsibility back to the Italians.[15][23][25][26][27]


Malta – the Harbour Barrage from the Upper Barracca, by Leslie Cole; depicting an AA gun (in the centre of the composition) firing during a night air raid.
Malta was largely left alone during the summer of 1941, but attacks resumed in November 1941 after Fliegerkorps II arrived in Sicily. Air raids were increasingly common during November and December, and rations and supplies began to run short. At the turn of the year headquarters instituted a policy of rotating HAA units to maintain freshness. 10th HAA Regiment exchanged with 7th HAA Rgt and took responsibility for defending Fort Manoel and Grand Harbour with a mixture of 4.5-inch, 3.7-inch and 3-inch guns.[28][29][30][31]
1942[]

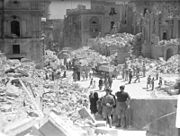
Service personnel and civilians clear up debris on a heavily bomb-damaged street in Valletta, Malta, on 1 May 1942.
The Luftwaffe continued to pound the island, concentrating on the harbour and airfields, usually with raids of 15 Ju 88s escorted by 50 or more fighters. By now the RAF fighter strength had been reduced to a handful of aircraft, and the AA guns were the main defence. March and April 1942 were the period of the heaviest air raids on Malta, with well over 250 sorties a day on occasions. In April 1942 the Luftwaffe switched tactics to Flak suppression, with particular attention being paid to the HAA gunsites.[32][33] On the last day of April the Regia Aeronautica rejoined the attack – which the AA gunners took as a sign that the Luftwaffe was suffering badly. By now each HAA regiment on Malta was rationed to 300 rounds per day and replacement gun barrels were scarce. When the fast minelayer HMS Welshman ran in ammunition supplies on 10 May (part of Operation Bowery), the most intense AA barrage yet fired was provided to protect her while unloading. After that, Axis air raids tailed off during the summer, apart from a flare-up in July. Only a few high-flying fighters or night bombers were engaged.[27][34][35][36][37]
By October the Luftwaffe had reinforced Fliegerkorps II, and a new round of heavy raids began, using new low-level fighter-bomber tactics, particularly against Luqa airfield, and sometimes machine-gunning the HAA positions. HAA guns had difficulty engaging these raids, but assisted the defending fighters by firing single 'pointer' rounds to conserve ammunition.This form of fighter-bomber sweep also lost heavily to the AA guns and RAF fighters. At this stage 191 HAA Bty, with seven officers, 208 other ranks, and 21 attached Maltese Auxiliaries, was billeted in Spinola, and was organised into three Troops manning gunsites XHE28 (Spinola, 3 x 4.5-inch and 1 x GL Mk I*), XHE 29 (Fort Manoel, 4 x 3.7-inch) and XHE33 (Tal Balal, 2 x 3.7-inch in action, with one gun in the workshops and another loaned to the Malta School of Artillery). Major Davies commanded 10th HAA Rgt while the CO was in hospital.[36][37][38]
Shortages of food and supplies on the island were now becoming serious. At last, in November Welshman and her sister ship HMS Manxman appeared, followed by a supply convoy. With the Axis defeat at Alamein and the Allied North Africa landings the same month, the siege of Malta was ended. The only enemy air activity for the rest of the year was occasional high-flying reconnaissances and one raid on Luqa in December. On 15 December Maj Davies was posted to HQ Malta Command and was replaced in command on 191 HAA Bty by Maj G.K.F. Holden.[36][37][39][40]
1943[]
With the worst now over, the AA units on Malta could get down to refresher training. By June/July 1943 10th HAA Rgt formed part of a large AA concentration protecting the build-up of forces in Malta for the Allied invasion of Sicily (Operation Husky), with 191 HAA Bty deployed at XHD17M (Ta Ġiorni, 3 x static 3.7-inch Mk II) and XHE28 (Spinola, 3 x static 4.5-inch Mk I, GL Mk I).[30][41][42][43]
68th (North Midland) HAA Rgt[]
RHQ of 68th (North Midland) HAA Rgt had been captured at the fall of Tobruk on 21 June 1942.[44] However, its 222 HAA Bty remained, forming part of 10th HAA Rgt on Malta. On 17 June 1943, RHQ 10th HAA Rgt was officially disbanded and reformed as RHQ 68th (North Midland) HAA Rgt, with the same batteries:190 and 191 from Birmingham, and 222 from Derby.[16][19][45][46]
Although the AA defences of Malta were progressively run down as units returned home or joined the campaigns in Sicily and later in mainland Italy,[47][48] 68th HAA Regiment remained part of the permanent garrison of the island until the end of the war and beyond.[19][30] Before then all the original members of the TA battery would have left under the 'Python' home leave scheme.[49]
Postwar[]
68th HAA Regiment was placed in suspended animation in Malta in December 1946 so that it could be officially reformed in the Territorial Army in the UK on 1 January 1947. The personnel remaining at Tigne Camp in Malta were then considered to be a war-formed regiment in the Regular RA.[1][19][45][50]
60 HAA Battery[]
The war-formed 68th HAA Rgt was redesignated 36th Coast Artillery/AA Rgt on 1 April 1947. Simultaneously, 191 HAA Bty was disbanded and its personnel used to resuscitate 19 Coast Bty of the Regular RA as 60 Coast Bty. The regiment became a pure HAA unit in 1948 and in 1959 it was converted into an AA guided weapons regiment. In 1968 60 HAA Bty was placed in suspended animation.[1][50][51]
469th (Royal Warwicks) HAA Rgt[]
Meanwhile the 69th HAA Rgt, which had been placed in suspended animation in Italy in January 1945, reformed in the TA on 1 January 1947 as 469th (Royal Warwickshire Regiment) (Mixed) HAA Rgt ('Mixed' indicating that members of the Women's Royal Army Corps were integrated into the unit).[1][2][52][53] However, TA batteries were now lettered P, Q, R, S within the regiment and lost their distinctive numbers.[54]
When AA Command was disbanded on 10 March 1955, 469 HAA Rgt with three other regiments was amalgamated into 442 Light AA Rgt, in which the regimental and battery lineage was maintained by P (5th/6th Royal Warwicks) Bty. This regiment was broken up in 1961, when P Bty became C Company, 7th Bn Royal Warwickshire Regiment.[2][52][53][55][56]
Notes[]
- ↑ 1.0 1.1 1.2 1.3 1.4 Frederick, pp. 755, 772–3.
- ↑ 2.0 2.1 2.2 2.3 Litchfield, p. 242,
- ↑ Jeff, p. 41.
- ↑ Monthly Army List, various dates.
- ↑ 6th Royal Warwicks at Regiments.org.
- ↑ Routledge, pp. 62–3.
- ↑ Routledge, pp. 65–6, 371.
- ↑ AA Command 3 September 1939 at Patriot Files.
- ↑ Routledge, Table LIX, p. 377; Table LX, p. 378.
- ↑ 10.0 10.1 10.2 10.3 69 HAA Rgt War Diary 1939–41, The National Archives (TNA), Kew, file WO 166/2360.
- ↑ 11.0 11.1 191 HAA Bty War Diary September 1939–March 1940, TNA file WO 166/2478.
- ↑ 190 HAA Bty War Diary 1939–40, TNA file WO 166/2477.
- ↑ Collier, Chapter 13.
- ↑ Collier, Chapter 16.
- ↑ 15.0 15.1 15.2 Farndale, p. 169.
- ↑ 16.0 16.1 Frederick, p. 766.
- ↑ Playfair, Vol I, pp. 241–2.
- ↑ Rollo, pp. 205–13.
- ↑ 19.0 19.1 19.2 19.3 Rollo, Annexes A and C.
- ↑ Routledge, Table XXVII, p. 174.
- ↑ Anon, pp. 4–7.
- ↑ Playfair, Vol I, pp. 119, 321–3.
- ↑ 23.0 23.1 Playfair, Vol II, pp. 46–51.
- ↑ Rollo, pp. 212–3.
- ↑ 25.0 25.1 Routledge, pp. 167–8.
- ↑ Anon, pp. 7–9.
- ↑ 27.0 27.1 Rollo, Chapter 8.
- ↑ Anon, pp. 9–11.
- ↑ Playfair, Vol III, pp. 118, 174.
- ↑ 30.0 30.1 30.2 Rollo, Annex E.
- ↑ Routledge, p. 169; Table XXVII, p. 174; Map 7.
- ↑ Anon, pp. 12–6.
- ↑ Playfair, Vol III, pp. 158, 162, 170–1, 178–9.
- ↑ Anon, pp. 22–5.
- ↑ Playfair, Vol III, pp. 179, 187–8, 193–4, 314.
- ↑ 36.0 36.1 36.2 Rollo, Chapter 9.
- ↑ 37.0 37.1 37.2 10 HAA Rgt War Diary July–December 1942, TNA file WO 169/7412.
- ↑ Anon, p. 26.
- ↑ Anon, p. 27.
- ↑ Playfair & Molony, Vol IV, pp. 194–200.
- ↑ Rollo, pp. 282–5.
- ↑ Routledge, Table XXIX, p. 175.
- ↑ 10 HAA Rgt War Diary January–June 1943, TNA file WO 169/14568.
- ↑ Routledge, p. 140.
- ↑ 45.0 45.1 Litchfield, p. 39.
- ↑ Rollo, p. 280.
- ↑ Anon, pp. 30–1.
- ↑ Rollo, p. 287.
- ↑ Jackson, Vol VI, Pt II, p. 373.
- ↑ 50.0 50.1 36 HAA Rgt at British Army 1945 on.
- ↑ Frederick, pp. 618, 949.
- ↑ 52.0 52.1 Frederick, p. 1016.
- ↑ 53.0 53.1 444–473 Rgts RA at 1945 onwards.
- ↑ Litchfield, p. 6.
- ↑ Frederick, p. 1014.
- ↑ Jeff, pp. 62–3.
References[]
- Anon, A short history of 7th Heavy A.A. Regiment, 3rd September, 1939-5th March, 1944, in the defence of Malta, Aldershot : Gale & Polden, 1947.
- Gen Sir Martin Farndale, History of the Royal Regiment of Artillery: The Years of Defeat: Europe and North Africa, 1939–1941, Woolwich: Royal Artillery Institution, 1988/London: Brasseys, 1996, ISBN 1-85753-080-2.
- J.B.M. Frederick, Lineage Book of British Land Forces 1660–1978, Vol II, Wakefield, Microform Academic, 1984, ISBN 1-85117-009-X.
- Gen Sir William Jackson, History of the Second World War, United Kingdom Military Series: The Mediterranean and Middle East, Vol VI: Victory in the Mediterranean, Part I|: June to October 1944, London: HM Stationery Office, 1987/Uckfield, Naval & Military Press, 2004, ISBN 1-845740-71-8.
- John Jeff, The 5th Battalion, The Royal Warwickshire Regiment, T.A.: its Predecessors, Successors and Historians, Kingswinford, 1986, ISBN 0-9504999-3-5.
- Norman E.H. Litchfield, The Territorial Artillery 1908–1988 (Their Lineage, Uniforms and Badges), Nottingham: Sherwood Press, 1992, ISBN 0-9508205-2-0.
- Maj-Gen I.S.O. Playfair, "History of the Second World War, United Kingdom Military Series: The Mediterranean and Middle East, Vol I: The Early Successes against Italy (to May 1941), London: HMSO, 1954/Uckfield, Naval & Military Press, 2004 ISBN 1-845740-65-3.
- Maj-Gen I.S.O. Playfair, "History of the Second World War, United Kingdom Military Series: The Mediterranean and Middle East, Vol II: The Germans come to the aid of their Ally (1941), London: HMSO, 1956/Uckfield, Naval & Military Press, 2004 ISBN 1-845740-66-1.
- Maj-Gen I.S.O. Playfair, History of the Second World War, United Kingdom Military Series: The Mediterranean and Middle East, Vol III: (September 1941 to September 1942) British Fortunes reach their Lowest Ebb, London: HMSO, 1960 /Uckfield, Naval & Military Press, 2004, ISBN 1-845740-67-X.
- Maj-Gen I.S.O. Playfair & Brig C.J.C. Molony, "History of the Second World War, United Kingdom Military Series: The Mediterranean and Middle East, Vol IV: The Destruction of the Axis forces in Africa, London: HMSO, 1966/Uckfield, Naval & Military Press, 2004, ISBN 1-845740-68-8.
- Denis Rollo, The Guns and Gunners of Malta, Valetta: Mondial, 1999, ISBN 99909-68-84-5.
- Brig N.W. Routledge, History of the Royal Regiment of Artillery: Anti-Aircraft Artillery 1914–55, London: Royal Artillery Institution/Brassey's, 1994, ISBN 1-85753-099-3.
Online sources[]
- British Army units from 1945 on
- Orders of Battle at Patriot Files
- Land Forces of Britain, the Empire and Commonwealth (Regiments.org)
The original article can be found at 191st Heavy Anti-Aircraft Battery, Royal Artillery and the edit history here.